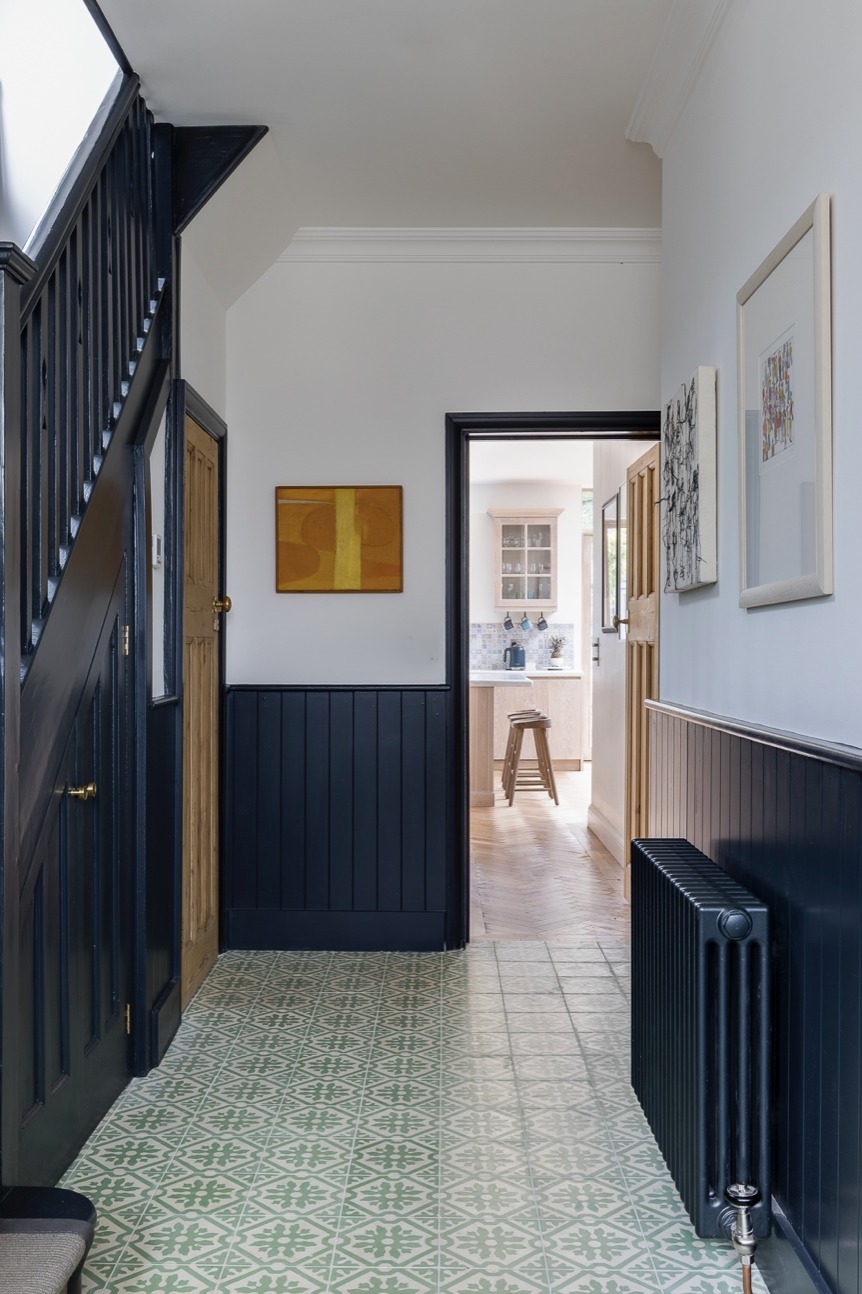
As I said last week we have made the decision to tile our hallway and install underfloor heating. It is a big expense but worth it for the warmth it will bring to such a cold space. Covering up the extremely battered and dirty floorboards in the hallway will also transform the space from an aesthetic point of view. However, the challenge of choosing the right tiles is not one I relish, if I am completely honest. I’d happily choose a kitchen or bathroom tile any day of the week but hallways are very different. I’d always go for a traditional Victorian mosaic floor in that period of property because that is what would have been there originally. A 1930s house is a different story as the hallway wasn’t originally tiled and it is a much more modest space with no intricate period features or high ceilings. If I had the budget I would lay a new wood floor from the hallway right through the living space downstairs but as it stands that won’t be possible until we extend the back of the house in maybe five years time. Therefore, I want a new floor in the hallway that we won’t have to touch when it comes to extending and tiles is the obvious choice.
I need the tiles to be Porcelain, easy to lay (so not mosaics) to keep costs down, suitable with underfloor heating, a traditional feel to them as modern isn’t really my thing, patterned to disguise some of the mud/dirt that gets traipsed into our house every day, light in colour as there is so little natural light in the hallway and fairly neutral colours that will suit a change of paint colour in the future. I can’t say I have found a huge number of options that I love that fit all of these criteria!
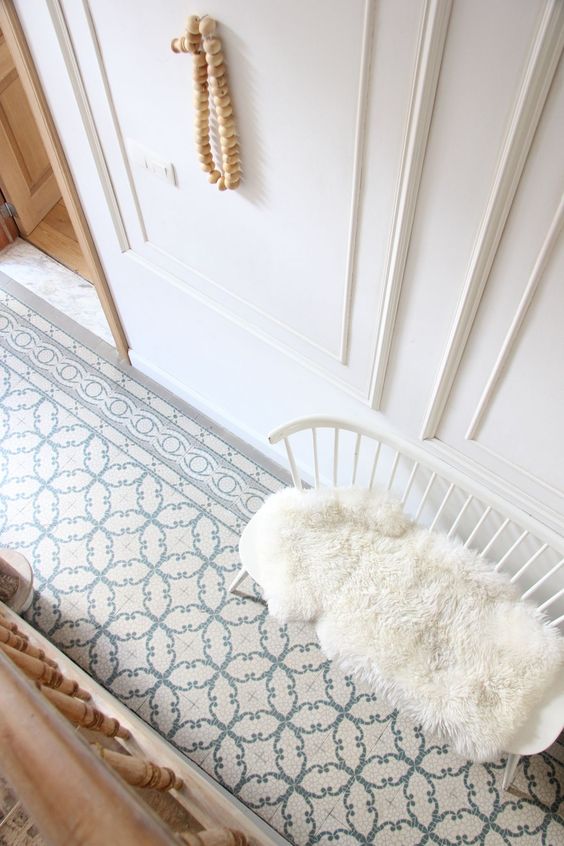
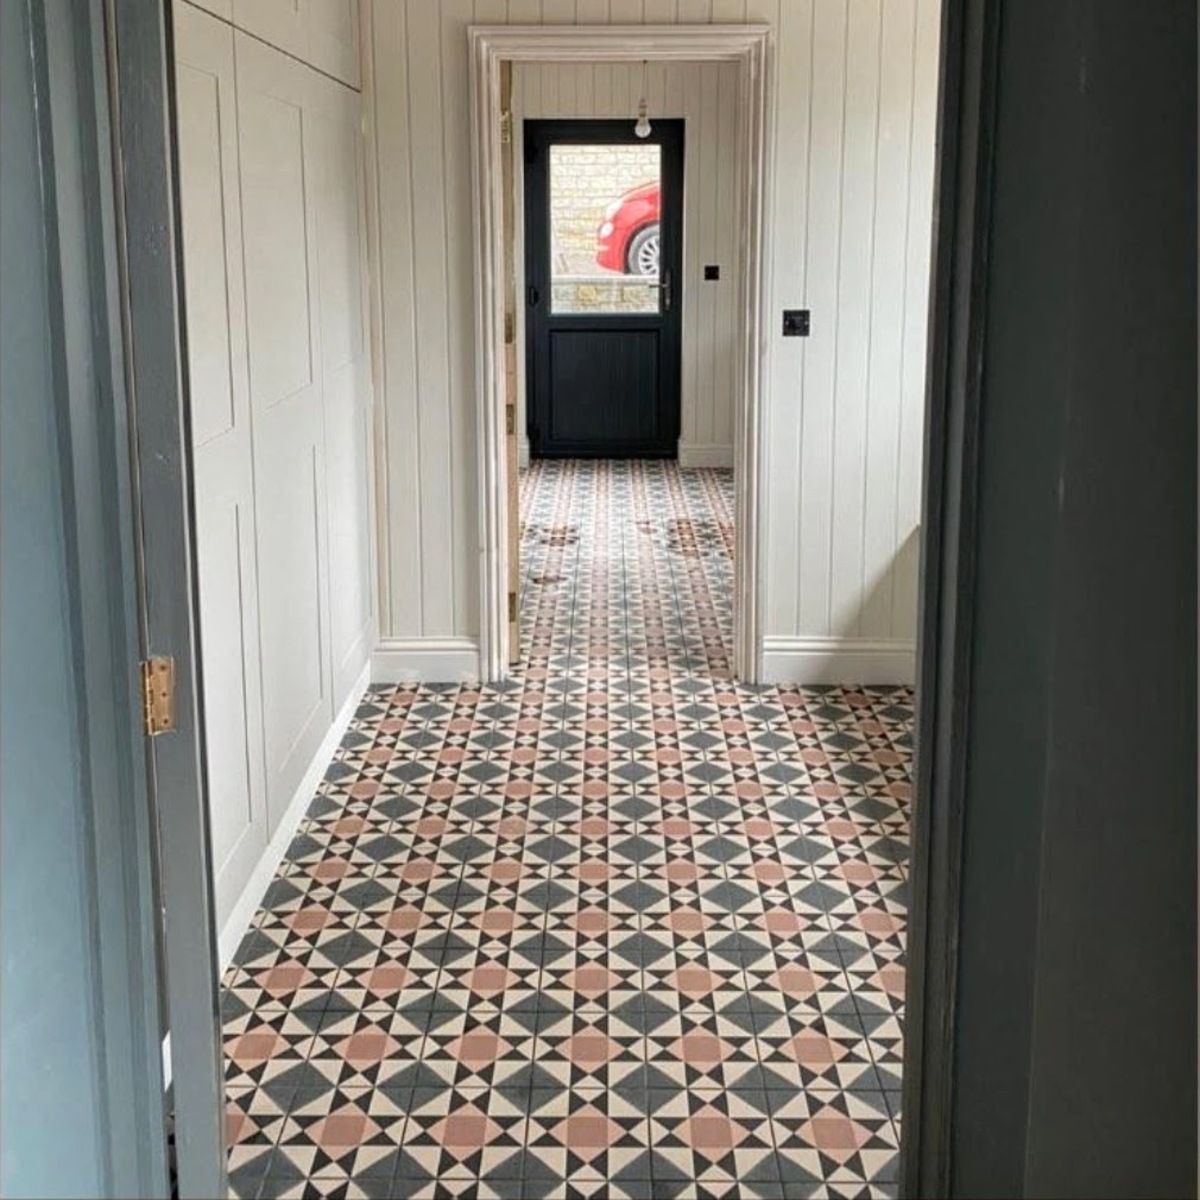
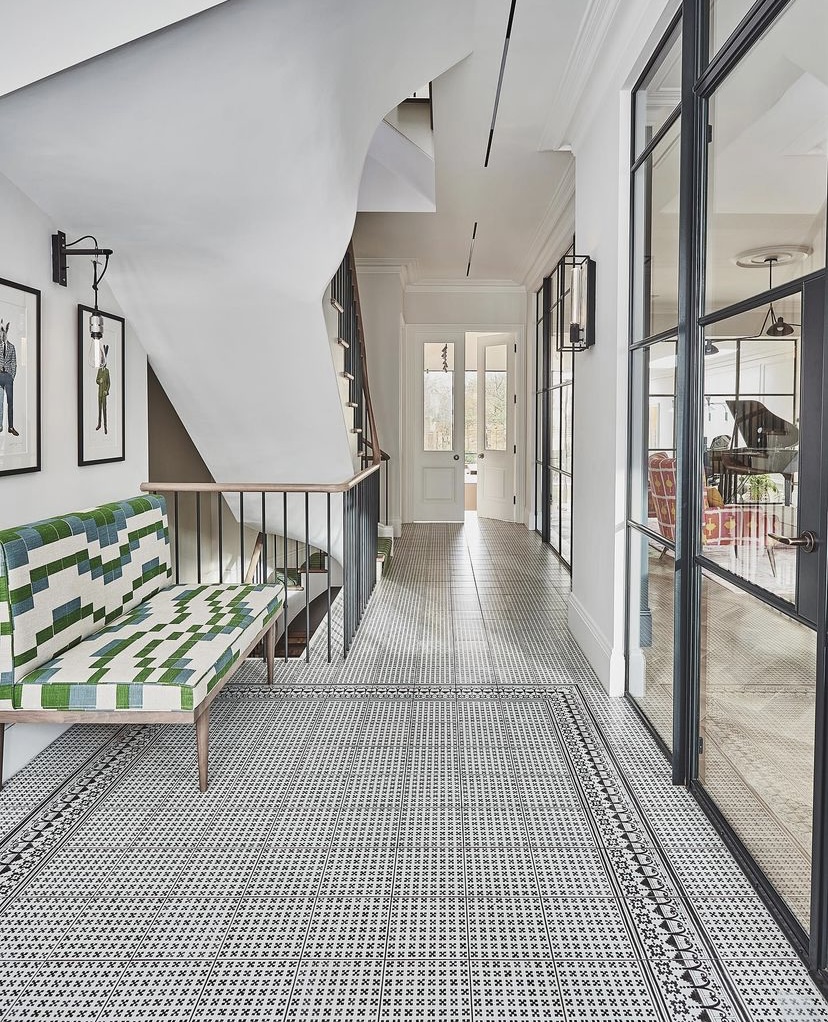
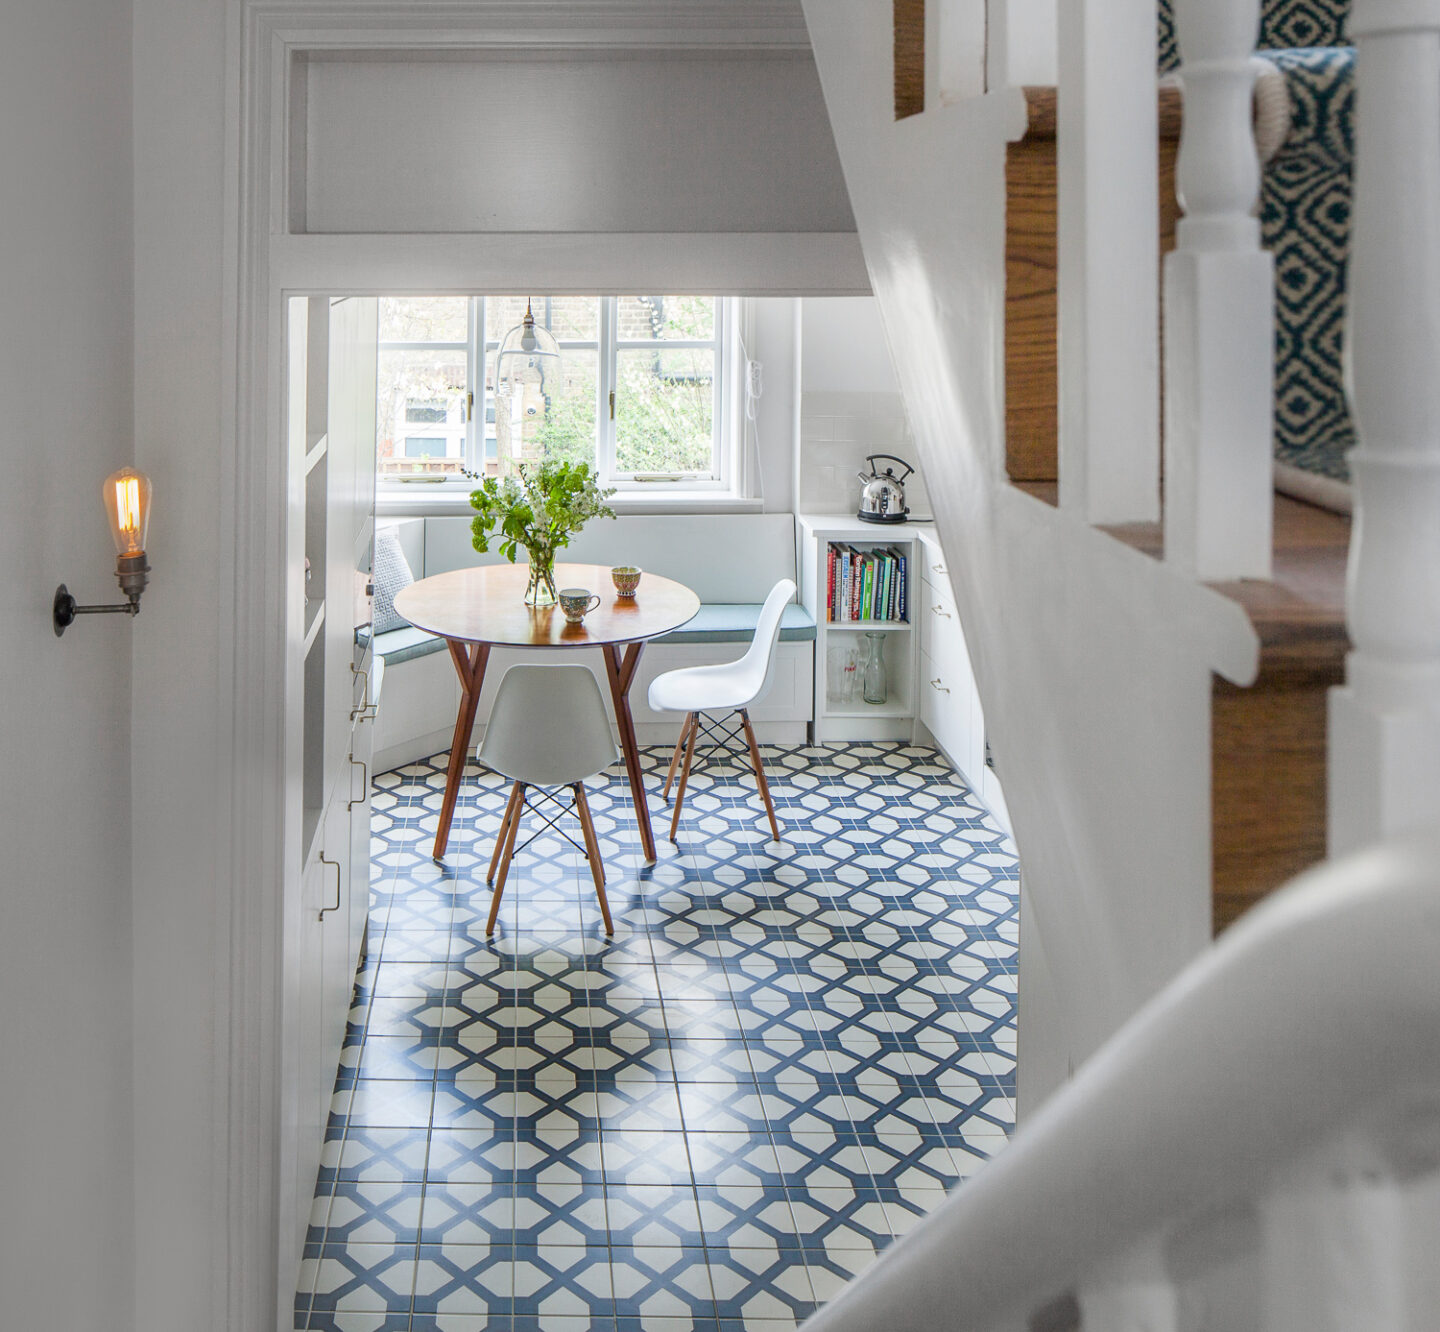
Let me just show you a few tiled hallways that I love:
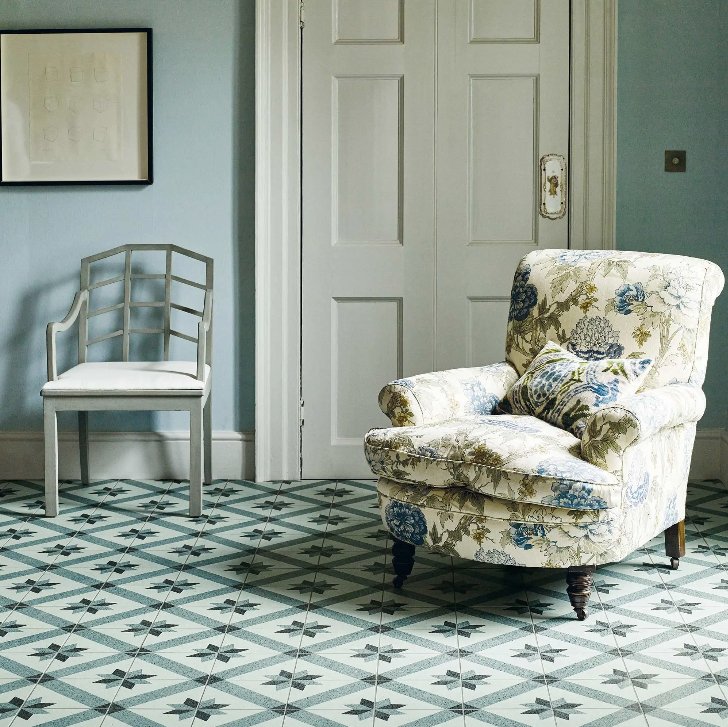
A 1930s house designed by Doris Lee who added these Bert & May tiles to a very similar hallway to ours (although this is a lot wider!) I love how much light and brightness they bring to the space as well as a lovely dose of pattern.
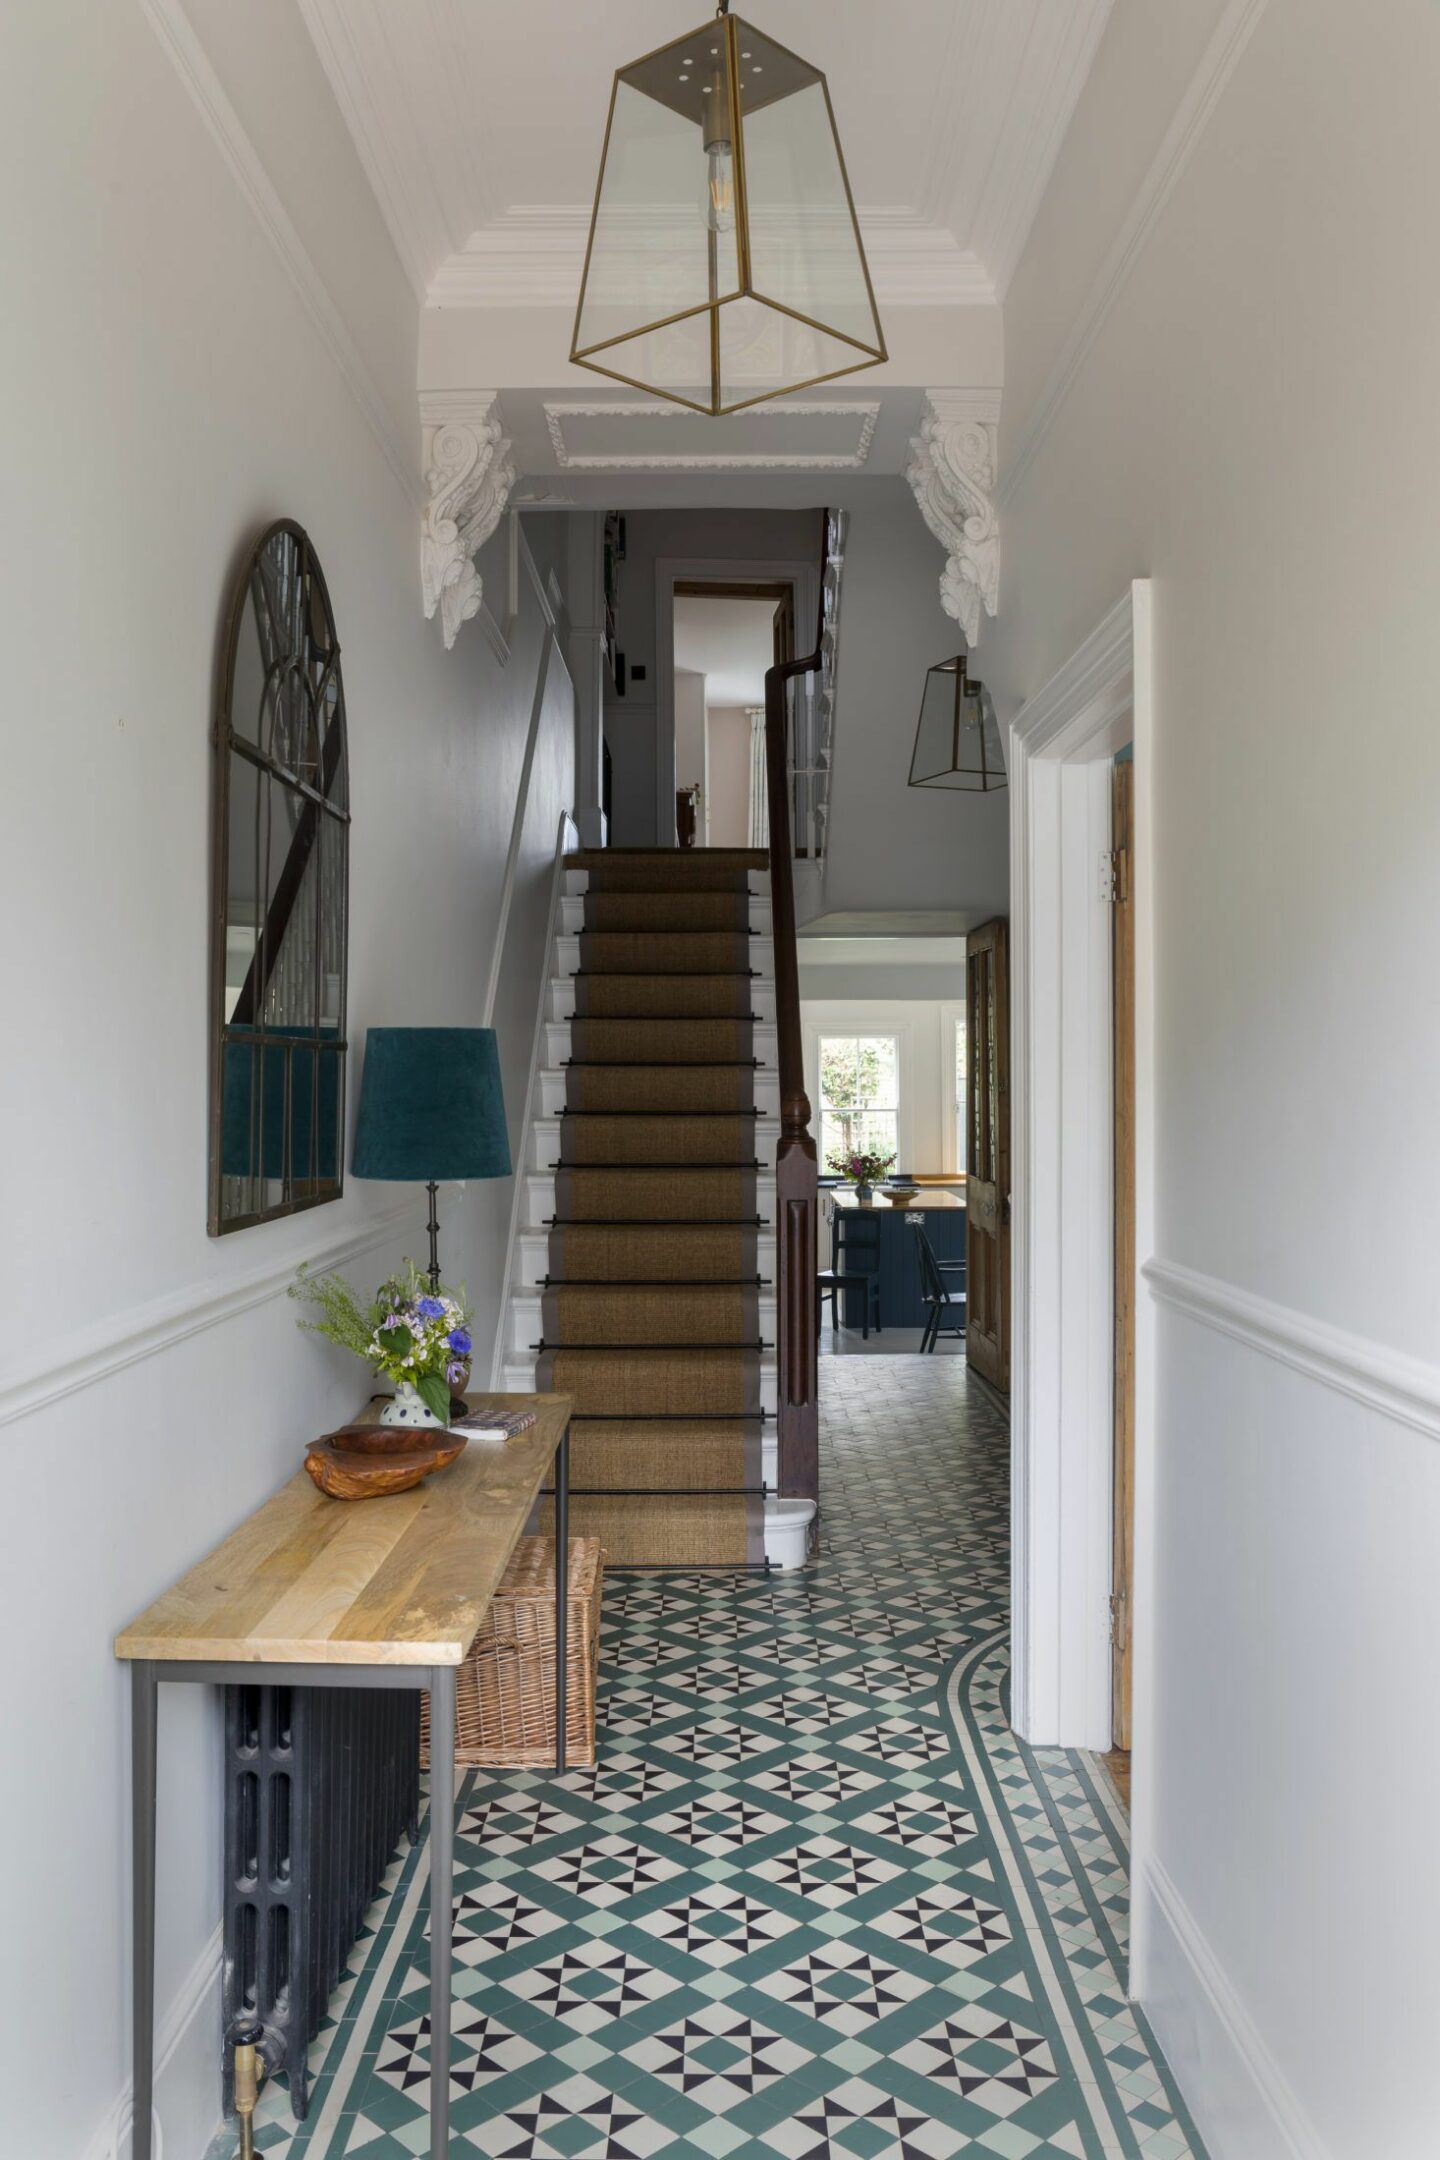
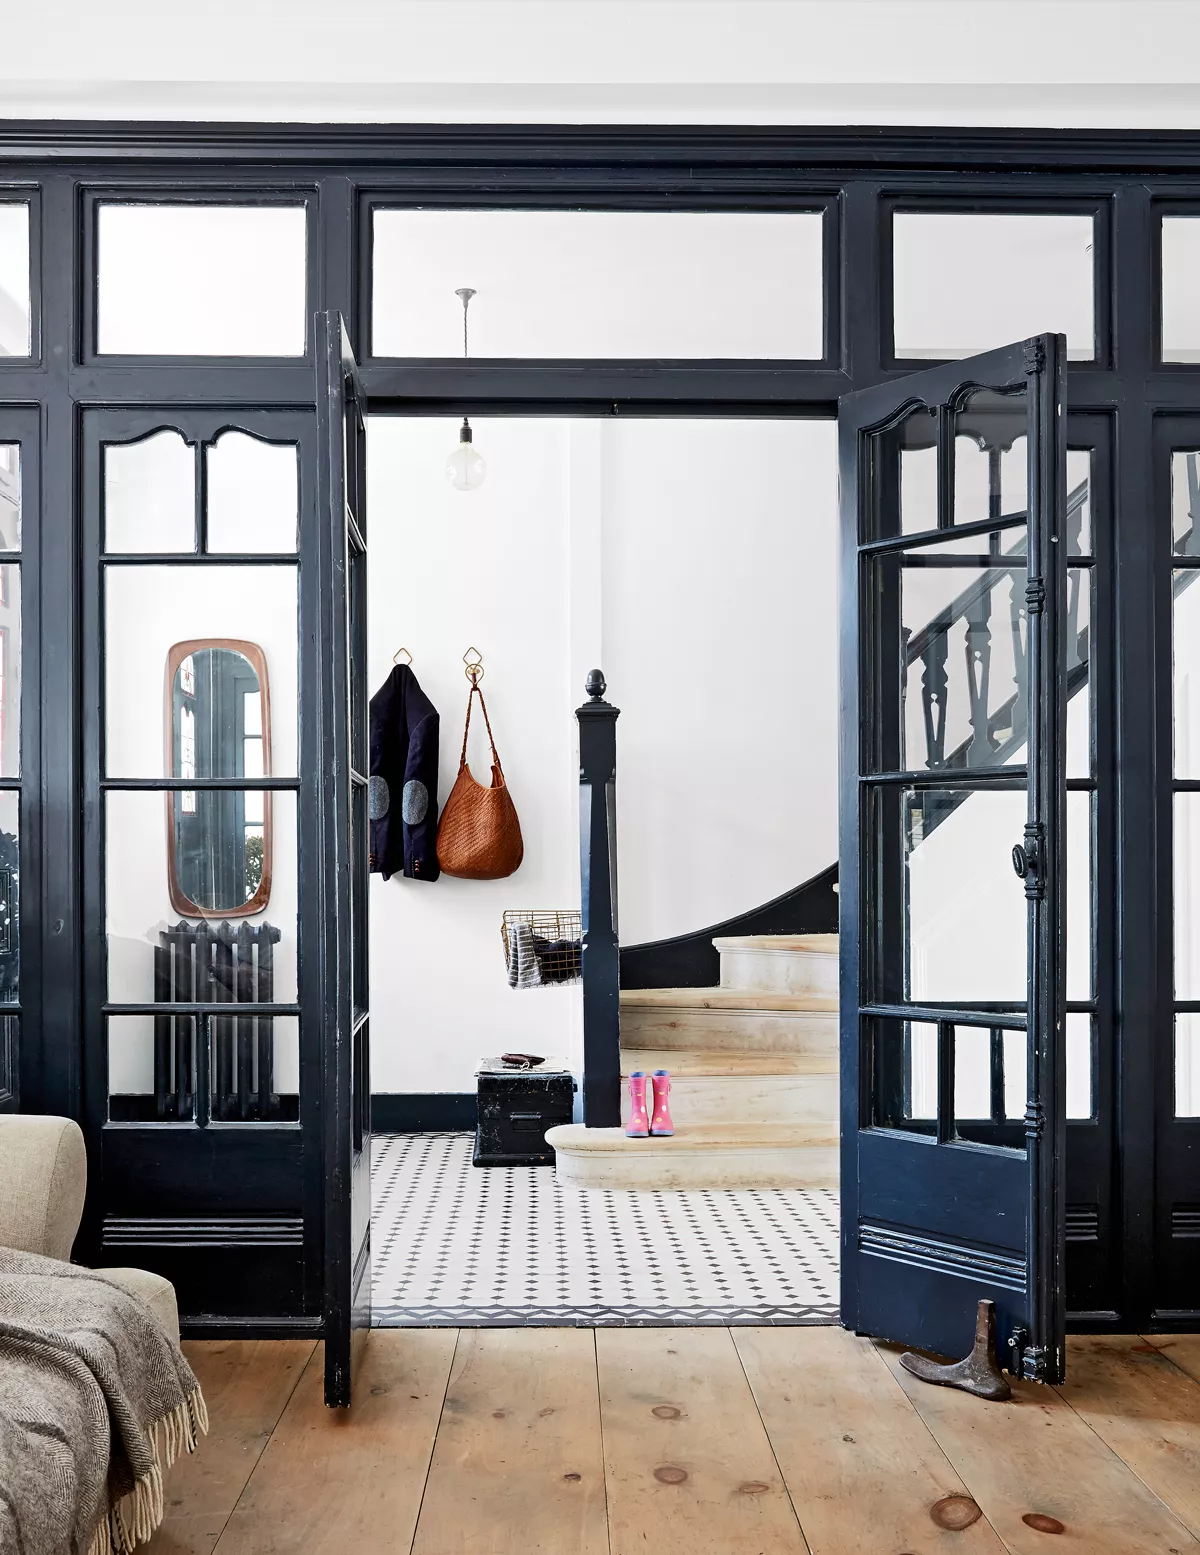
A gorgeous house designed by Imperfect Interiors and what an entrance! These are my fantasy Victorian tiles (above left). I love this recent hallway makeover by Arle House. These beautiful limestone tiles (that require a fair amount of maintenance and sealing) from Artisans of Devizes suit this elegant Victorian hallway perfectly (above right).
I’ve shared this image before of a house deigned by The Vawdrey House because I love it so much. In an ideal world I would love a wooden floor like this but I do love the combo of the tiles in the utility at the back of this hallway so I hope when we do come to lay a new wooden floor throughout the downstairs living space it will be nice to have the contrast of a tiled hallway (above left). Only in my hallway DREAMS do these tiles appear! (above right)Again, only in my hallway dreams does this image appear! Photograph by Paul Massey for Living Etc.
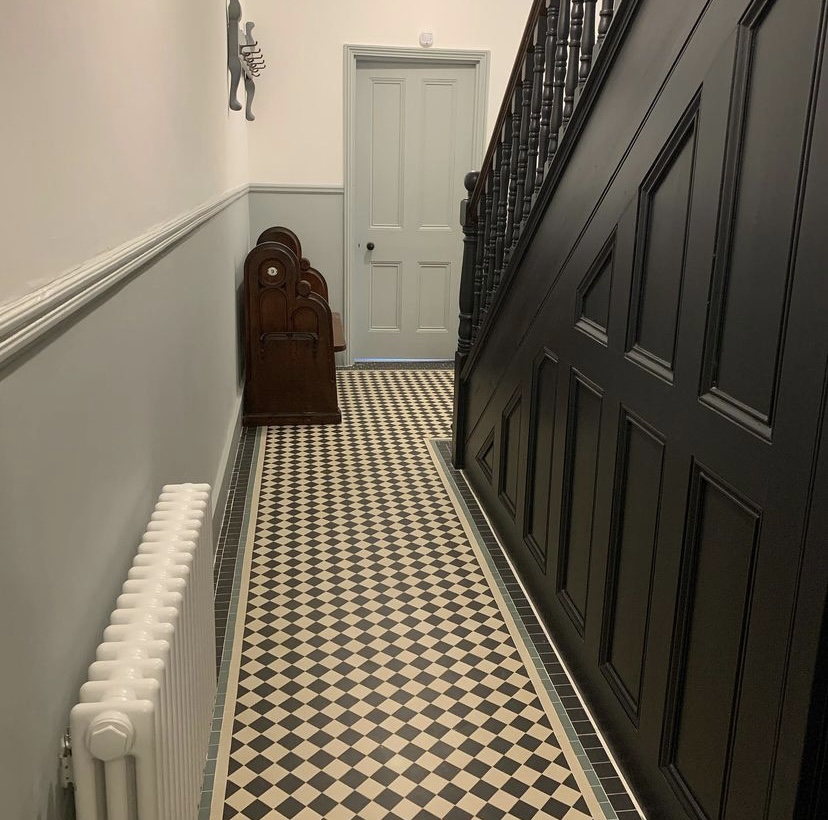
So, I only have a few tiles in the running at the moment for my hallway. Firstly black and white chequer, a very classic choice that Jules is in favour of:
A lovely example of black and white mosaic tiles by Cowper Corner (above left). Image from Create and Style (above right).
We have ruled out a large (20cm) black and white chequer tile (as can be seen in the image above on the right) as our hallway is too small and I worry it looks too utility room/kitchen if you know what I mean. Also, it is very difficult to find an off white tile and I definitely definitely don’t want brilliant white.
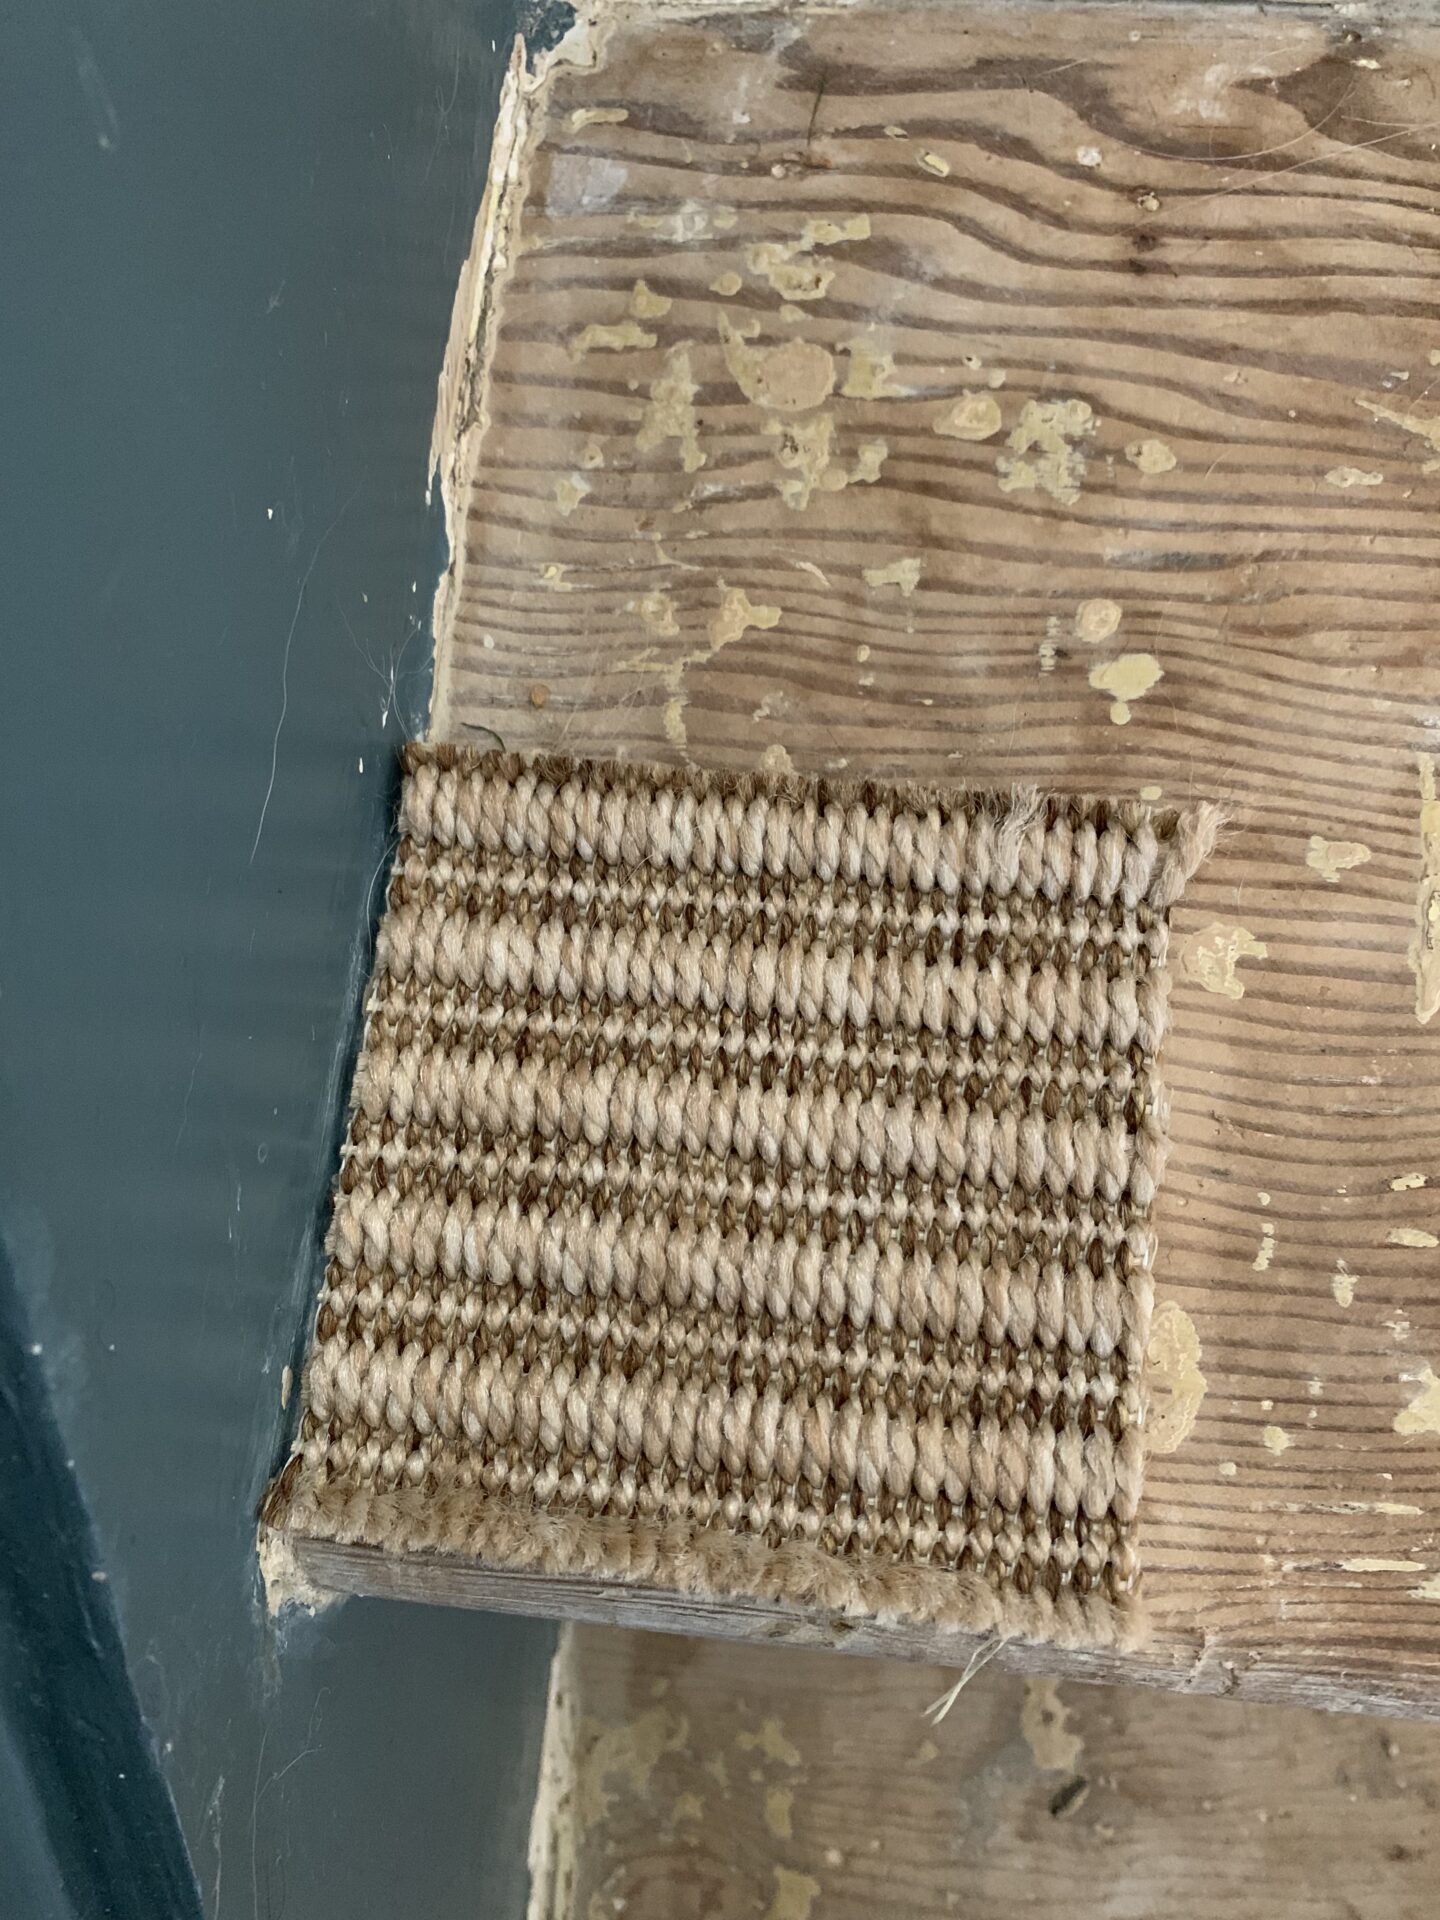
However, we do both really like Topps Tiles Victorian Mosaic black and white chequer tile, which is much smaller and the white tile is off white (much more like the image above on the left). The issue is that they are a lot more expensive to buy and lay. Also, I would really want them to be laid diagonally and that will be a nightmare to do, especially with a border. I worry they are quite cold looking too and I would really like the hallway to feel more cosy and welcoming. Hmmm…
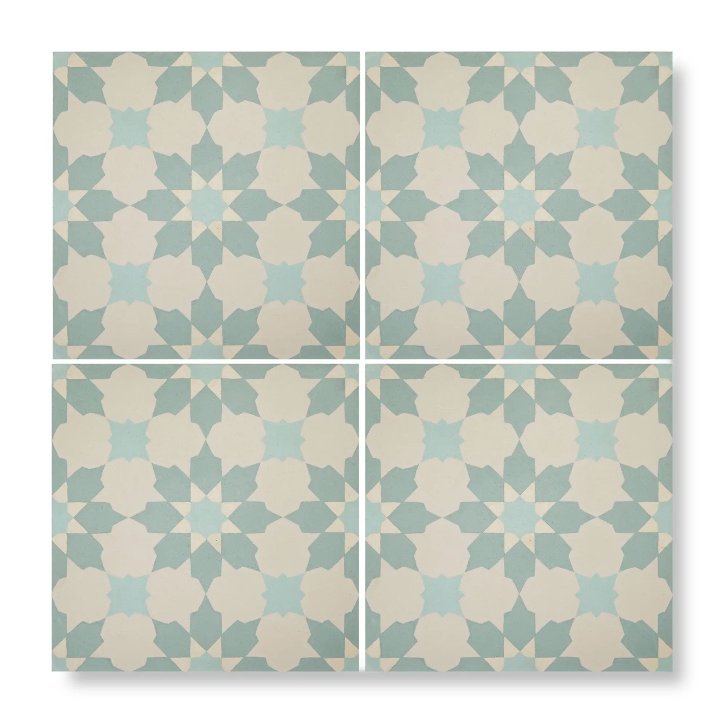
The second choice is something I’m quite keen on but Jules not so much. It has a bit of colour in it so they look warmer but still quite muted and it would be very easy to lay. My only issue is that it kind of matches our house too much! I would like something with a touch more contrast.
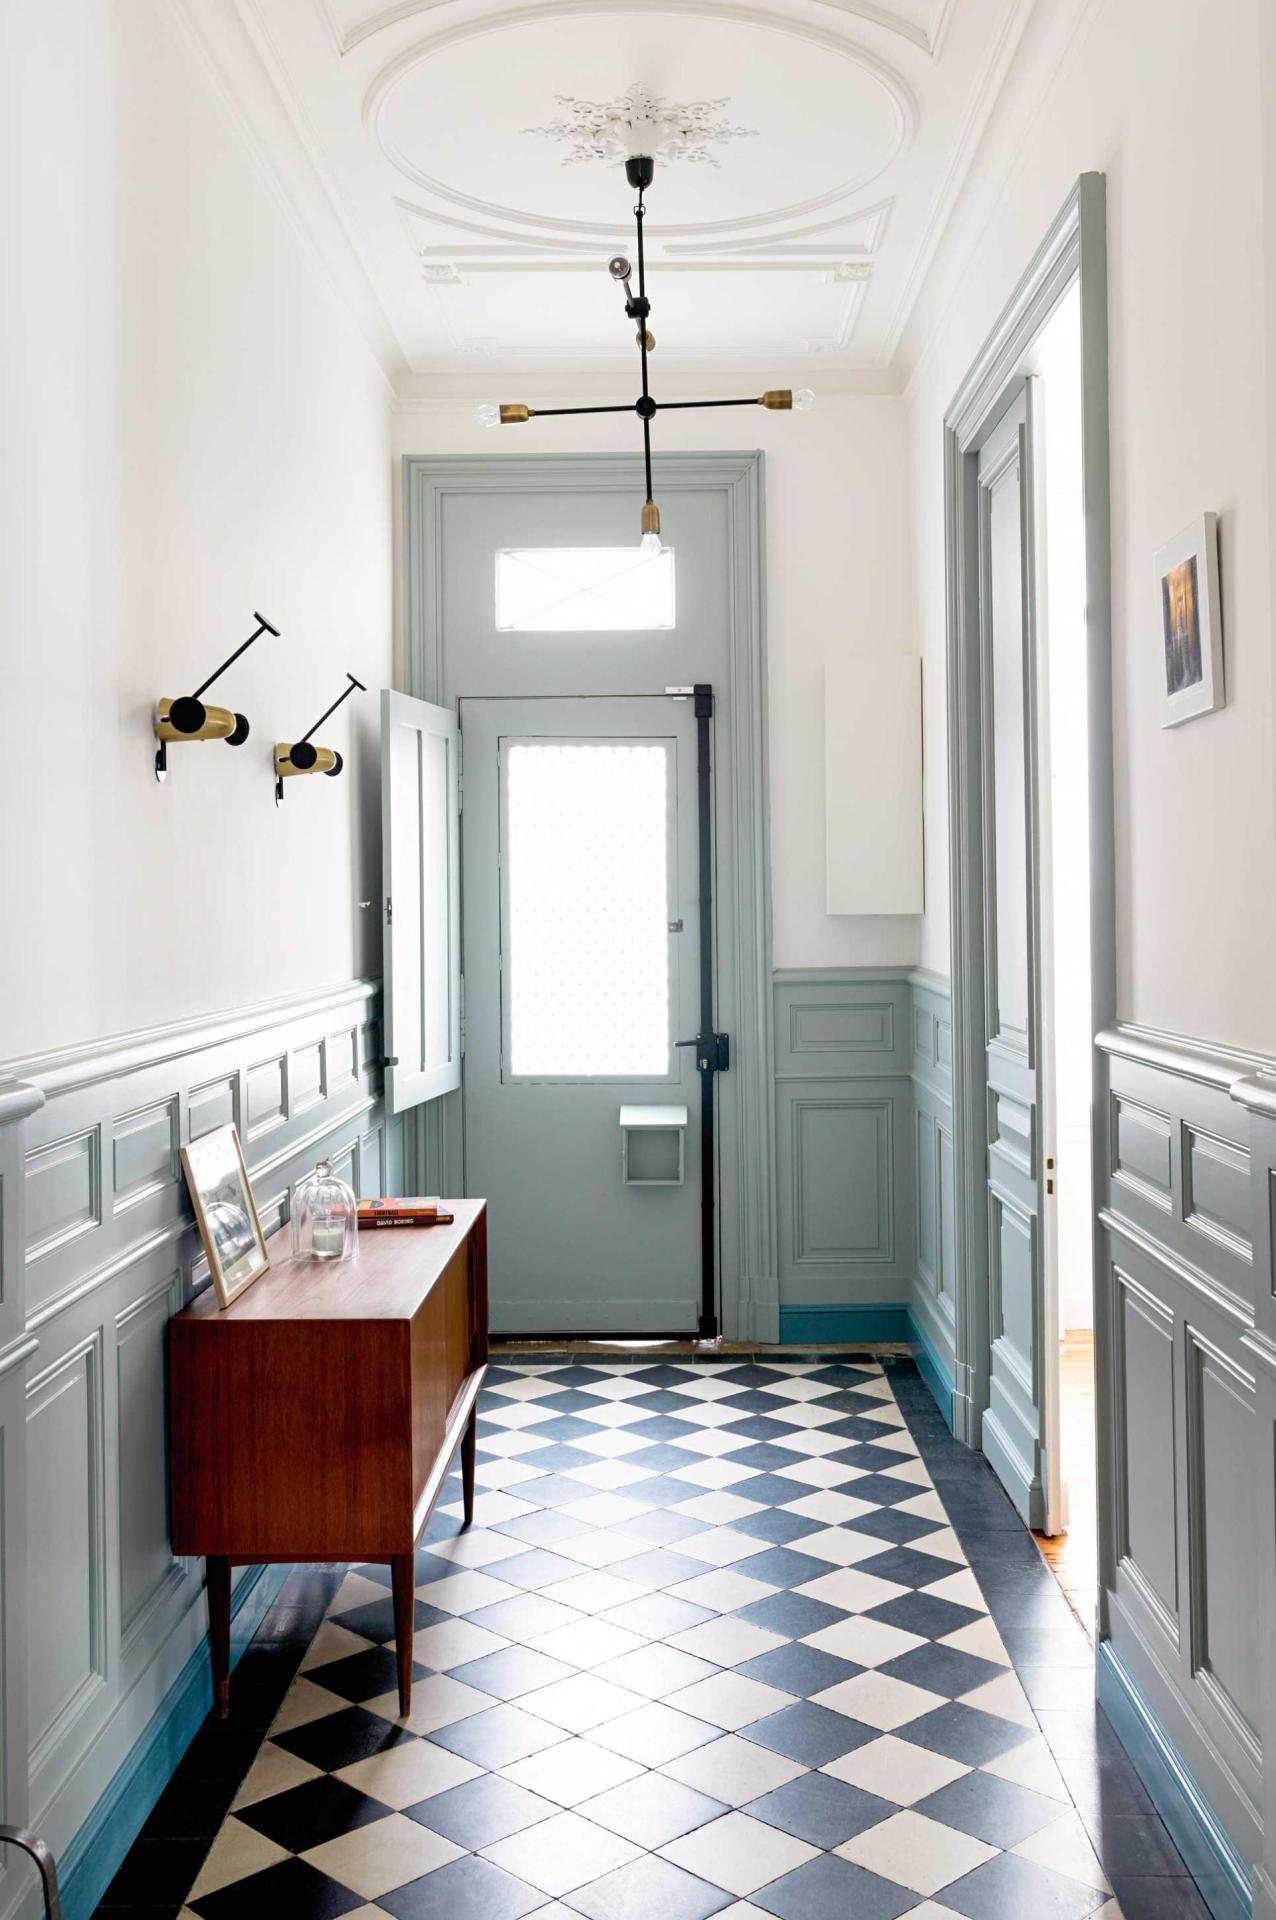
I have to say if I could consider encaustic tiles the choice would be a lot easier as I feel a lot of the designs are more suited to hallways but they are just too high maintenance for our family. I would love to have either of these Fired Earth tiles but sadly our budget and general levels of muckiness just won’t allow it. Also, they are quite colour specific so it would be harder to change the colour of the hallway in the future:
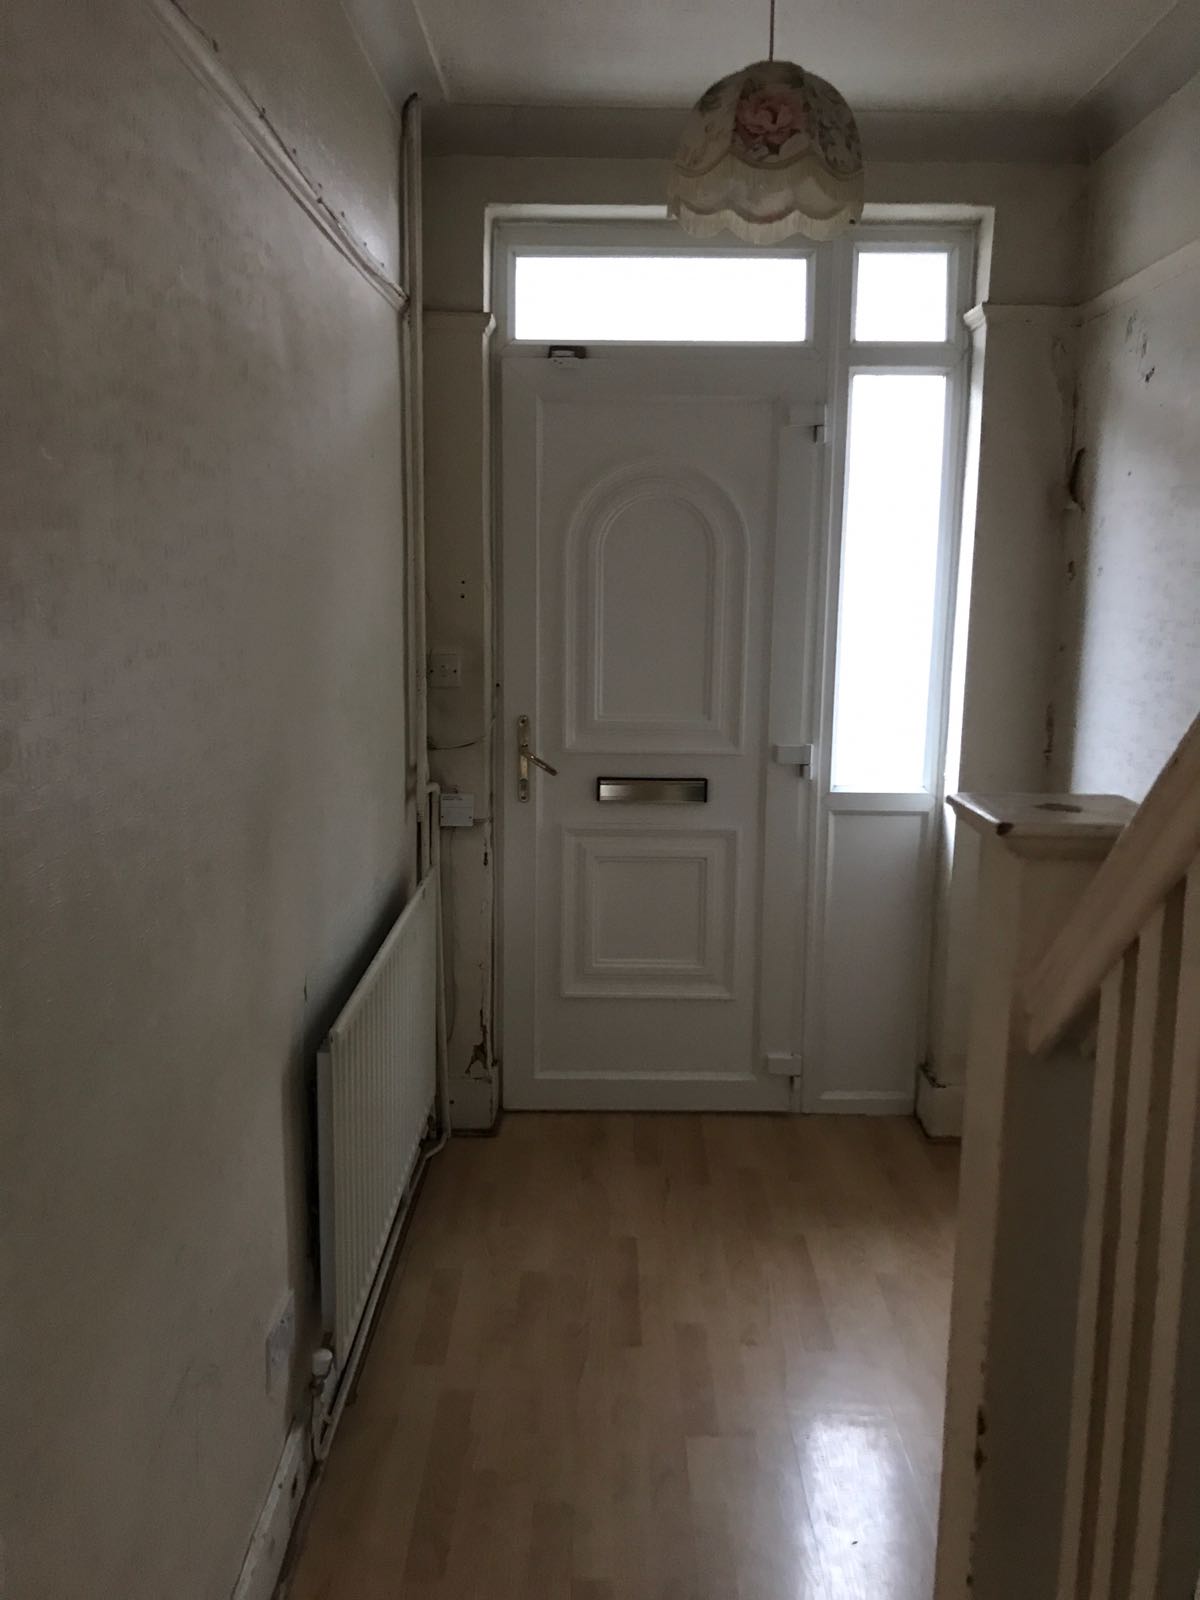
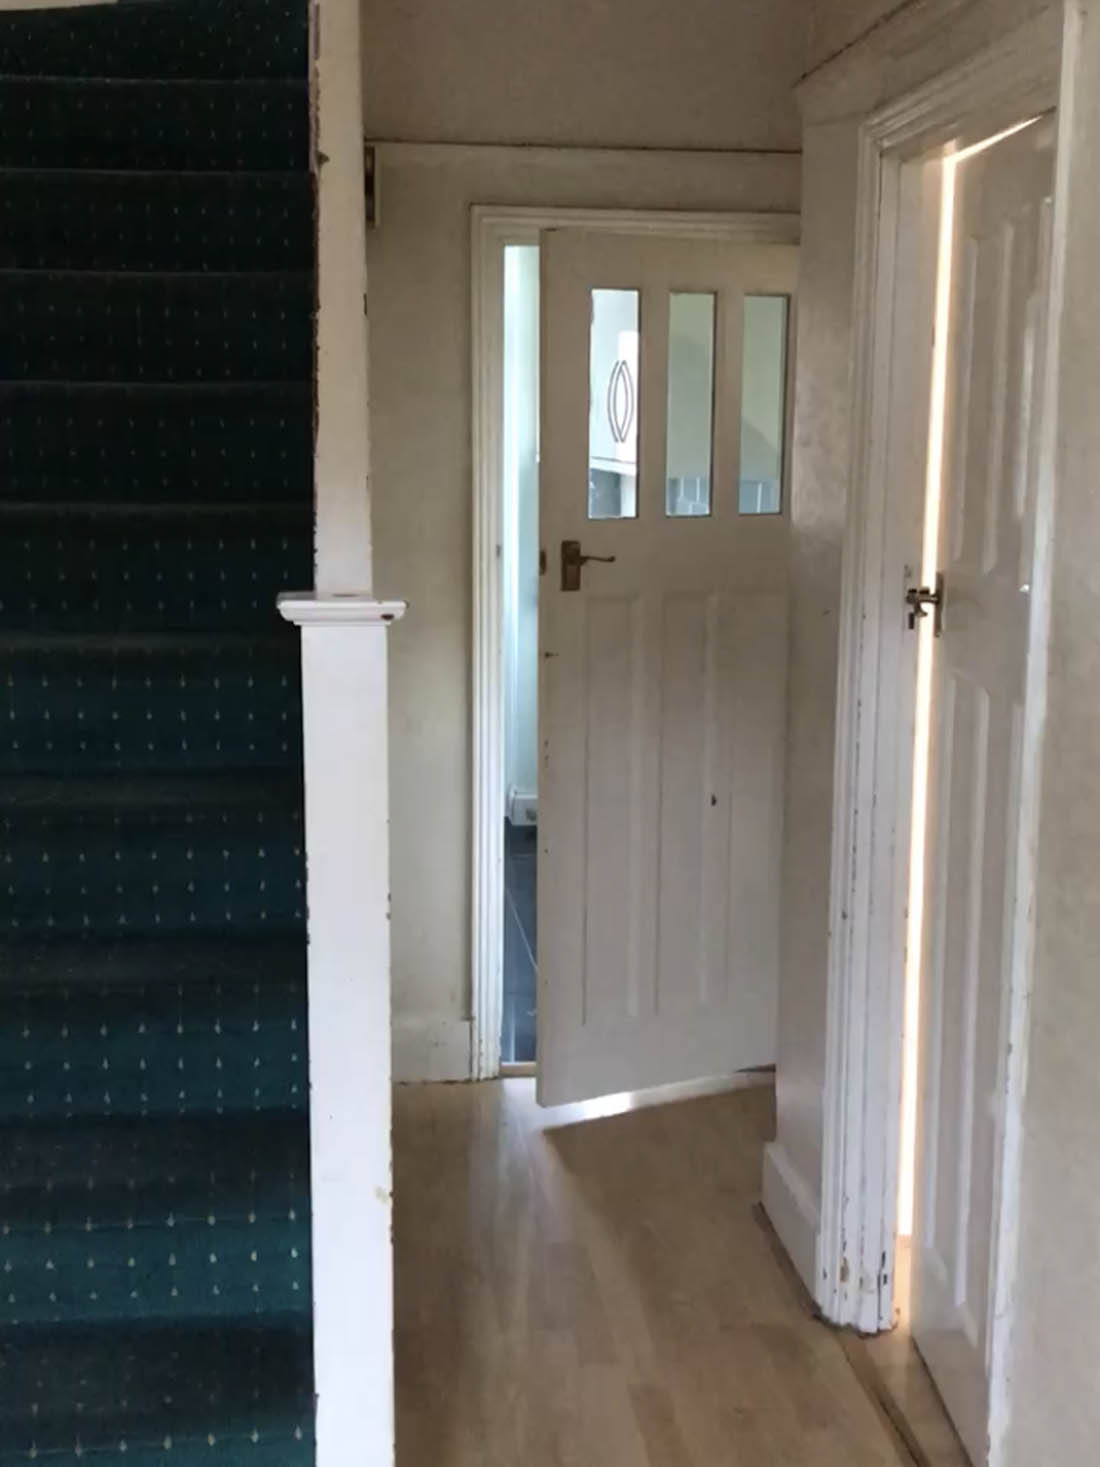
I was super excited about our hallway when we were doing the first round of renovations to the house as I had such a clear image in my mind of what I wanted it to look like. As it turned out we didn’t have enough money finish the hallway so it was left plastered and painted but not a lot else. On the surface it looks good but actually the unfinished stairs, the old floorboards and the brilliant white walls make it a pretty miserable space.
If you are interested in the doors you can read this post about restoring 1930s doors. You can also read more about painting a uPVC front door and I have to say the painted front door has done AMAZINGLY well – not a single scratch. I still hate it but slowly, slowly!
And here is a reminder of what the hallway looked like when we first viewed the house…
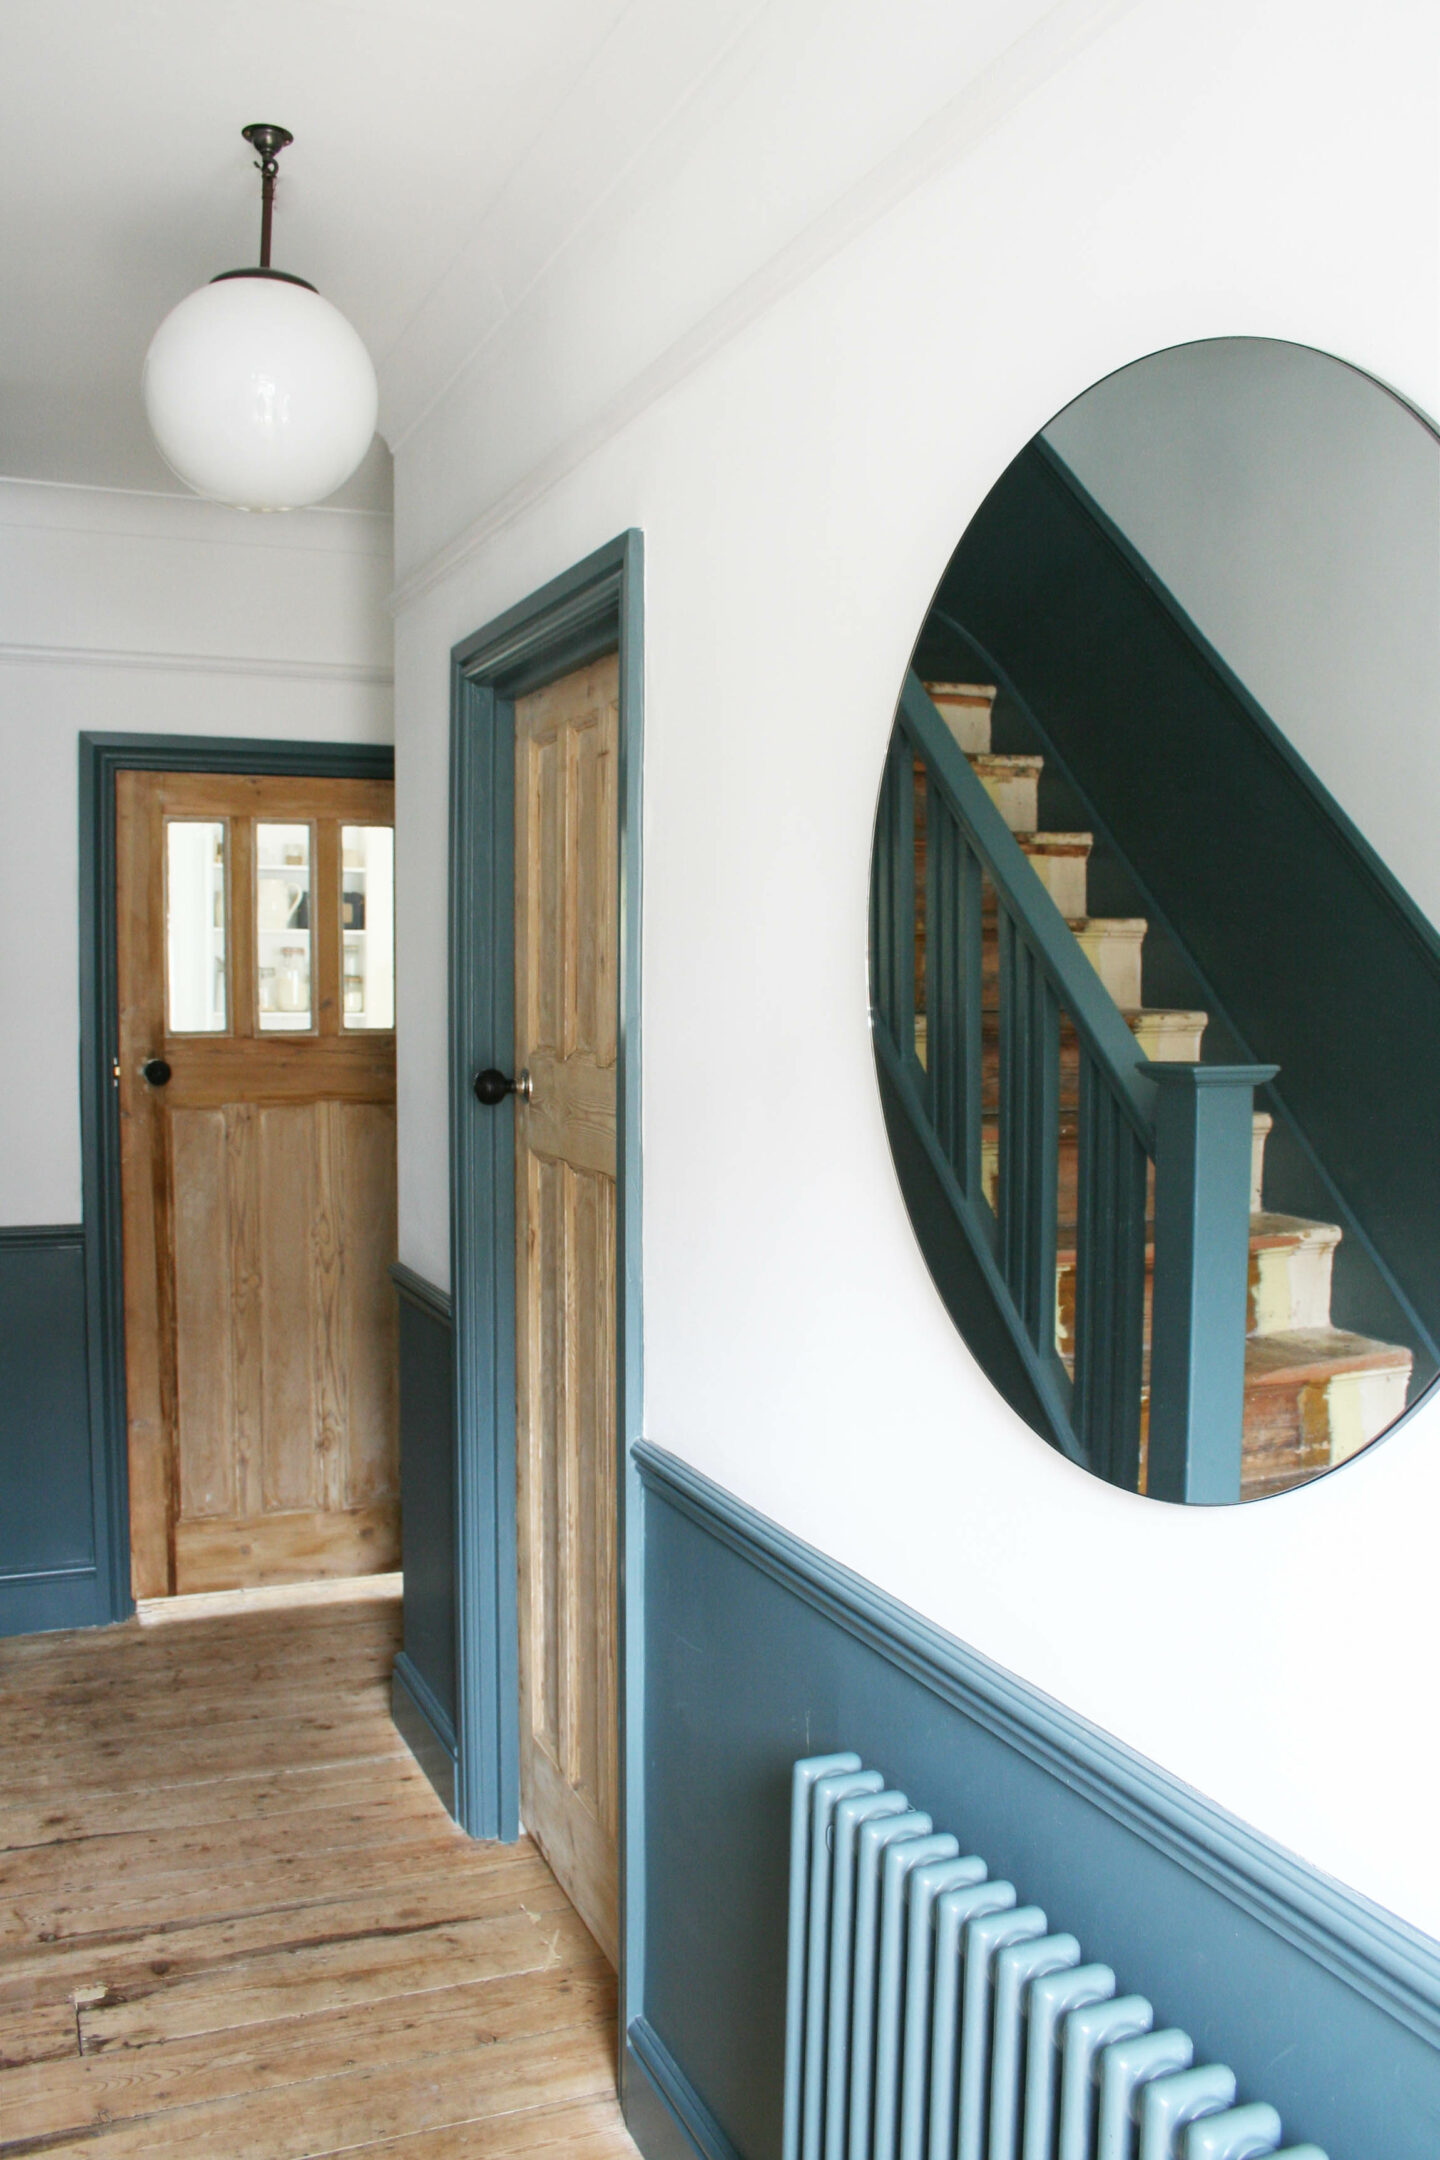
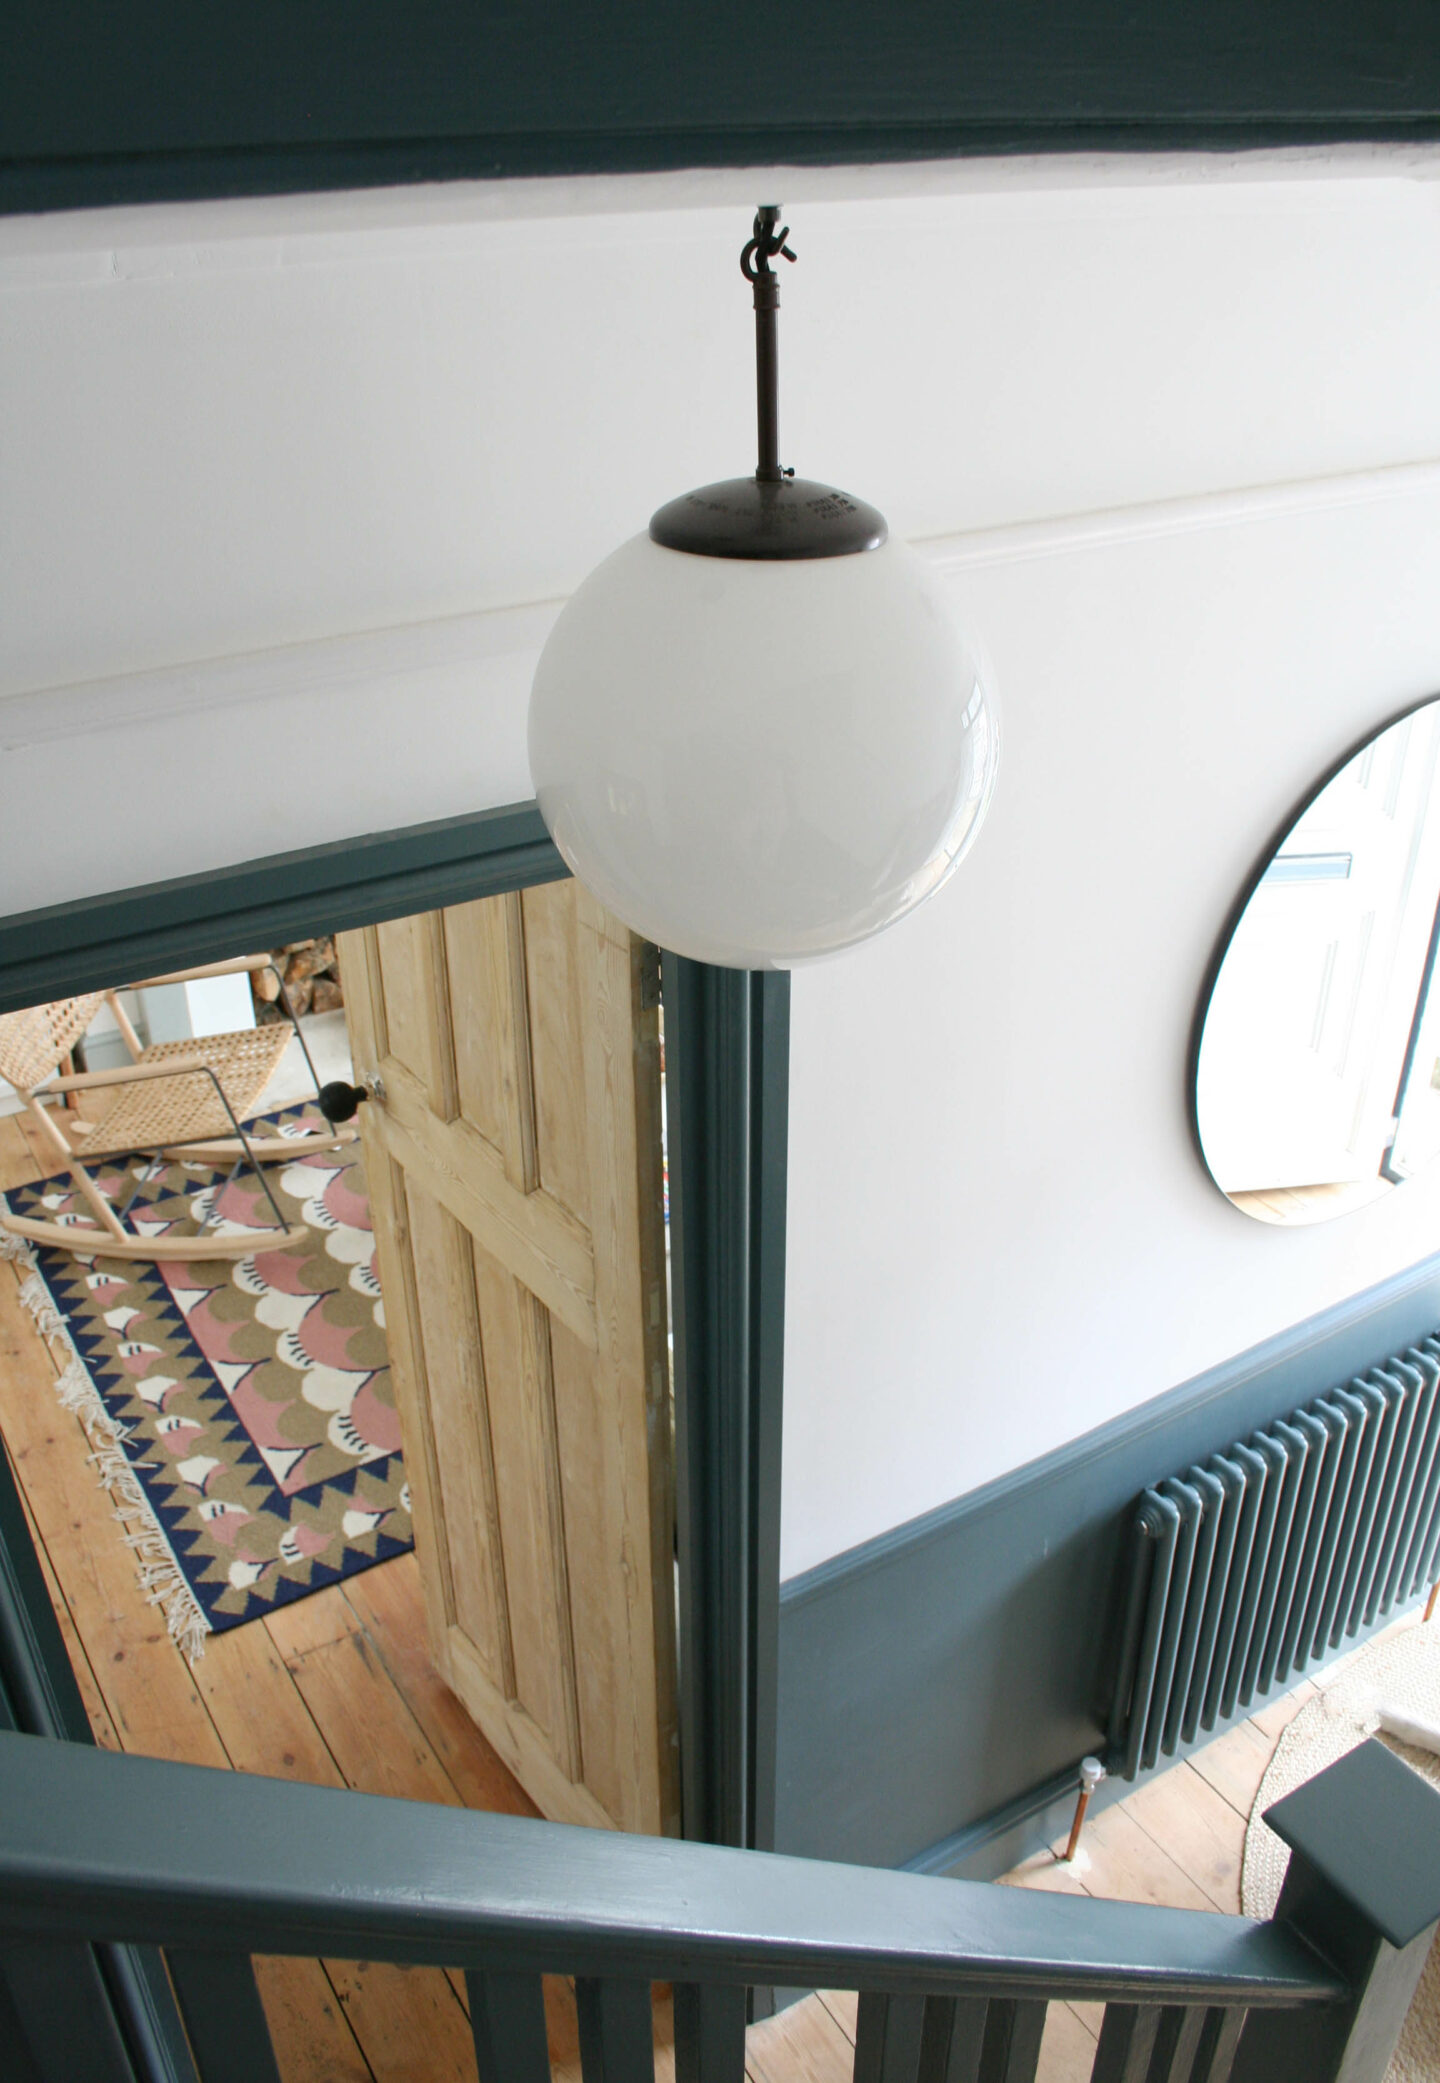
So what do we need to change? I still absolutely love the Inchyra Blue woodwork, the beautiful Skinflint globe light and the stripped doors so that is all definitely staying. The biggest issue we need to deal with is the floor. The hallway is incredibly cold because of the external wall (we are semi detached). The floor makes it even colder because there is no insulation beneath the floorboards. Therefore, we are getting quotes to install underfloor heating and getting it tiled. Porcelain tiles will work well for us because Otto brings in so much dirt – I would never consider porous tiles (encaustic cement tiles, for example) as it would be a nightmare maintaining them and they would constantly look dirty. Tiles also a good way to lighten the space and throw a bit of light around as the grubby floorboards that were never oiled are so drab and just absorb all of the light. Primarily, however, the priority is to stop cold coming in through the floor and add an extra dose of heat to this space.
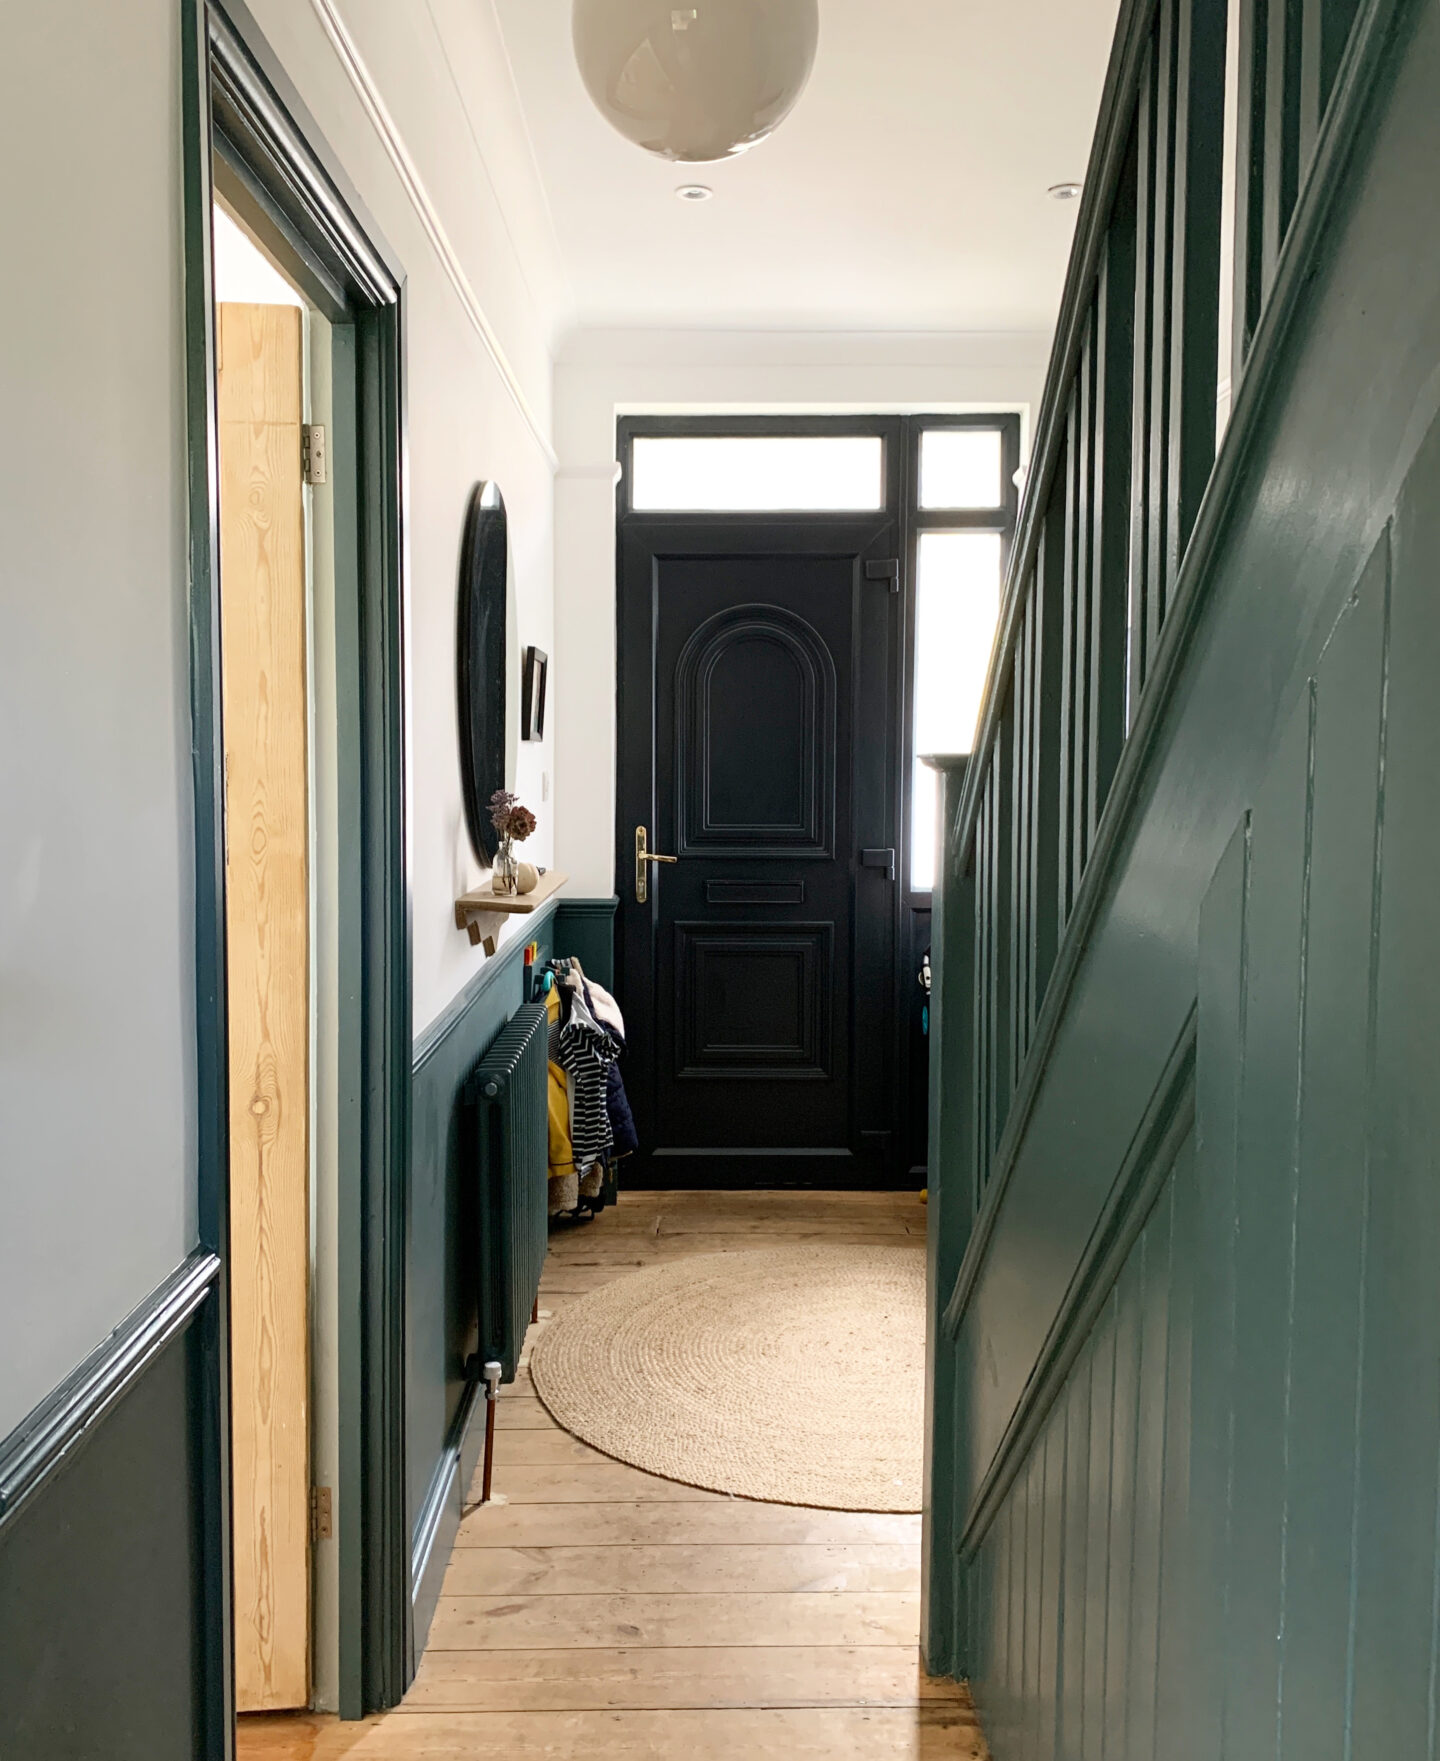
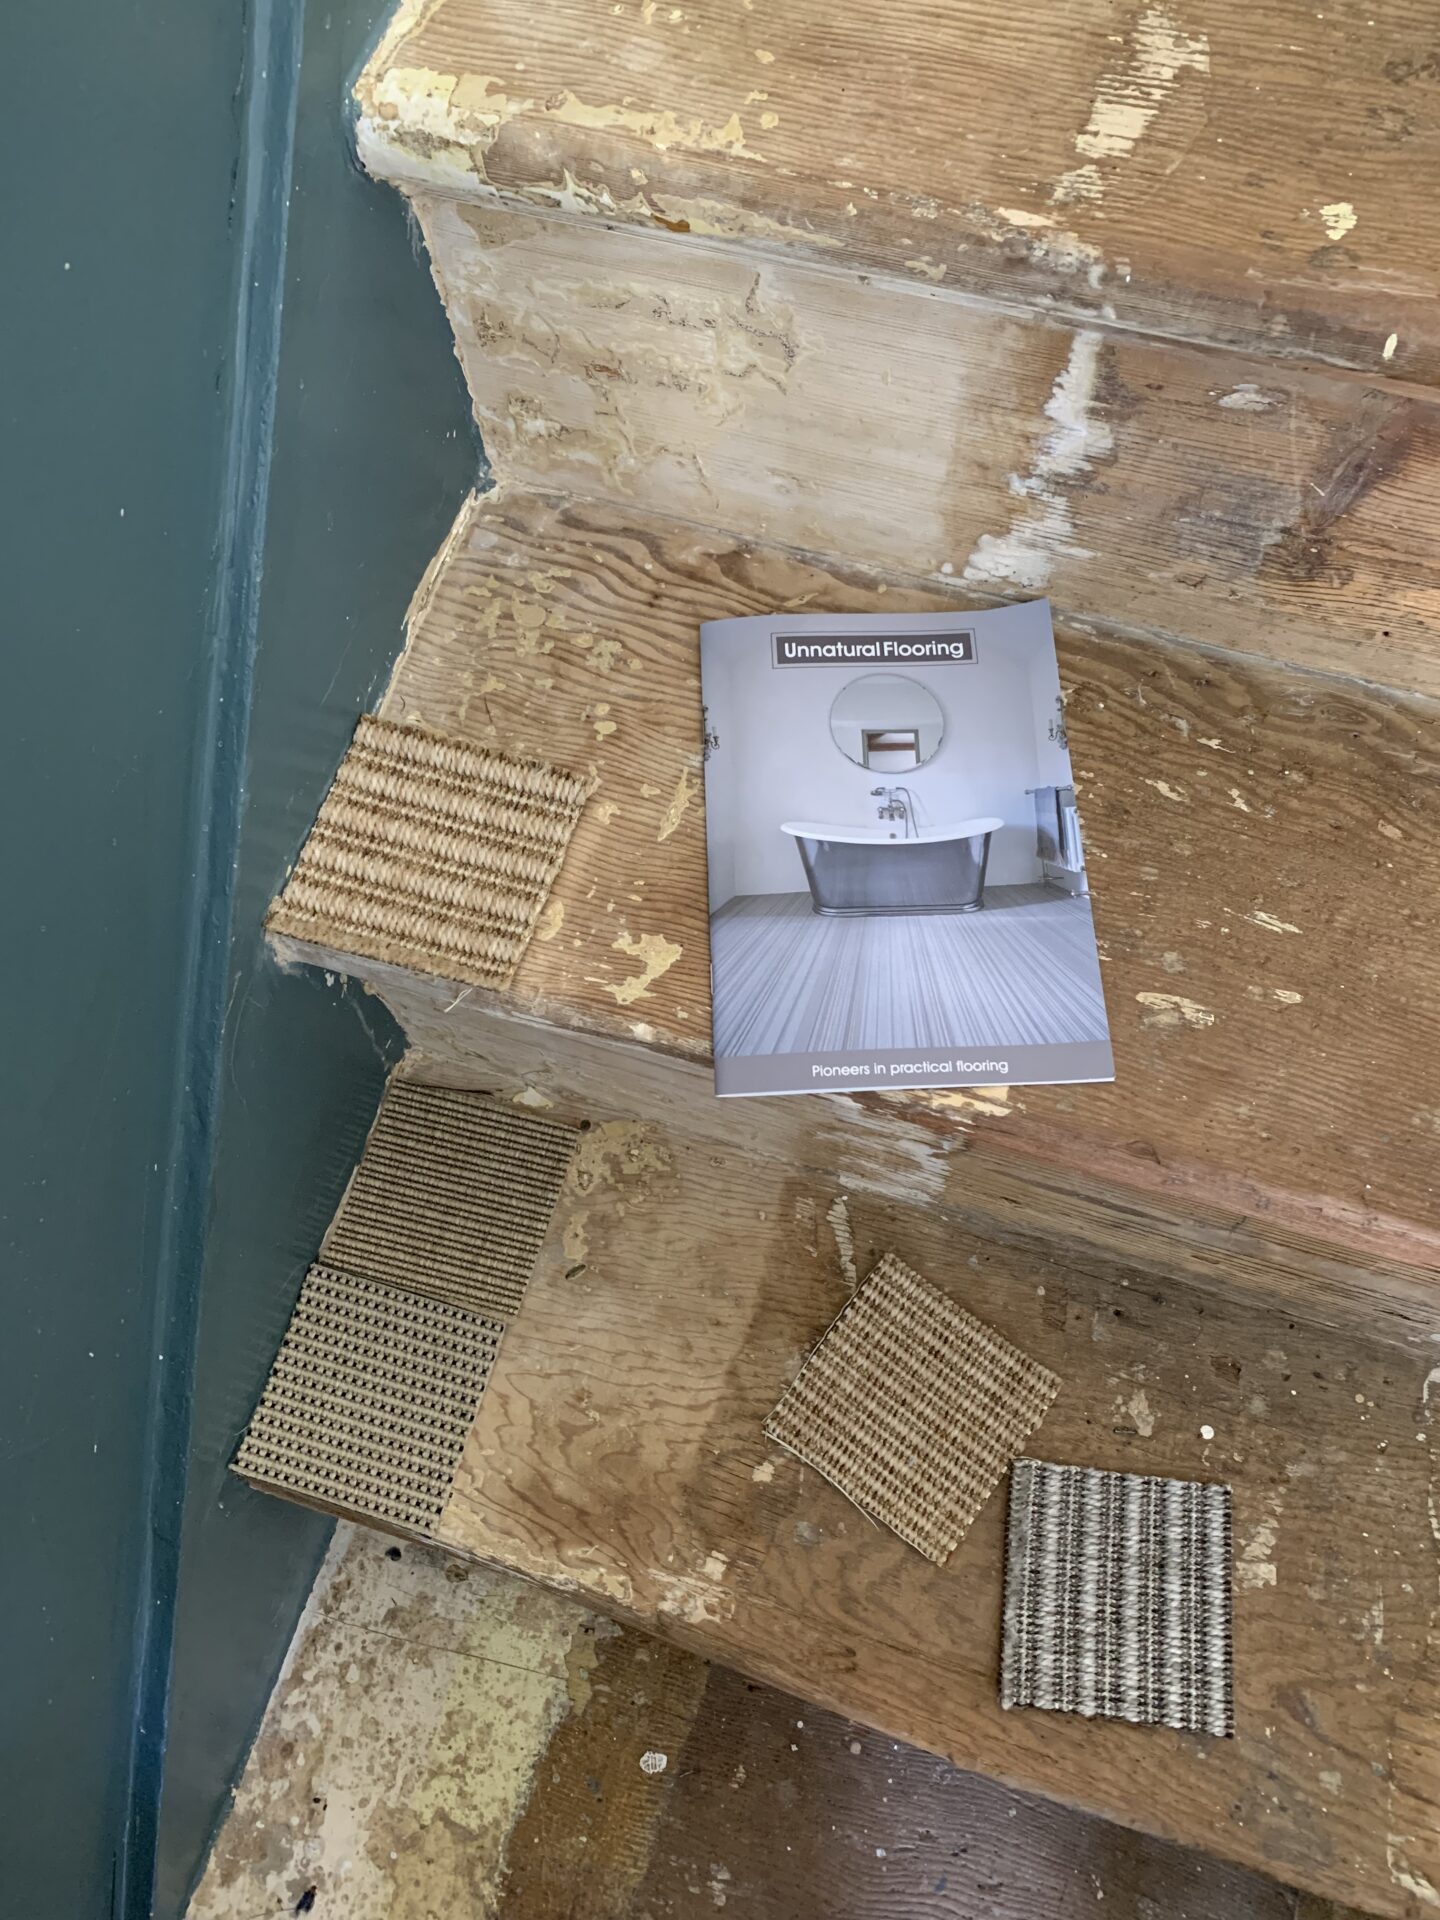
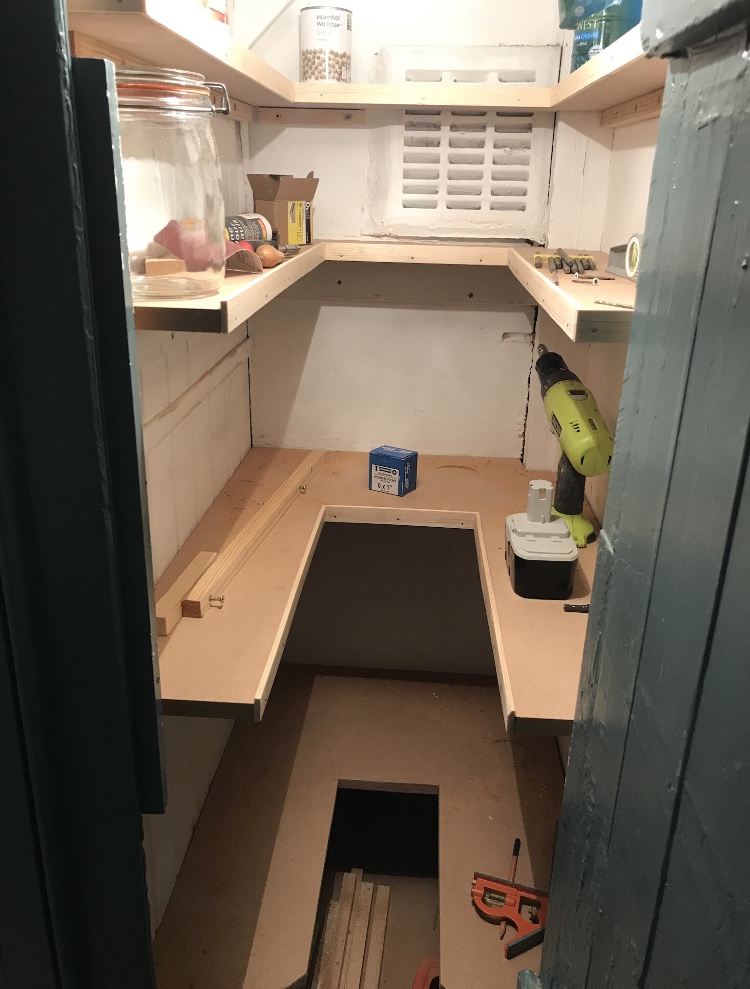
The stairs is a whole other issue and expense so we’re going to see how we go on that front. We had a moment of madness recently and started the paint peeling process on the stairs with Peelaway but we quickly abandoned that as it was the least fun DIY process I have ever experienced! Yes, a lot of the paint came away but our skirting paintwork took a real hit so it all looks even worse now. It’s still very much in debate as to the way forward. If we decide to spend the money and get carpet I have chosen a few options from Unnatural Flooring – it looks exactly like sisal but it is 100% manmade which means it is stain resistant, washable, bleach-able and a lot softer to the touch. It also won’t be attacked by moths (anyone else obsessed with keeping moths at bay?!). My favourite option is the New England Newport carpet (close up on the right):
The other big issue for me is how cold the brilliant white is on the walls. Using brilliant white does not make a dark space brighter and lighter; it actually makes it feel cold and dingy. Therefore, I would love to paint it Shadow White but I would have to do that myself so…
Anyhoo, the floor is the first big step and big expense and I’ll show you more about the tiles that I am thinking about soon.
Welcome to a new project! It’s a real beauty as you can see…
This is a house very close to mine that my sister has recently bought and I am going to be helping her to decorate it. She is working with the same contractor we used J A Whitney Building Contractors who, when I first started writing this post a month ago (full time childcare is not allowing me much time at the moment!), had just started stripping out the house and they’ve been as quick and focused as ever because now a month on they’ve re-wired, re-plumbed, knocked through downstairs and in the bathroom, plastered and even had a mist coat on upstairs when I went to see at the weekend. It was such a joy working with James and his team on our house and they made the experience so smooth and stress free so I’m really pleased that my sister is able to work with them too (they already renovated a flat she sold before buying this place).
The first thing my sister asked me at the beginning of the project was what were the best things we did in our house and what were the things we got wrong or wish we had done. So I thought it would make quite an interesting blog post to document those things especially for those of you who are mid-renovation or thinking about starting one soon. It’s taken quite a while to make a list as it’s so easy to forget these things once you’re in the house. I found it especially hard because we were living with family during the renovation so Mimi slept in our room, which unfortunately led to a baby that didn’t sleep. I also couldn’t go on site much so I just wasn’t as hands on as I would have liked to have been. Anyhoo, after discussing with Jules we came up with our list that we have been able to pass on to my sister and I hope it may help some of you.
Have a look at the house first as it looked a month ago and my list is at the bottom of the post…
The sitting room with walls and ceiling stained with nicotine! The house is Edwardian so really nice square proportions and high ceilings.
The layout of the house is exactly the same as mine but the house is a little wider and deeper with higher ceilings. I have advised my sister to knock through downstairs and then because her stairs are further forward than mine she has some extra space for a utility or storage area.
The front bedroom.
Back bedroom.
The bathroom will be made larger by knocking through into the separate loo.
The third bedroom.
James and his team uncovered a couple of beauties on their first day of stripping out the house, which is exciting!
These original tiles are behind the stairs where the utility area will be.
Things we learnt from our own renovation (in no particular order):
1. Spend as much time and attention as possible planning electrics and lighting.
I remember so clearly having to do the electrics and lighting plan because it felt like the worst chore ever. My advice is do not do it in the evening, do not do it when you’re exhausted, do not do it sitting in front of the TV, do not do it mid-heatwave with a baby that is awake all night and do not do it after a big row with your partner because you don’t want to do it – ha! Carve out a moment of time when you can be fully focused and go through it meticulously as it will have such a huge effect on the overall look and feel of your home. Lastly, do not forget a blooming plug socket in your hallway so you can’t have a lovely lamp on the hallway table (I’m still deeply regretful of that). Also, think about the type of lighting you have – I’ll have to do a separate post on this as it is a huge topic – but we knew we would have quite a few lamps so we made sure we could turn them on and off at the wall with the other lights. Little things like that make a big difference day to day.
2. Consider cost of exterior
We very much glossed over this. We knew the inside of the house was right for us and we knew that we had enough budget to get it to a certain point that we would be really happy with. However, we wrote off the outside as something that was easily fixable and could be done later on. We didn’t consider how much that was going to cost us or what the extent of the work would look like. I think this is important because you don’t want to be in a position with an unusable garden for example because you will never have the budget to get it cleared or landscaped.
3. Knock through
Obviously this will be different for everybody but for us it has been the best decision as I don’t think we would have enjoyed living here if we had left the downstairs as three very small rooms. My sister’s new house is the same layout and even though the rooms are bigger I have still advised her to knock through as it will suit her so much better with a baby to be able to see her at all times and it makes entertaining so much easier too.
4. When you knock down walls properly consider the space that will be created
It is quite easy to fall into the trap of not considering the new wall space that is created once old walls are knocked down. Think about how those new walls will be used, plan electric sockets and radiators to go on them.
5. Add enough radiators and sockets
Too many sockets is never enough sockets! Get USB ones too.
6. Budget for built in storage
I wish we had done this. I hated having nowhere to put anything when we first moved in and I still have nowhere to put my clothes.
7. Have washing machine upstairs
This has worked out really well for us. All laundry stays upstairs (except in summer when it is hung on the line) and all linens can be stored above the washing machine in purpose built cupboard. Most importantly it freed up space in our teeny tiny kitchen space.
8. Don’t take on DIY jobs unless you are sure you can achieve them
It is very tempting to look at a builder’s quote and try to take on jobs yourself to cut costs. Be very, very careful about it. Most likely you will end up with a badly executed job and will have spent as much more more than it would have cost your builder to have done it. We made this mistake with sanding the floors in our house – BIG MISTAKE!
9. Don’t fill your loft with crap!
Just don’t.
10. Don’t put spotlights everywhere
A big waste of money for us was installing spotlights in the hallway, on the landing and in the dining room – we never, ever use them.
11. Think about your hallway as an extra room
When planning electrics and radiators and lighting don’t forget to give the hallway as much thought as the rest of the house.
12. Reclaim fireplaces
I’m so happy we did this and added fireplaces in the bedrooms and reclaimed one for the living room. yes we would have had more wall space without them but the house would have lacked so much character.
13. Reclaim and rehang doors
Sadly in my sister’s house none of the original doors remain so I have advised her to reclaim some because they make such a difference to the overall feel of the house. Also, make sure to rehang your doors so that they open onto the wall of each room rather than opening into the room.
14. Electrics and lighting outside
Get an electric point and wiring for outside lights even if you don’t have the budget for the lighting itself yet.
15. Try to plan furniture
So difficult but as much as possible try to plan where your furniture will go in each room as this will dictate changes that will need to be made. For example, I advised my sister to get the door in her living room moved as it was exactly where she would naturally place a sofa.
16. Invest in nice radiators
It makes such a difference.
17. Underfloor heating
The best thing ever if you can do it.
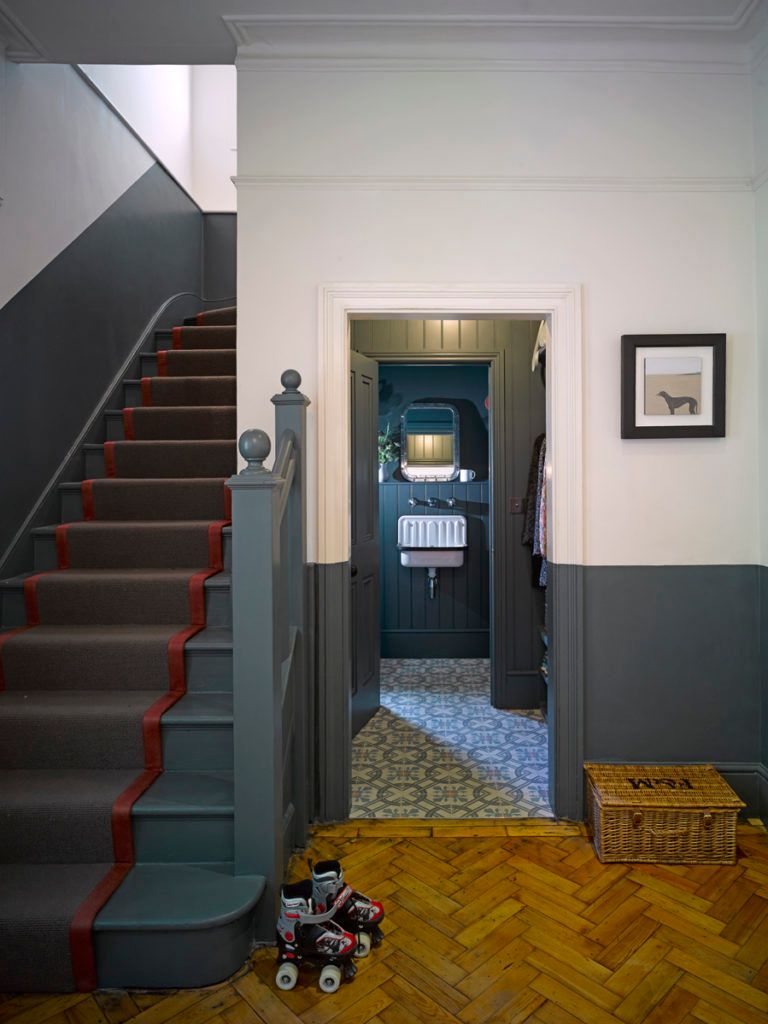
18. Use a dark colour below dado rail in hallway – it will save you a life of scuffed white walls.
A small thing but it really does make a difference especially living with a muddy dog who likes a good shake in the hallway.
19. Plan, plan, plan.
It’s very easy to be caught out and to have to suddenly make important decisions on the spot for tiles or flooring or skirting board profiles or wall colours. Try as much as possible to have it all planned and ordered and decided so that you don’t have to rush decisions or make the wrong decisions because you don’t have time to research properly.
20. Budget to get the place cleaned before you move in.
If you can get the place professionally cleaned because it will make a massive difference. Moving is so full on and there is no spare time to do anything so even if you tell yourselves you’ll do it you probably won’t and you’ll be wading through building dust forever.
21. Be flexible.
It’s fine to have a design in mind for your home or the decor but when it becomes clear that it’s not going to work, it’s not the best option or it’s going to be too expensive be willing to change your mind. Don’t dig your heels in just because you had your heart set on something.
I’m sure there are loads of other things that I can add to the list as they come to me. As I said a while ago I want to share more about the ins and outs of working with a contractor and I’ve already started that post and I will definitely follow up with more about planning lighting as it is a minefield!
I hope this is useful and I will be sure you keep you up to date with how the team get along and some of the finished rooms soon! If you have done a renovation and want to add to my list leave a comment below.
I’ve been promising to write this post since the day we moved in to our house, nearly two years now, so to make up for the wait I’m going to make this long and detailed! Are you ready?
As many of you will know our contractor renovated the vast majority of our house, which included: taking the entire house back to brick, re-wiring, re-plumbing, knocking down two walls to combine the kitchen, dining and living space into one open plan room, knocking the separate loo and bathroom into one room and installing a brand new bathroom, sanding and oiling the floorboards, re-plastering and painting the whole house, as well as adding new skirting, architraves and picture rails throughout. However, the kitchen was the one area that we had to make big compromises on for two main reasons: 1) We didn’t have the budget for a new kitchen 2) We had half an eye on the fact that we would like to extend the back of the house in the future so we didn’t want to spend a lot on what could effectively be a temporary kitchen.
Therefore, we made the decision not only to fit the kitchen ourselves but also salvage as much of the existing kitchen as possible. We set ourselves a rough budget of £1000 and as soon as the builders had left we gave ourselves a week to get it done as we were DESPERATE to move in by that point (we stayed with my sister during the renovation, which was a total of five months as we had to wait for two months for our builders to become available and the renovation itself took three months).
First and foremost, this is what the kitchen looked like when we bought the house…
A very narrow galley kitchen accessed from the hallway with a door out to the garden. The units and worktops themselves were actually pretty new but it felt incredibly cramped.
The house was never going to work for us if we kept the 2m wide kitchen as it was. Mimi was just starting to walk and was in to EVERYTHING and I had to have eyes on her 24/7 so being locked away in a tiny kitchen would have been a logistical nightmare. It also wouldn’t have worked well when we have friends over. It was cramped, claustrophobic, dark and I hated everything about it! The right hand side of the kitchen units and worktop were half the standard depth as there was so little width to the room. One of the worst things about the room was that the door opened outwards into the hallway and when that door was open it completely blocked the door to the dining room (see the floor plan). It was a case of constantly banging doors. Therefore, the decision to knock down the walls downstairs was an instant one for me and a total deal breaker – it had to happen for us to consider buying the house. A quick check on Rightmove showed me that many of the houses on our road (it’s a super long road so there really are a lot of examples to look at) had already done what we wanted to do so we were happy to make an offer. As soon as the right hand side of the kitchen was ripped out I could already see the potential and light flowing into the space and that was all I really wanted.
So much of the light was being blocked by the right hand side of the kitchen (and the awful black shiny floor tiles!) and as soon as the units were gone I could begin to see what the space would look like once that wall came down.I was SO happy to see and feel the space when the wall between the kitchen and dining room was removed.
The actual design for the kitchen was dictated by budget. In lots of the other houses on our streets that have been renovated and made open plan, the kitchen has been made into a horseshoe shape by blocking up the doorway from the hallway and the garden door. We had a couple of problems with that. Firstly, we just simply didn’t want to/couldn’t spend the amount it would cost for that amount of fitted kitchen. Secondly, I’m not mad keen on this design as I feel like I would have my back to the dining/living space a lot of the time and it feels closed in. Thirdly, we really wanted to keep two points of access to the kitchen/living space as sometimes we don’t want Otto coming through the sitting room when he’s really muddy etc. The added benefit of keeping the kitchen door was that we could have really easy access to the larder cupboard under the stairs so we could spend even less on the kitchen in terms of cupboard space. Finally, I just LOVE the original glazed kitchen door and I couldn’t bear getting rid of it!
Examples of other houses on my street with horse shoe shaped kitchens (they are currently under offer on Rightmove, which is where I got the photos).
Having a very small budget actually makes designing a kitchen pretty simple as options are so restricted and our builder James from J A Whitney Building Contractors helped us with the layout and measurements. We decided that we could salvage the existing hob, tap, hood and oven as well as the unit that holds the oven with a drawer below.
We decided to salvage the oven and the unit it sits in, hob, hood and tap from the old kitchen.
We decided against having the fridge freezer on the left hand side and instead planned to fit two under counter kitchen cupboards there instead. That would enable us to have a worktop that spanned the back wall so we could have space for a coffee machine and toaster on the left of the oven. As we were keeping the garden door and not replacing it with a window our only real option was to have another worktop running parallel with the back wall. We would essentially recreate the original galley kitchen but in an open plan space. This is what we had to work with when the builders left and we had one week until move in day!
Now let me show you the image that inspired the ‘look’ I wanted for the kitchen…
I was led to this deVOL kitchen as I had decided on a dark blue kitchen because I wanted to tie in with the dark blue in the living room rug (remember, it is an open plan room so I had to consider the whole space quite carefully when designing the kitchen), as well as providing some contrast with all the white in the room. The dark blue also helps define the kitchen space from the dining and living spaces. I had bought Railings paint for the front door and stairs (I still haven’t painted them!) and so I tested that and it worked perfectly with the Light Blue in the rest of the room as well as the Inchyra Blue in the hallway. I was really keen to create a sense of continuity in this house as it’s so small and that helps to make it feel bigger so I’m pleased that the kitchen ties in with colours in the hallway. We painted very large pieces of cardboard boxes with Railings Modern Eggshell and stuck them to the kitchen units to help us visualise what the kitchen would look like.
I was very keen to keep a period feel in the house so it was easy for me to decide on a shaker style kitchen and James suggested buying a Howdens kitchen as he works with them on a regular basis. I chose the Burford paintable units (I’ve had a look online and I’m not sure if they are available anymore but there are lots of similar styles) that we could paint ourselves. This brought cost down and enabled us to have exactly the colour we wanted. Ordinarily it would be A LOT of extra work to paint a kitchen but because we only bought four cupboards – two on the left of the oven with a drawer, one under the sink and one under the ‘island’ for the bin – it wasn’t too hectic! Also, because the house was completely empty there was enough room to lay everything out and it was late summer so everything dried nice and quickly too. The cost of the carcasses, four door fronts, one drawer, end and dividing panels and kick boards was £816. Therefore, we needed to find door handles, worktops and a sink for as little as possible.
I really liked the idea of mixing the worktop finishes like the deVOL kitchen as I definitely wanted a wooden worktop for the island but I didn’t want too much wood because we were going to have floorboards and a wooden dining table and big wooden wall cabinet. I knew I could get away with a cheap white laminate worktop quite easily on the back wall as so much of it would be covered by the sink and oven. I’m not very keen on laminate worktops but I can honestly say the white one I chose from Worktop Express for £80 is really great and very easy to keep clean.
Jules started the fitting process whilst I was at home with a sick baby and so I got these photo updates every now and again!
The 3 metre white laminate worktop needed to be cut to fit the space.
The birch worktop was 186cm and so that also needed to be cut so that it would be easy to walk around it into the open plan space.
The wooden worktop for the island is birch from IKEA and cost £100, which took us up to our budget of £1000. We were left with a black sink from the existing kitchen and that was a big no from me so we stretched the budget to buy a new white resin sink from B&Q for £94. This is by no means my ideal sink but for the price and the ease of fitting it works well as well as looking ok.
The cheap white resin sink works really well as it matches the work top so it’s quite inconspicuous. The island houses an under counter fridge, freezer and one slim cupboard with a bin that’s so handy. This picture was taken before the worktop was trimmed.
We were able to paint the oven unit and handle to match the rest of the kitchen so that you can’t tell that it was part of the old kitchen.
We didn’t have the budget for any snazzy handles so I got five handles for 72p each and painted them.
At this point we moved into the house and it was pretty tricky as we still didn’t have any storage. We actually went away with family for a week to Rye almost as soon as we moved in and whilst we were there I found a £5 shelf in an antiques shop and I won an eBay bid on a wall cabinet for £40 so when we got home they immediately got put up.
With no storage other than two cupboards and one drawer it was quite tricky when we first moved in (also note the hole in the wall, the fact we hadn’t added the back to the island unit or the kick board under the oven). The £5 shelf unit I found in an antiques shop.The antique wall cabinet was an eBay find and houses all of our glasses and excess crockery that we don’t use on a daily basis.
The shelf in the kitchen quickly became a priority as we had no where for crockery and we recycled old lengths of MDF and brackets from shelves in our flat so they cost us nothing.
We didn’t tile the splash back for ages but we now have left over white metro tiles from when we tiled our kitchen in our old flat. We also had leftover grout and adhesive from the bathroom, so again that cost us nothing.
Very quickly I could tell that the kitchen was going to work really, really well and as soon as we fitted shelves into the larder, which is under the stairs, everything had a home. The larder is accessed through the kitchen door and actually it’s one of the best things about the kitchen. It makes storing food so easy as I can see everything and nothing gets lost at the back of a cupboard.
This is how the kitchen looks today…
The larder is just through this door.AO sent me a black dishwasher as a PR product, which works so much better than the white one we brought from our flat. Otherwise I would have painted the white one as it really did stick out like a sore thumb.
I love the garden door and I’m really pleased that we kept it as we use it so much especially to let Otto in and out. I was worried about having an under counter fridge and freezer (on the right) but it really is fine and
The wooden worktop island is the perfect work space as I can look out into the living space and Mimi loves standing on a stool to take part.
Things I would change…
I would have removed the cooker hood altogether as it no longer works (we salvaged it from the old kitchen) and we so rarely fry food so we really don’t need one.
I wish we had lowered the shelf and added another on top of it to give us more storage space.
We still haven’t oiled the floorboards after it was sanded just in the kitchen section. As a result they are now filthy and I’m furious about it every single day(!)
I wish we hadn’t bothered with spotlights in the kitchen as I never ever put them on and have instead added a clip on lamp to the shelf and have a big standard lamp next to the island. I would have preferred wall lights above the shelves and a pendant or two above the island.
I told you it was going to be a long post! Well done if you managed to get to the end but if there are still any questions I haven’t answered please do leave a comment or send me an email katy@18.200.196.112.
Soooo, one of our biggest mistakes during our renovation was deciding that one way of saving money and reducing our renovation costs was to take on the sanding of the floorboards ourselves. Big mistake. Firstly, the job itself was EXHAUSTING! And secondly, it is not a cheap DIY and because we made a hash of it we ended up spending more than if we had given our builders the job in the first place.
It must seem odd then that I’m writing a blog post about it but we learnt a lot during the process and did end up with a result we are really pleased with so I hope it will be helpful to share our experience.
When we bought the house all of the floors were covered in cheap laminate that was bubbling up here and there. On viewing the property because it was empty and very obvious that the whole place needed ripping apart we were able to take a peek under the laminate where it was coming up to see that the floorboards beneath looked pretty good. We had to cross our fingers that once all the laminate came up the boards in each room would be decent as we definitely didn’t have the budget to buy and fit new flooring throughout the house. Lucky for us the boards are good albeit a few weak points and quite large gaps between the boards downstairs. This is a big downside as there is no insulation beneath the boards and there was no cheap way of adding it because there is a 3 or 4ft chasm under the ground floor. As a result it can be very draughty downstairs so we really should have filled the gaps between the boards. To be honest, I have notions of replacing the flooring downstairs in the future if we extend so it’s never been a big priority.
The flooring throughout was shiny laminate when we bought the house. We had to cross our fingers that once that was removed the original boards would be in good enough condition for us to restore as we didn’t have budget for new flooring.
Another issue that we uncovered was the fact that some of the original boards had obviously been replaced in the living room at some point. Once they were sanded the colour of the new boards was a lot lighter but lucky for us we had planned a big rug for this area so it’s not at all obvious.
Post sanding you can see that the boards on the left hand side were replaced at some point and they are a lot lighter than the original boards.
Aesthetically speaking I adore original floorboards and it’s such an easy way to inject character back into a house, especially a 1930s house that doesn’t have all the period features of a Victorian home. They create a warm and lived in feel and practically speaking they can be very easy to look after as well as covering a lot of dirt and wear, which is something I always have to think about with a big dog. I would never recommend painted floorboards from that perspective as the paint chips and scratches so easily and unless that is the worn look you want it will drive you crazy and you’ll be forever re-painting.
The sanding process
Jules took a week off work with the aim of sanding the large downstairs room, hallway, upstairs landing, three bedrooms (two double and one single). He spent the first day getting together the materials he would need including driving to collect a floor sander from HSS (not our nearest branch) and sanding sheets.
Mistake number one: DO NOT HIRE THE SANDER UNTIL YOU HAVE PREPPED THE FLOOR! The hire companies charge you by the day or week so try not to have it in your possession unless you are using it. There is a lot of prep to do before you will be ready to sand such as knocking in nails with a nail punch and replacing certain boards (our builder salvaged a few lengths for us from a skip).
Mistake number two: BOOK YOUR SANDER AHEAD OF TIME. We couldn’t get a sander from our local HSS branch last minute so wasted a lot of time driving around London to locate one.
Mistake number three: BUY MORE SANDING PAPER THAN YOU NEED. HSS sell sand paper on a sale or return basis and they advise buying more than you need and we agree. We used about 15 sheets of each grit: 60 (some people suggest using 40 grit to start with but we didn’t need to as there was no paint or varnish on our boards and they were pretty smooth), 80, 120. We wasted more time buying more sand paper as we ran out. Do note, if you haven’t done enough prep with your nail punch protruding nails will rip up the sanding sheets.
Mistake number four: HIRE AN EDGING SANDER. We tried to save on the hiring cost of the sanders by using an angle grinder for the edges instead of an edging sander. This is just a horrible mistake and there’s nothing much else to say about it. The edging sander is essential to get right up to the skirting boards.
This photo was taken mid-sanding. The living area on the left had been sanded with 60 and 80 grit and still needed its final sand with 120 grit. You can see the un-sanded boards in the hallway on the right hand side.
Jules did manage to sand the whole house with 60 and 80 grit in the week he took off. He planned to go over all the rooms with 120 grit the following weekend but it all went wrong at this point…
Oiling the floor
After the first week of sanding we decided to sort out exactly what finish we were going to use in advance. When it came to deciding on a finish for the floors my main concern was using any type of finish that would make the pine boards appear too pink/red. I also didn’t want to use a varnish that would make the boards shiny or slippy. I was leaning towards a white tint to create a Scandi feel, which is why I was keen to use Osmo Oil White. Jules tested it and it seemed like a very subtle white tint. However, I would say this was our fifth mistake.
Mistake number five: TEST FINISHES ON A LARGE AREA. As you can see from the photo below Jules tested three finishes on three small sections. The issue with this is that it is very difficult to get enough of the oil on such a small section of board and you can’t get a true representation of what the finish will look like on the whole floor. It’s a bit like the mistake of just using a paint tester on a little piece of paper. We believed that the Osmo Oil White was going to look ok on our boards based on the tester but it really didn’t!
Choosing the wrong oil
Jules started the oiling in our bedroom as he had already done the last 120 grit sand in there. I wasn’t there so didn’t see it being applied but he sent me a couple of photographs the next day once it was dry and I HATED it.
The boards looked dull and had a horrible purple tinge. I really, really did not like it in the photos and when I saw it in real life I still hated it. It had to go!
At this point Jules threw in the towel. He was exhausted after a full week of sanding, followed by a full week of work, oiling in the evening, travelling for an hour back to where we were staying and the idea still having to do the last sand throughout the house AND re-sanding a whole room sent him over the edge! Did I also mention it was the extreme heatwave of 2018? Ha! We very quickly made the decision to hand the job over our builders.
We gave up the idea of a white tint as we just didn’t have the time within the building schedule to do another round of testing. We had already tested Osmo Oil Raw and we both really liked it so we just went with that and it turned out really well. Untreated sanded pine has a light, pale character from its natural ‘raw’ appearance. Osmo Oil Raw is designed to retain this appearance. Yes, it does make the wood slightly darker but it’s very subtle, has a lovely matt effect and it makes the wood feel warm and characterful. We used one application of Osmo Oil Raw and then a top coat of Polyx-Oil Original.
This is the same room as above after being re-sanded and applying the Osmo Oil Raw. I loved it.
I think the colour of the floors works perfectly with the Light Blue woodwork.
A regret
One of our builders re-sanded the bedroom that we didn’t like, did the final 120 grit sand throughout the house and then once we had had the house cleaned top to bottom he did the application of Osmo Oil Raw and the top coat of Polyx-Oil Original. However, it was agreed that he wold leave the hallway and kitchen not oiled so he could access the house (i.e he couldn’t oil himself in upstairs or outside, for that matter) and that we would do that bit as soon as we moved in. The plan was to do an application of oil one evening before bed so that it would have enough time to dry overnight.
Mistake number six: OIL EVERYWHERE AND DON’T SKIP THE HALLWAY AND KITCHEN. Urgh – can you guess what we did? Yes, that’s right, we didn’t get round to oiling the hallway and kitchen. Moving in was busy and stressful and there was stuff everywhere and we just never got round to it. Two years later we now can’t do it as it needs sanding again as it is so dirty.
You can see the big difference between the oiled floor on the right and the un oiled floor on the left in the photo above. Now try to imagine two year’s worth of dirt being ground in to an untreated floor. It annoys me every day and how we go about fixing it remains to be decided (I actually want underfloor heating and tiles in the hallway as it’s such a cold space). Watch this space.
Here a few pics of what the floors look like in our ‘finished’ home. I would say we have a rug in every space so at no point can you see a huge amount of the floor…
So, there you go; the story of our floors. I get messages every single week asking me how we restored them so I hope this is helpful in one way or another. Do drop me a line if you need to know anything I haven’t covered.