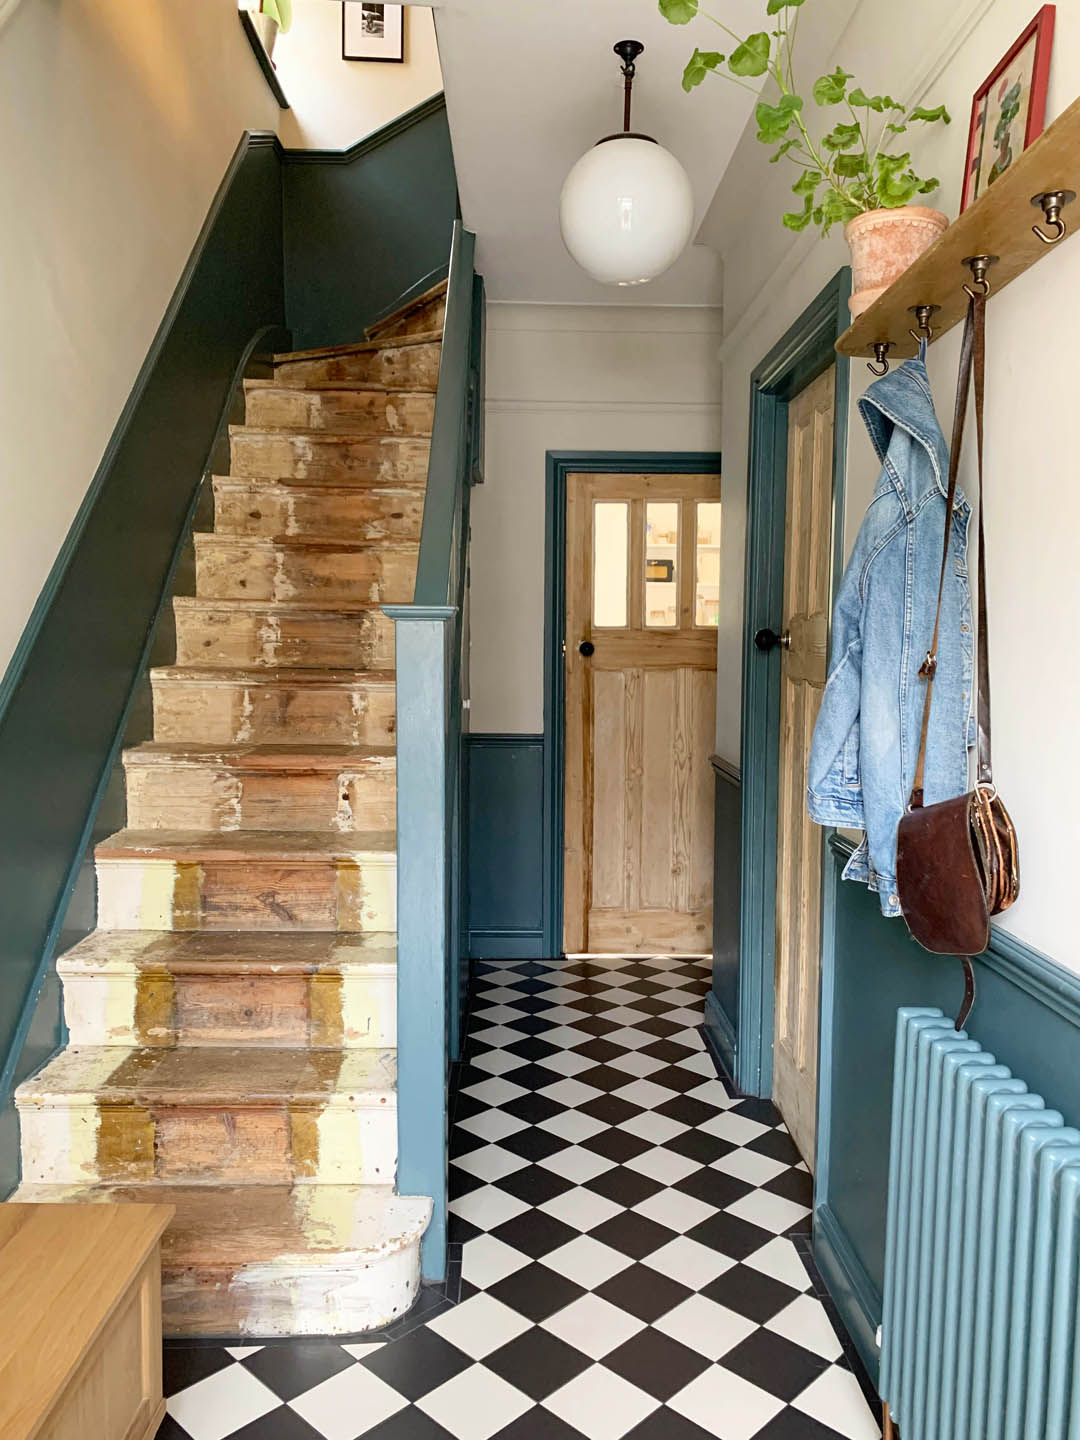
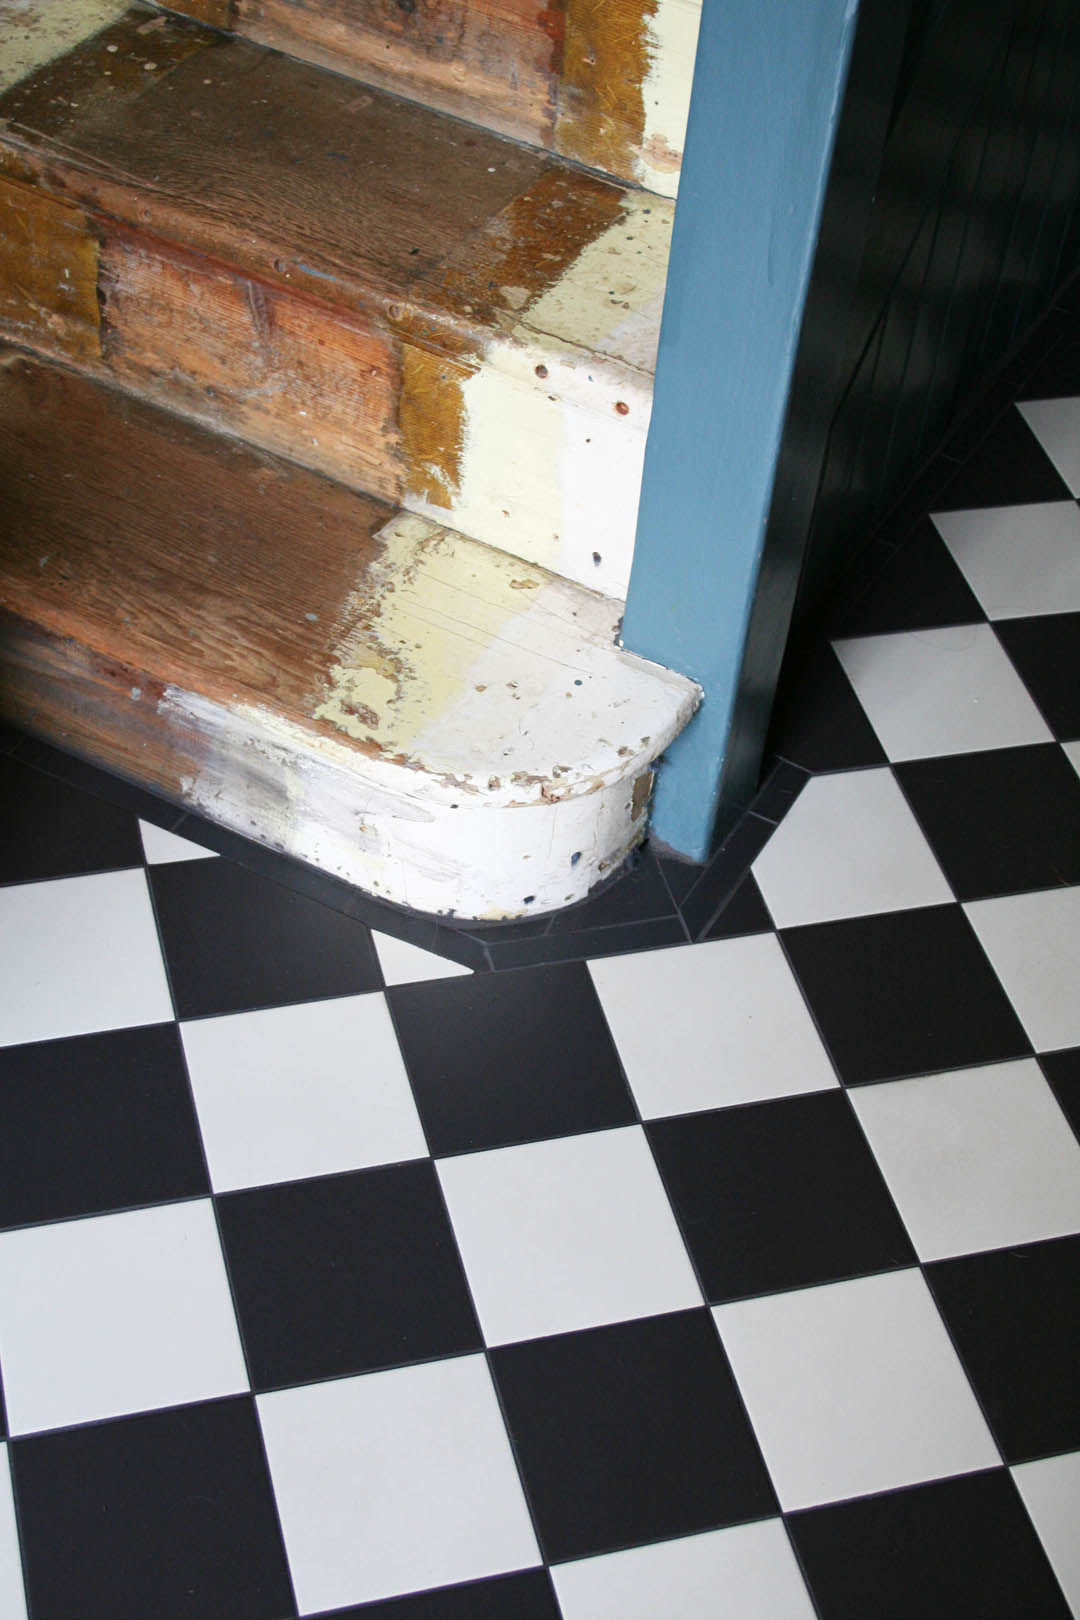
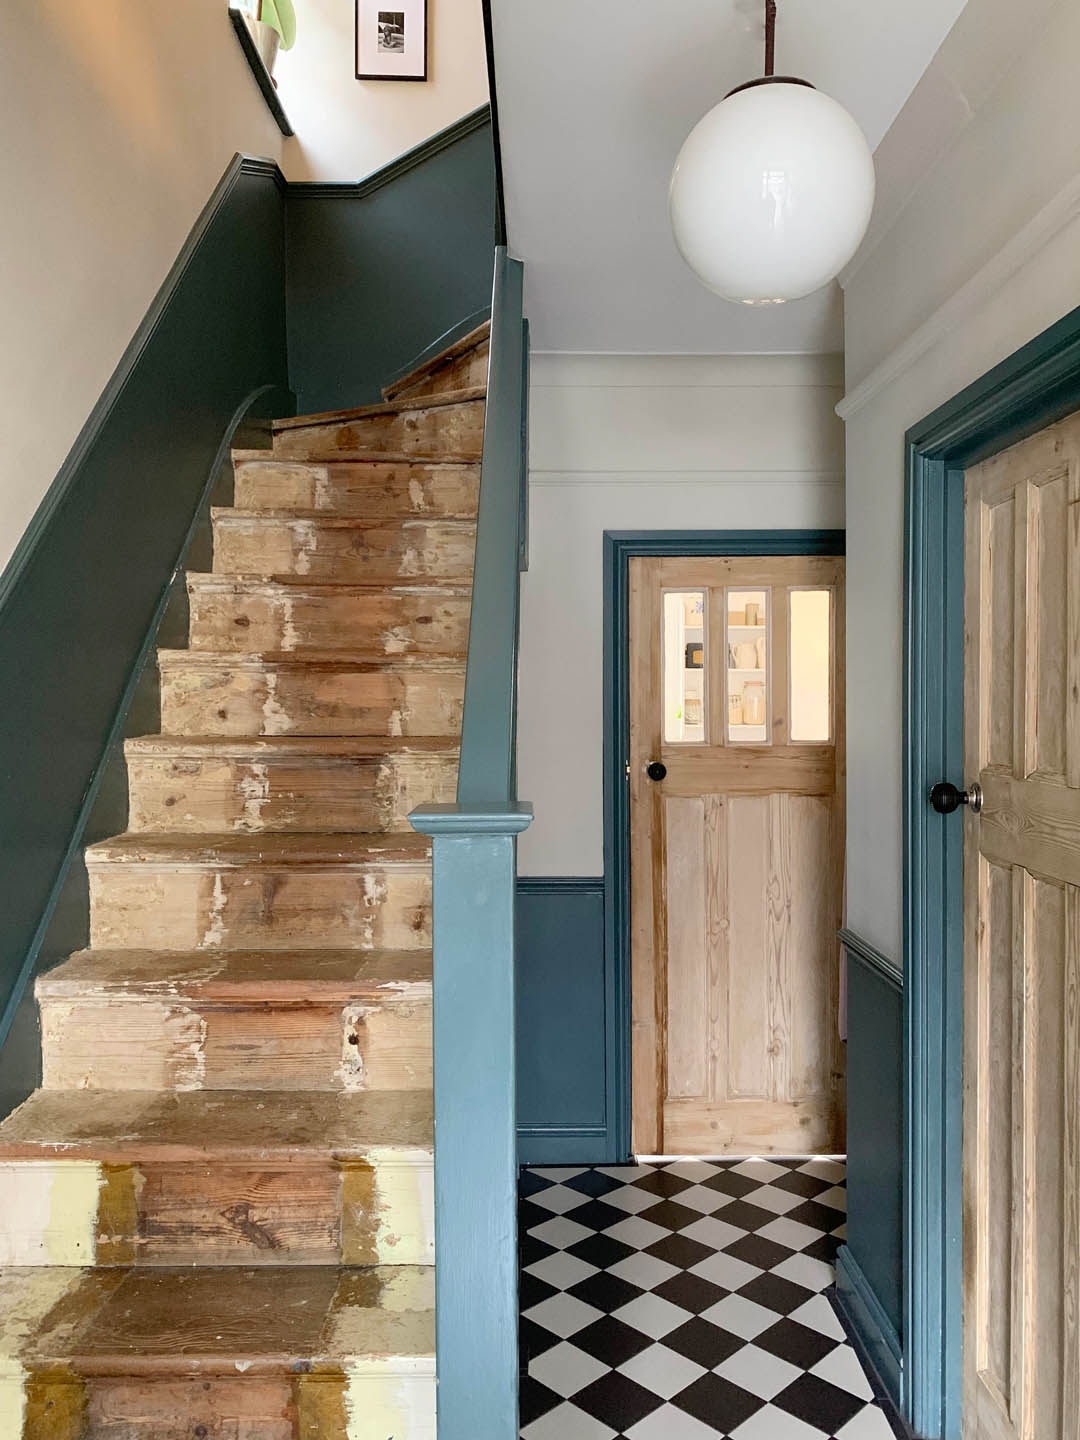
Our stairs are still languishing in their bare, rough, paint and plaster splattered state nearly eighteen months after moving in. Ideally I would carpet them in sisal or jute as I love the look and the colour and texture of natural carpets disguise the muck brought in by a big dog much better than a wool carpet. However, realistically, we do not have the budget for that – sisal and jute carpets are particularly expensive as the fitting costs are higher than other carpets as they have to be glued – and the only wool carpets I would consider (I always, always have to think of the dirty paws!) may be a bit too dark for the space considering the dark walls, front door and the fact the hallway doesn’t get a great deal of light. Therefore, I’ve been thinking about a more affordable solution using paint and I wanted to share some inspiration here as I often get asked about what we will do with the stairs so it seems a lot of people are in the same boat.
Carpet options
Choosing carpet and the way it is fitted is a bit of a minefield AND can cost thousands – literally! To give you a rough outline you can either have a runner and paint either side of it or you can carpet stringer to stringer, which basically means you carpet the entire stair covering all of the risers and treads. I prefer the way a runner looks, especially as you can choose to have the edges – the whipping – sewn in any colour you like. It looks very smart and you can use the colour you paint the rest of the risers and treads to contrast or tone in with the carpet; the options are endless really. However, you need to think about the disadvantages including the fact that the stairs will need to be painted, dirt and dust collects on the hard part of the stairs not carpeted and for us it may not work with a dog as he tends to walk up the side of the stairs so we would have to make sure the paint was very hard wearing.
I love how this stair runner looks, especially the contrasting tape. The stairs are painted in Inchyra Blue, the same as our hallway, so it’s a useful reference for me. I worry about having such a dark carpet not least because of the white dog hair in our house. Totally swooning over that floor too – that’s my ideal floor covering for our hallway. One day! Image via The Vawdrey House
This would work well for us as it’s very hard wearing and disguises dirt well however, it is very expensive to fit so not an option for us right now. Jute stair runner from Alternative Flooring naturals collection
My second choice would be this Striped stair runner as stripes hides dirt well but I’m still nervous about how well it would hold up to cleaning and big paws. Image via the gorgeous Come Down to the Woods.
This is a very inexpensive carpet that could be option for us budget wise. Striped carpet from Carpet Right Image via The Idle Hands (such an amazing Instagram account!)
Alex’s hallway is so beautiful and her blog post about choosing and fitting this gorgeous Wool stair runner with striped tape border is a very useful reference point. Image via The Frugality, whose interior style I love!
DIY paint options
For now, I think we’re looking at a DIY paint option as I’ve promised not to spend any money on the interior of our house this year as we want to do as much as we can afford to do on the outside of the house this year. Jules feels depressed approaching the house every day as it really is in a bad state so I’m willing to make the compromise. We would need to sand the stairs (urgh!) and I have Railings, Inchyra Blue and Light Blue paint that we could use but I think it would have to be on the risers only as otherwise it really will feel too dark. I also worry the paint will get wrecked in time.
We could do this with either Railings, Inchyra Blue or Light Blue but i do worry we won’t ever get a good finish on the treads of the stairs as they are in such a bad state and seem quite oily from previous paint jobs. Painted stair risers – Jérémie Blancféné
I love this so much. Such a clever use of contrasting colours. Painted pink stair runner Image via Making It Lovely
I do really like the look of Bare wooden stairs but the issue is we have too much wood in our hallway what with the floor and doors. it looks great here with a white backdrop. Smita Patel’s home photographed by Penny Wincer
Here is how our stairs currently look to give you an idea:
You can see how much work needs to be done to the stairs.This was taken just after we moved in.
I’d love to hear from anyone who has a carpet or paint job that has withstood a lot of dirt and dogs particularly!
For a long time now, I’ve been trying to convince Jules to create our ‘five year plan’. Sad, I know, but I’m a bit of a control freak and like to know where I will be and what I will be doing in the near future (even though I know, through experience, that plans never work out the way you want them to).
This weekend, I have finally managed to pin him down to agree to buying a house in the next year. This decision has mainly been influenced by our new puppy, Otto, who needs a garden (I knew this would happen, hence agreeing to get a puppy !). The idea of having a house – hopefully a period one – and being able to decorate and furnish it, is almost too exciting to bear. So, I am going to begin by dreaming of stairs…
When you move into a new house, there is always work that needs to be done and money that needs to be spent. You have to prioritise and make compromises and I am always looking for ways of saving money, whilst making my home as nice as can be.
We are currently away for a week, so I am unable to make anything or take photos of my own, so I am going to show you some stairway inspiration that I have found from Pinterest. All of these ideas are achievable, cheap and relatively easy and would be a good place to save some precious money when moving into a new home.
Inspiration…
The first idea is to use wallpaper to decorate stair risers. Sarah Mooreis a vintage designer and writer and here is an excerpt from her book Vintage Homewith a tutorial for these gorgeous stairs:
You will need:
Tape measure
Pencil
Metal ruler
Thick card for template
Scissors or craft knife and board
Selection of vintage papers
PVA glue and brush
Clear acrylic varnish
Tutorial:
Measure one of the risers in the middle of the staircase and use the dimensions to create a card template using scissors or a craft knife and board. Check that this fits on all the steps – the first and last often vary slightly.
On the back of your wallpaper, draw around the template, then cut out the pieces. Measure and cut out any risers that vary from the template.
Make sure the stairs are free of dust and any loose particles, then paint one riser at a time with a thin layer of PVA glue and smooth the paper in place. Push out any air bubbles or creases towards the edge of the stairs. Pay particular attention to the edges, ensuring that they are glued in place.
Wait until the glue is totally dry, about 24 hours, then cover the surface of each riser with a light coat of clear acrylic varnish to protect the paper.
Other ideas…
I love the simplicity of this hallway and the striking addition of colour to the banister rail.
This is a great idea, instead of spending a fortune on a professionally fitted stair runner. This grain sack fabric is tough and hard wearing and can be attached using glue. Stair runner tutorial here.
I did a post recently about paint effectsand this is a good example of how playing around with colour can be an easy way to add interest to any home.
A cheap, stylish alternative to a traditional stair runner. I like the colour a lot.
Or, just leave the middle of the stairs natural wood, which ties in well with the beautiful banister.
A little more tricky to do and very time consuming. Would definitely be a talking point.
By painting the stair risers the same colour as the walls, with a different tone for the treads, creates a clean, simple look.
Now, I’m off to traipse through Right Move…I’m sure I can get a year down to six months. Jules is going to regret entertaining this idea. Ha!
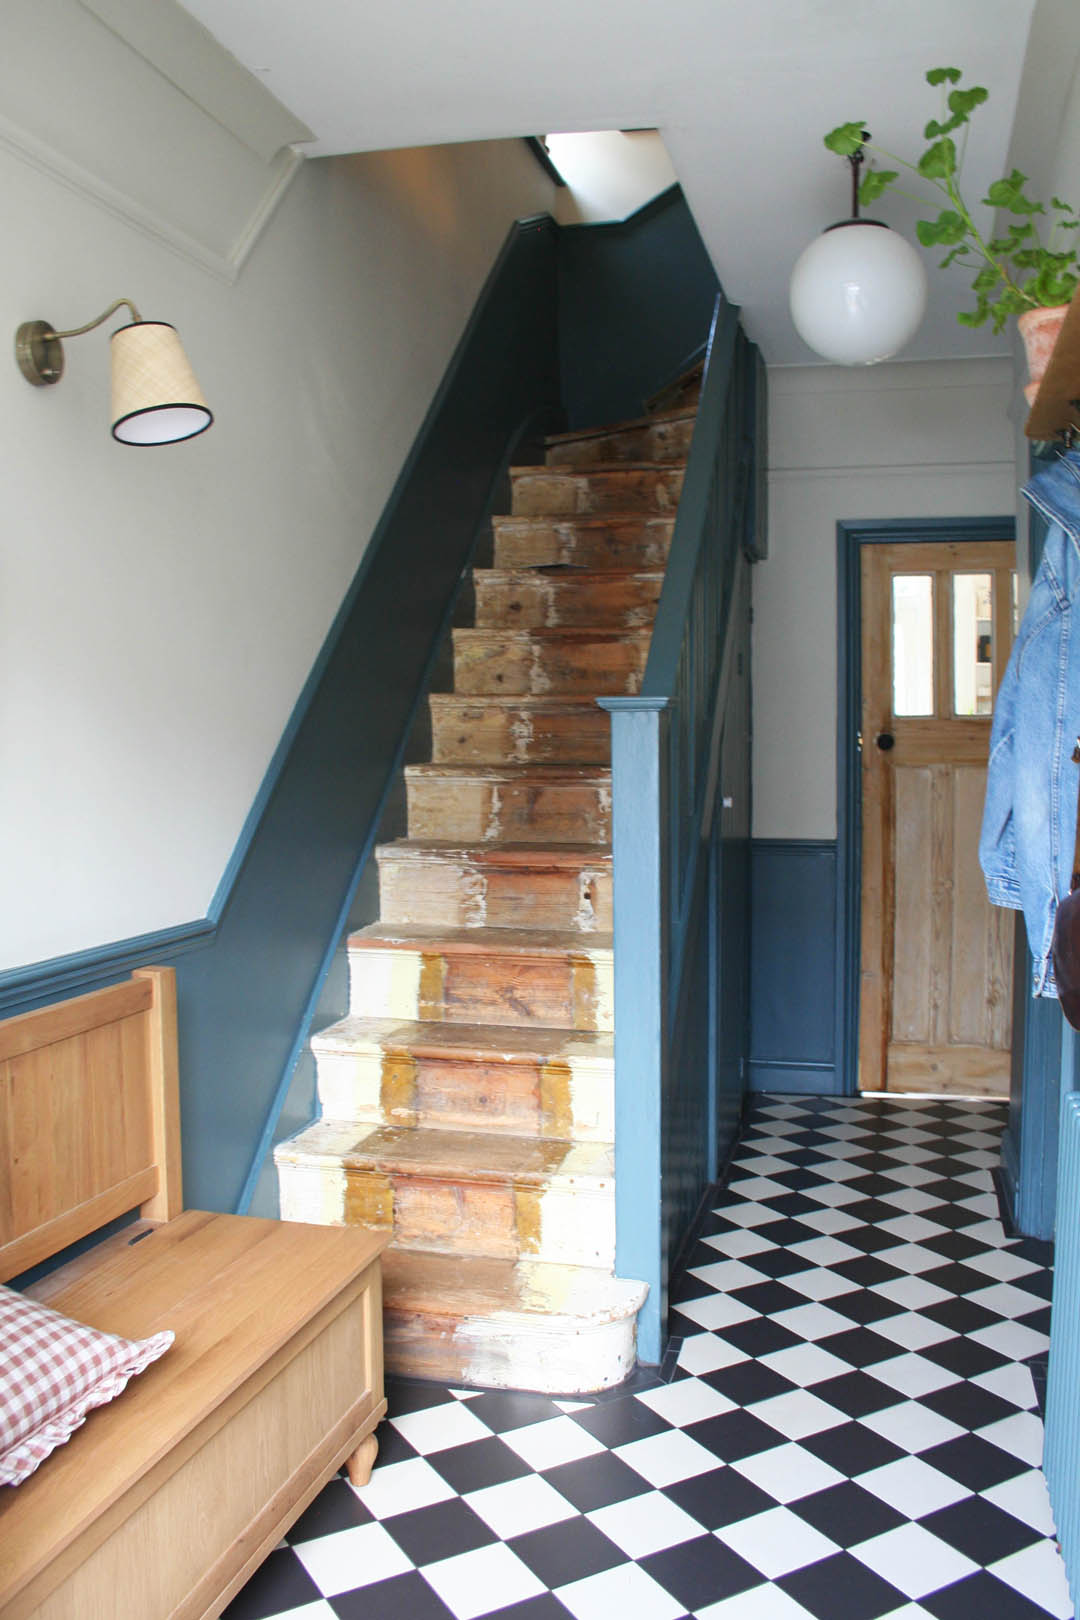
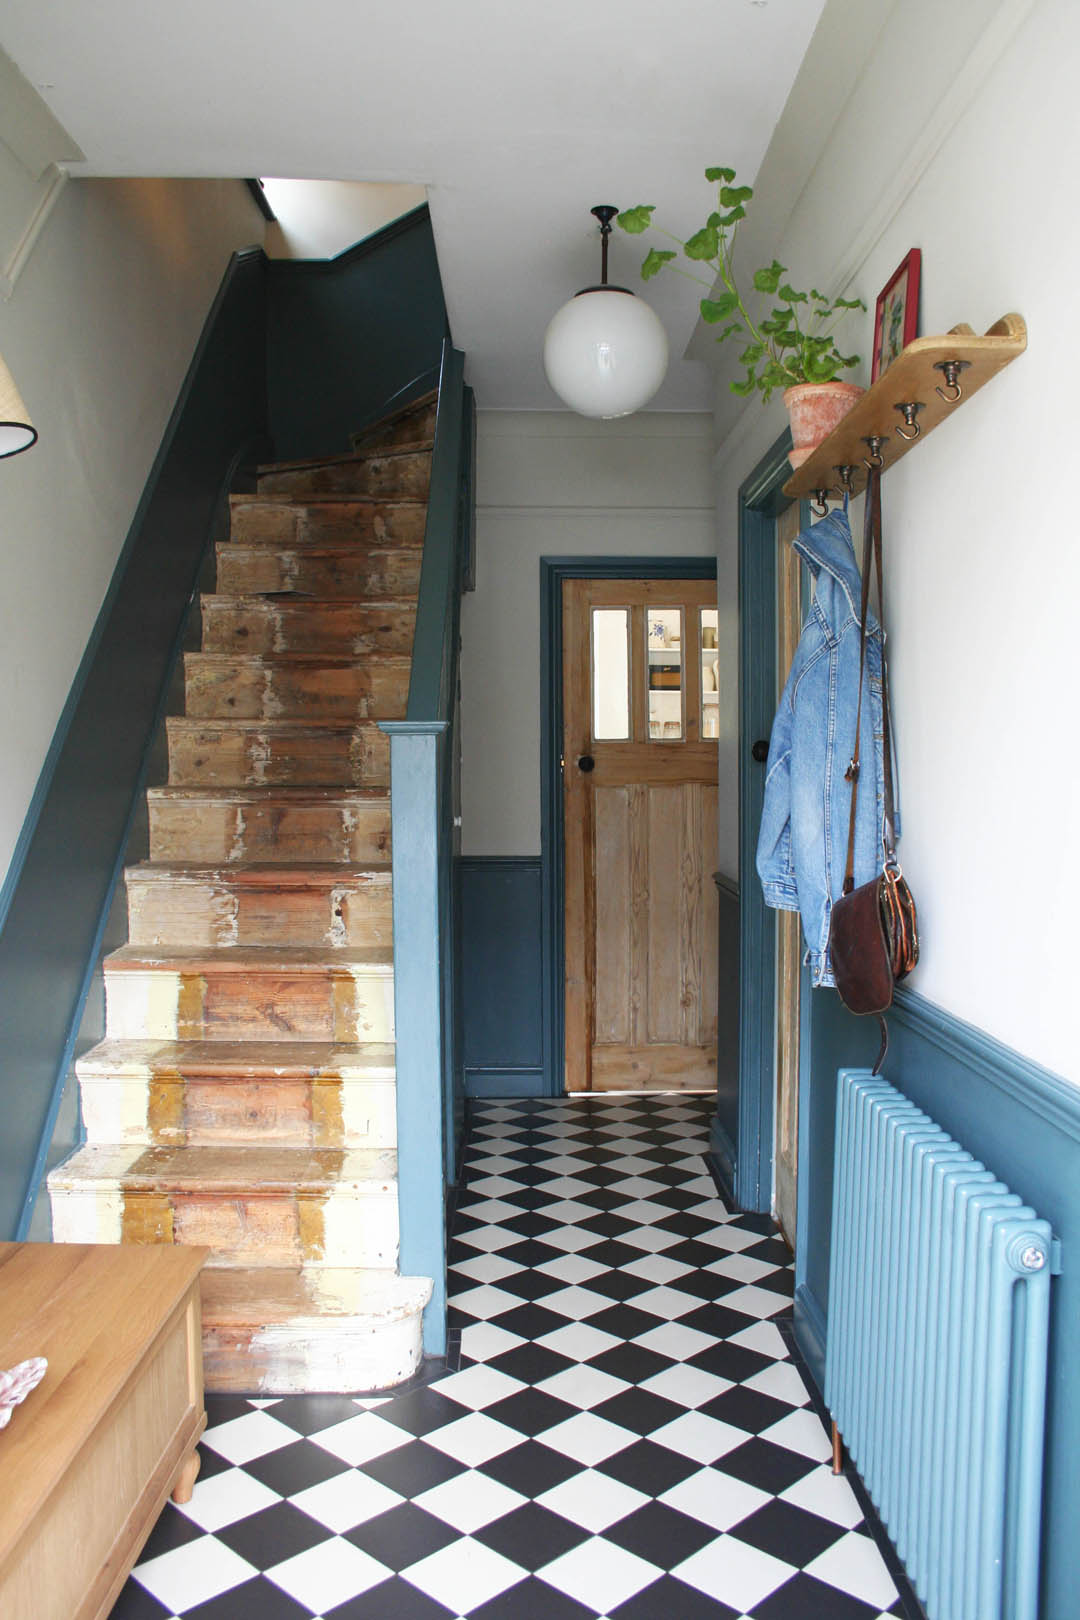
Our hallway was never finished after our initial renovation three years ago as we ran out of funds. It’s been a case of waiting patiently not only to make the space look nicer but to add the much, much needed underfloor heating as our hallway is FREEZING due to draughty floorboards and the external wall on to our side access. We can now finally warmly (literally!) welcome people into our home and coming home ourselves to a warm space is a game changer. Let me chat you through what changes we have made.
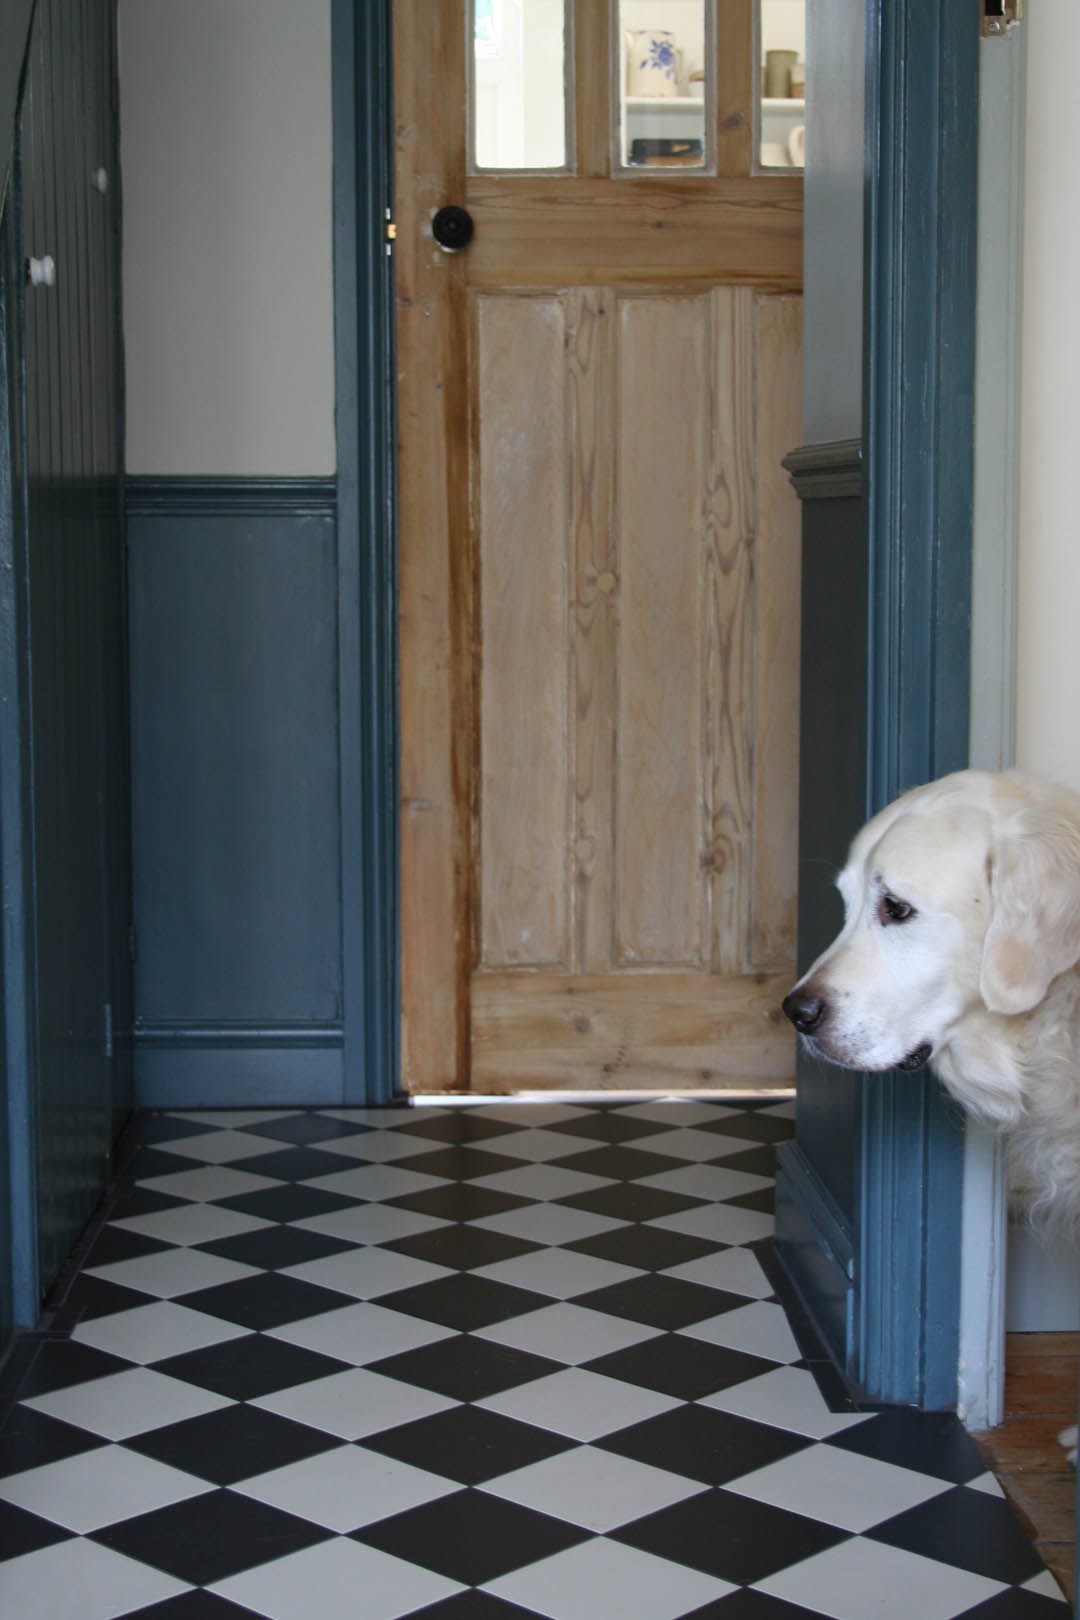
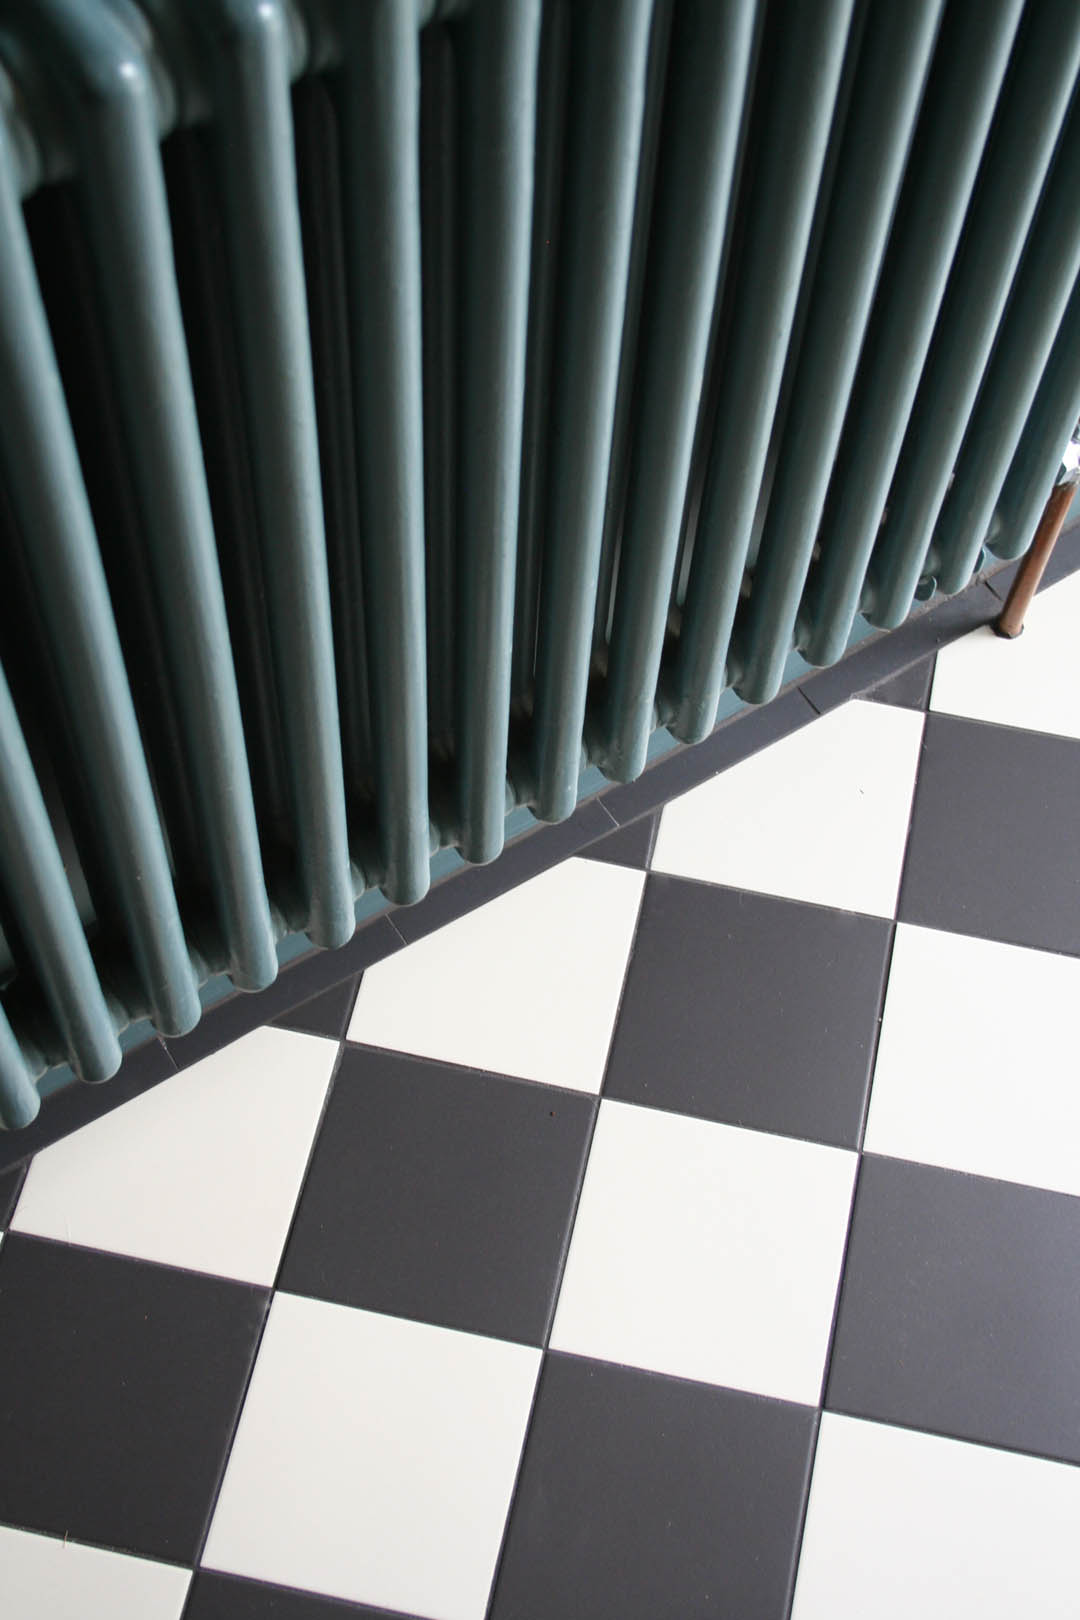
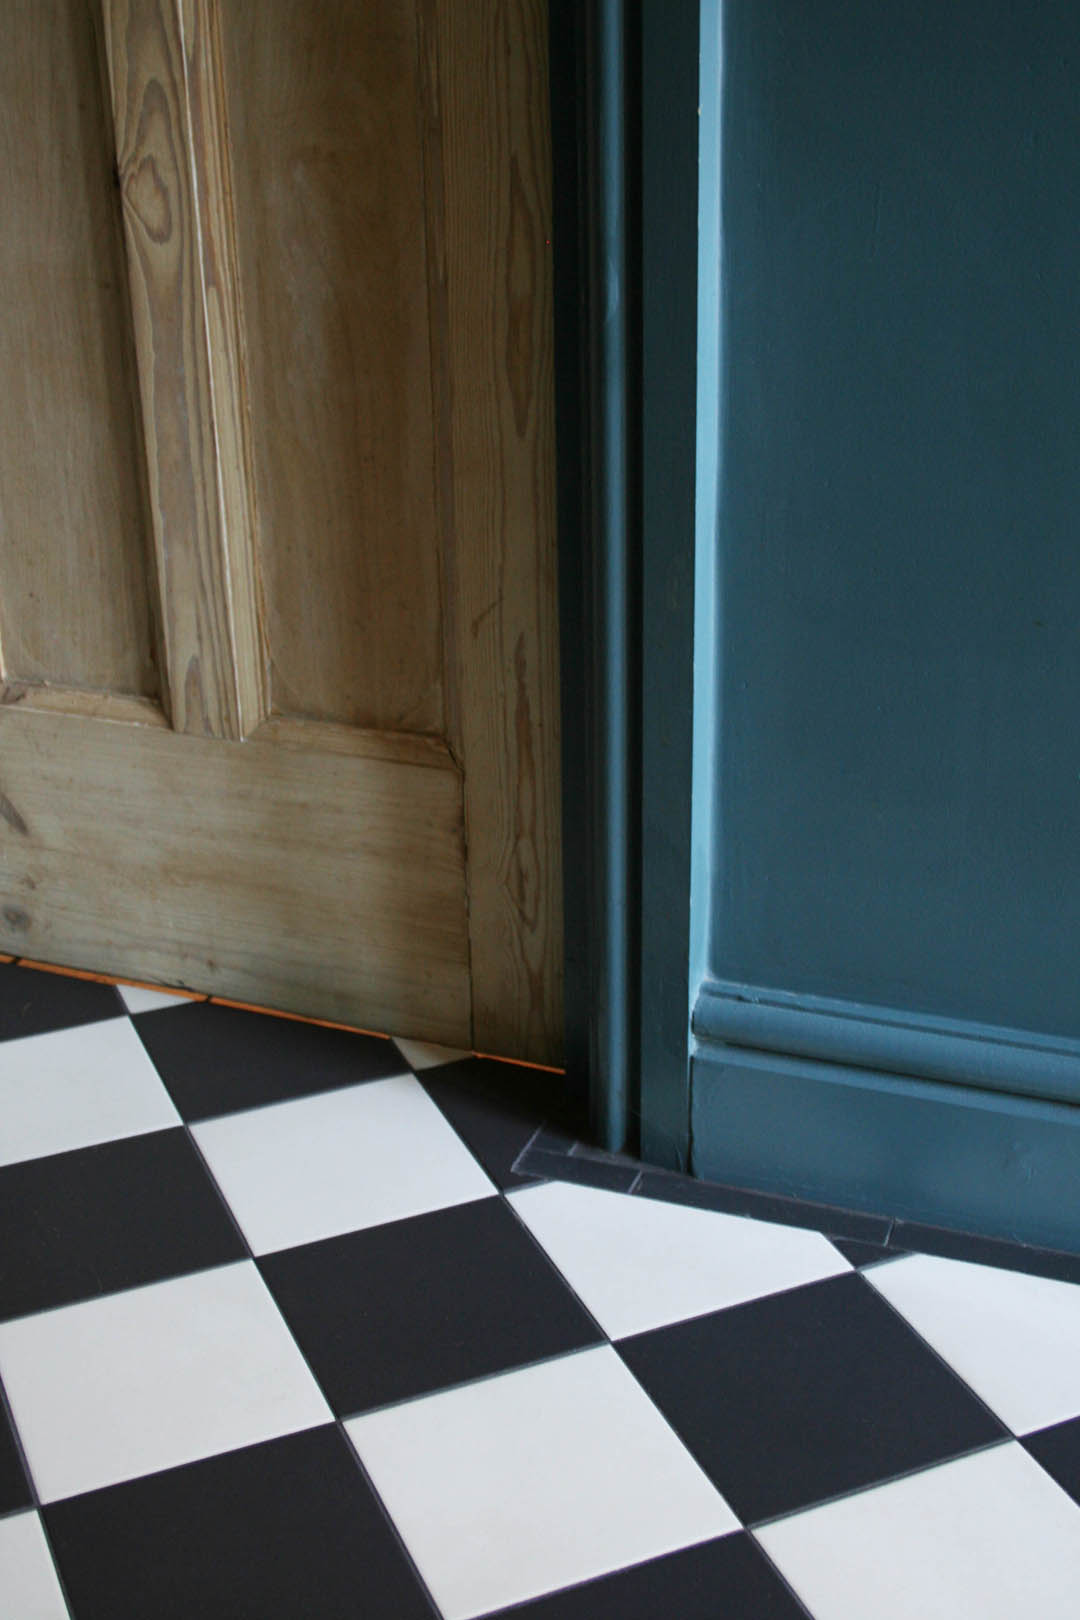
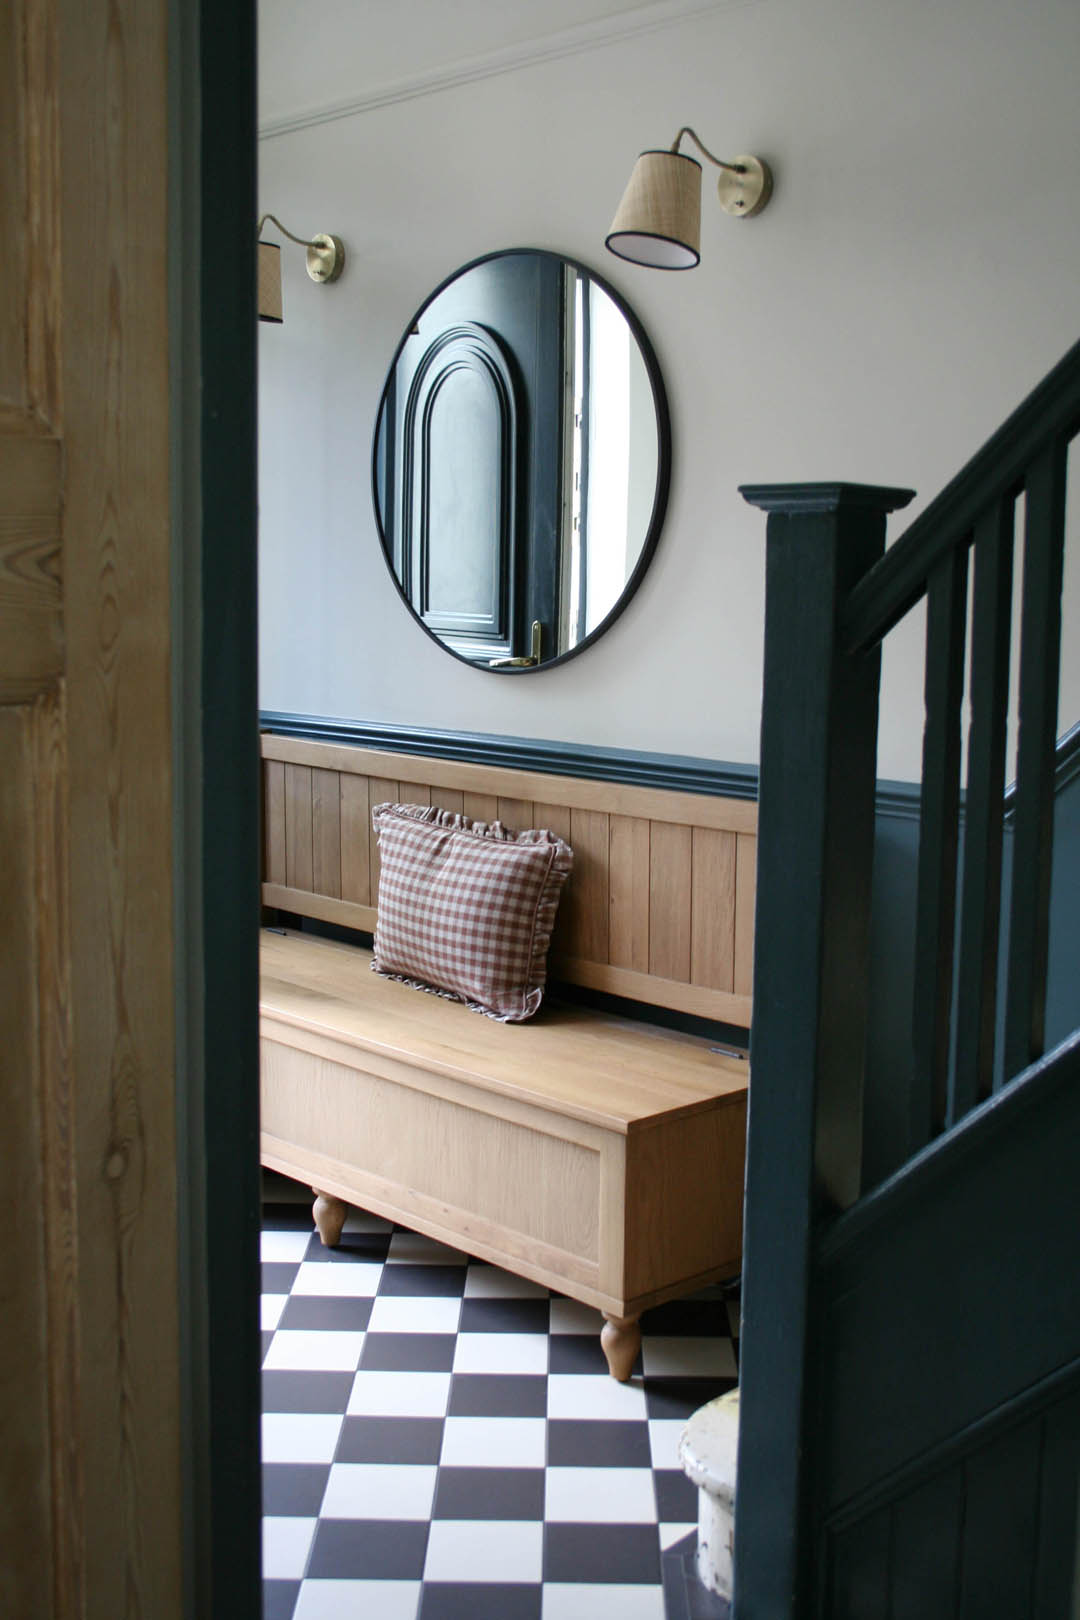
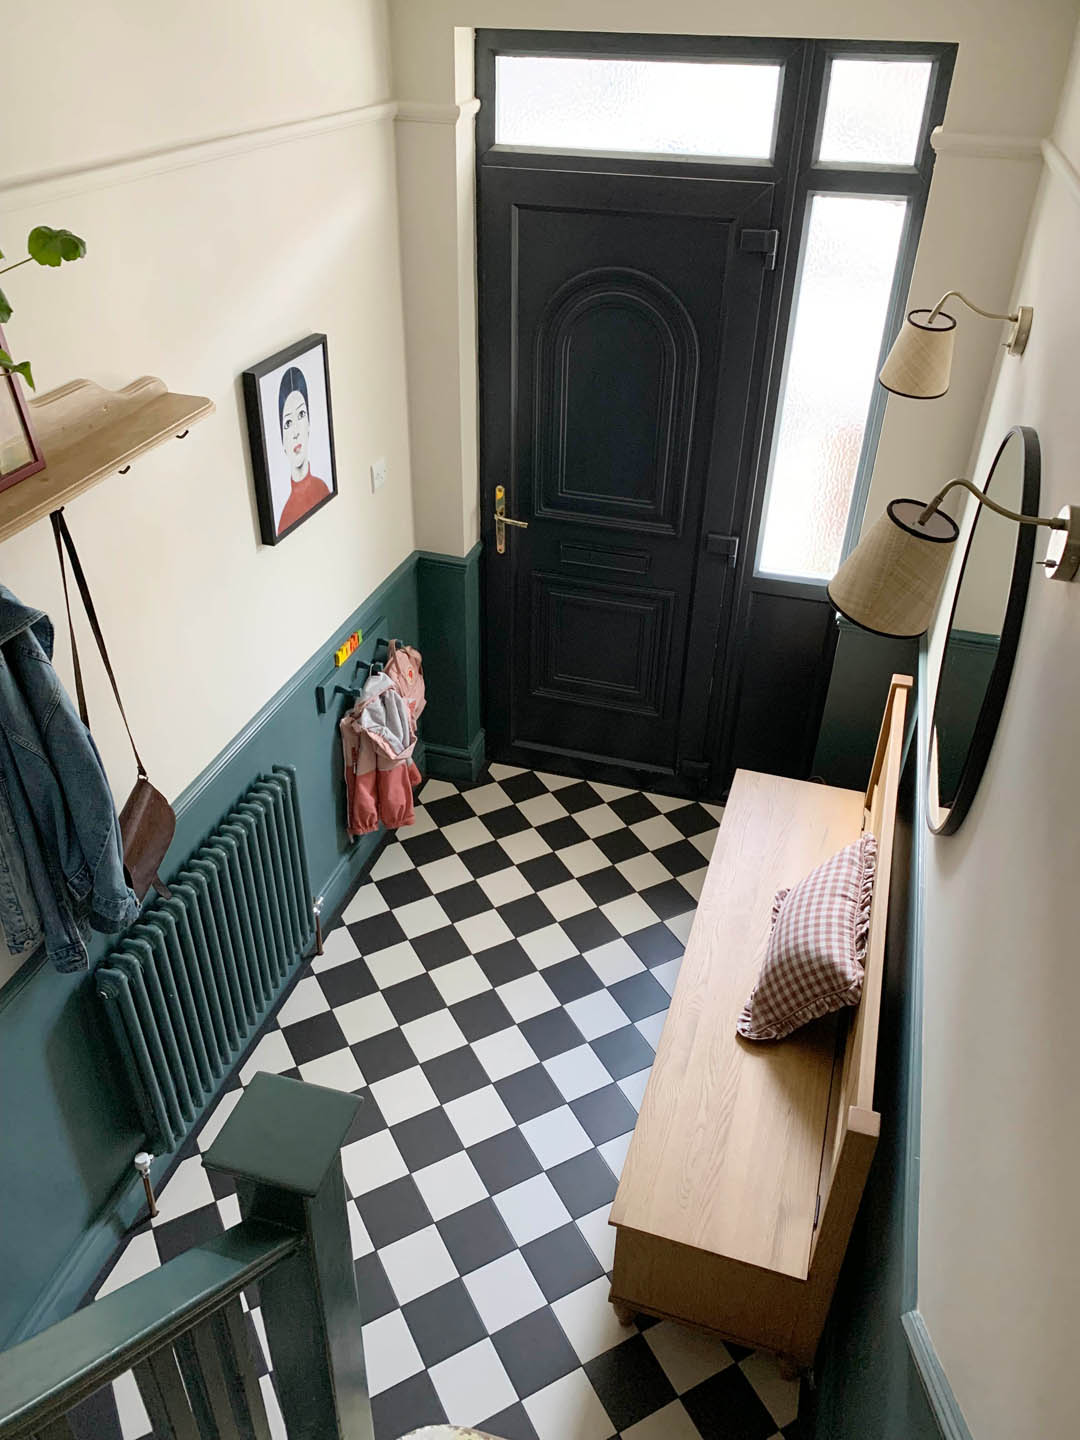
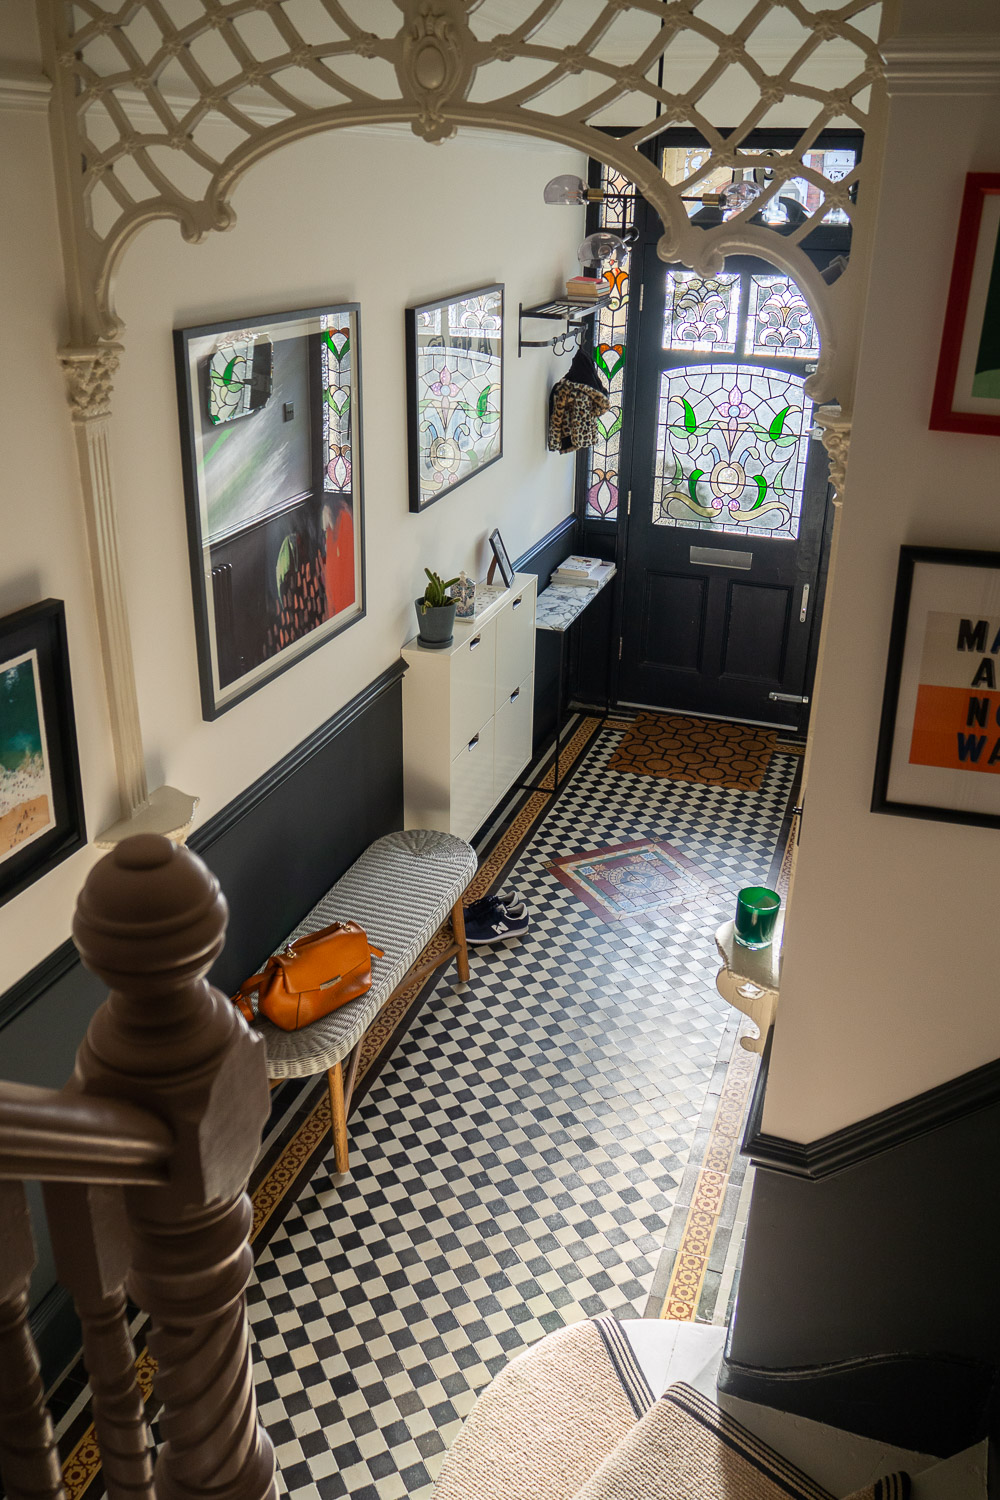
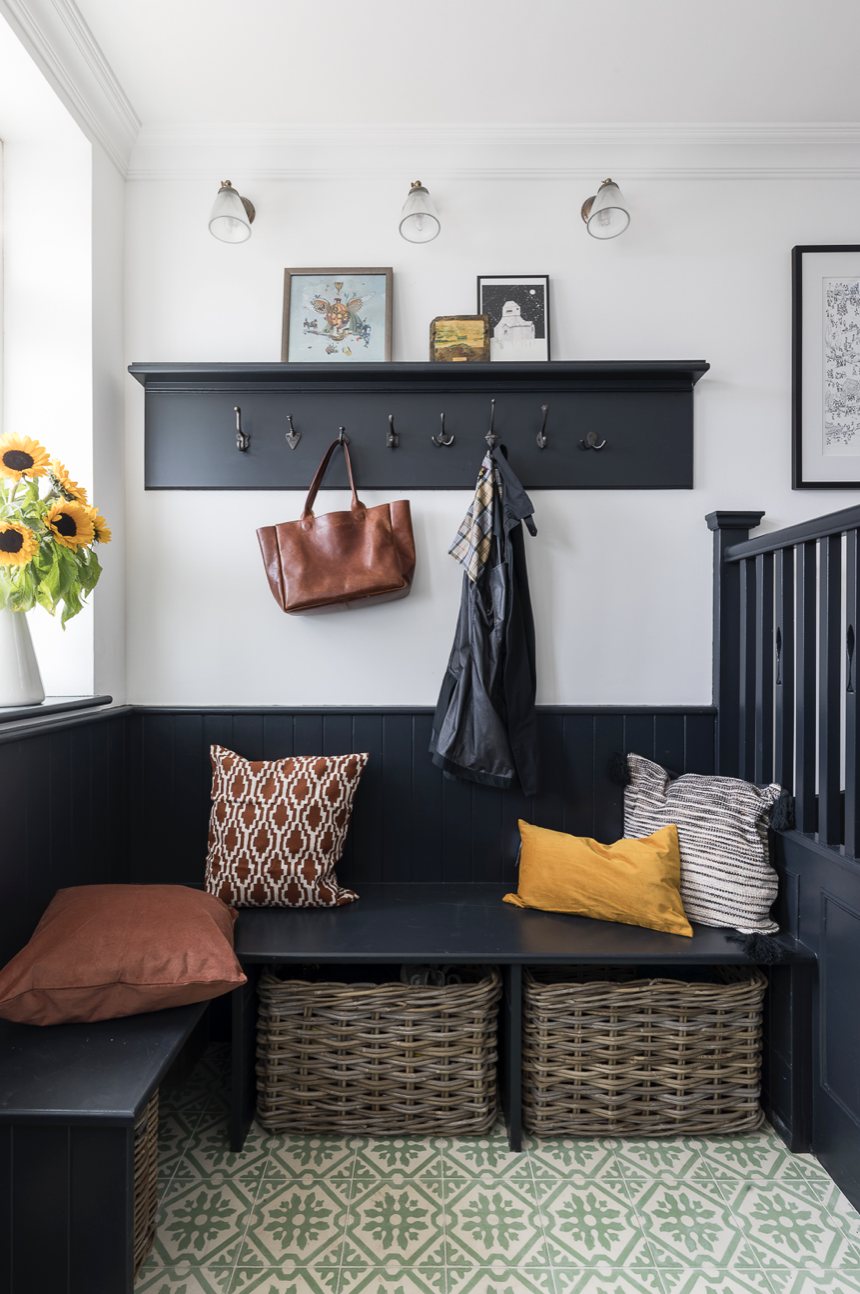
First and foremost on the priority list was to install underfloor heating. This meant we would have to cover up the original boards, which was just something I had to accept as I would have loved to keep the boards and have a lovely kilim rug BUT practically speaking this was just not an option. Underfloor heating and tiles were the answer to make the hallway significantly warmer and easily cleanable (having Otto in mind, as ever). I’m very happy with our tile choice – Black and White Victorian Quarry tiles from Walls and Floors* (PR product). Considering thirties properties were not traditionally tiled I didn’t want to choose anything too intricate or Victorian and I really didn’t want anything too contemporary as it’s just not my thing. I feel the black and white quarry tiles are classic and importantly they certainly won’t date. They will also enable me to change the decor in the future (I envisage a plaster coloured hallway in a few years!). They are so easy to clean and the black grout means they won’t end up looking mucky like some encaustic tiles and lighter grout can do. Importantly for me, the Victorian White Quarry Tile is not brilliant white but rather an off white that almost directly matches the Shaded White paint on the walls. This makes a huge difference as the white tiles don’t feel as stark as bright white ones can so I’m very pleased about that. The other bonus of these tiles is that they stretch out the space and make it feel so much bigger as well as reflecting the light so it really has a different feel to the old wood that absorbed all the light. They’re perfect.
Our tiler was very impressed with the quality of the tiles and how easily they cut , which makes the fact that they were the least expensive tiles that I sampled even better! Our tiler did a brilliant job as I asked for the tiles to be laid in a diamond formation as I think that makes them look more traditional but it makes laying them much more difficult. I chose to buy a small border tile to go around the perimeter of the space to add a traditional touch but border tiles are very expensive so even though I wanted a thicker border comprised of two or three tiles there was no way we could afford that. The border tiles I bought were black individual rectangle tiles 150x25mm and they are exactly the same texture and colour as the black square tiles we have used in the main area. The black Mapai grout is brilliant as our walls aren’t straight and there were quite a few kinks to work around so where there were gaps the black grout fills in so well.
We did discuss with our builder the option of removing all the skirting (that we had put on new three years ago) and removing all the original boards but in the end we opted to keep the boards and use a more expensive UFH system called Schluter. This did mean that we have ended up with less skirting as the level of the floor is higher but it really isn’t noticeable. It also meant far less labour for the builder so the whole job ended up being £1700.
Three weeks in and the combo of UFH and tiles is dreamy. I still can’t quite believe I’m able to walk around in socks in comfort and Mimi lies on the floor every morning whilst I faff around trying to get us both out of the door. Otto is also a massive fan and has been really enjoying his new napping spot. We’re all very, very pleased!
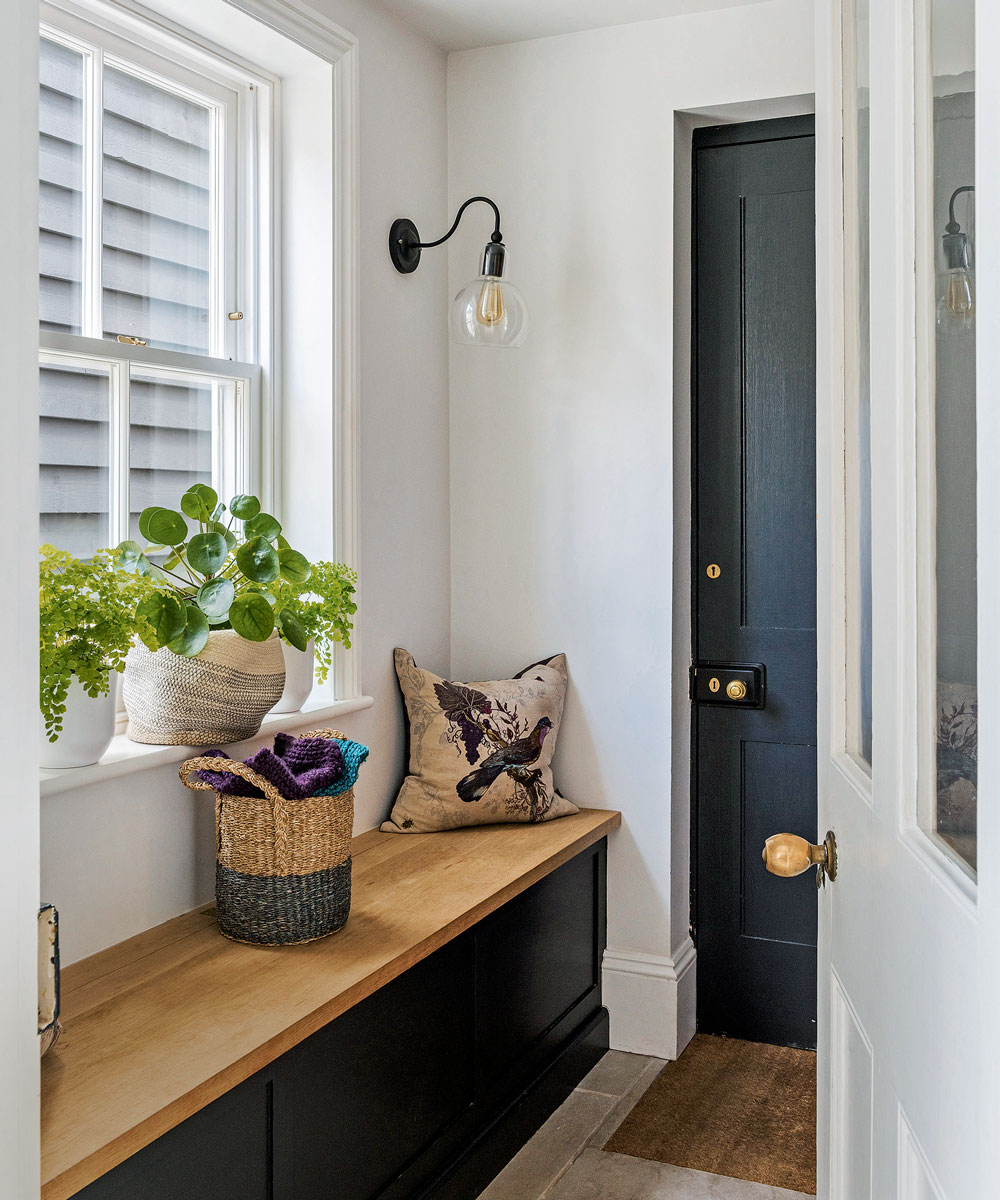
Storage and seating
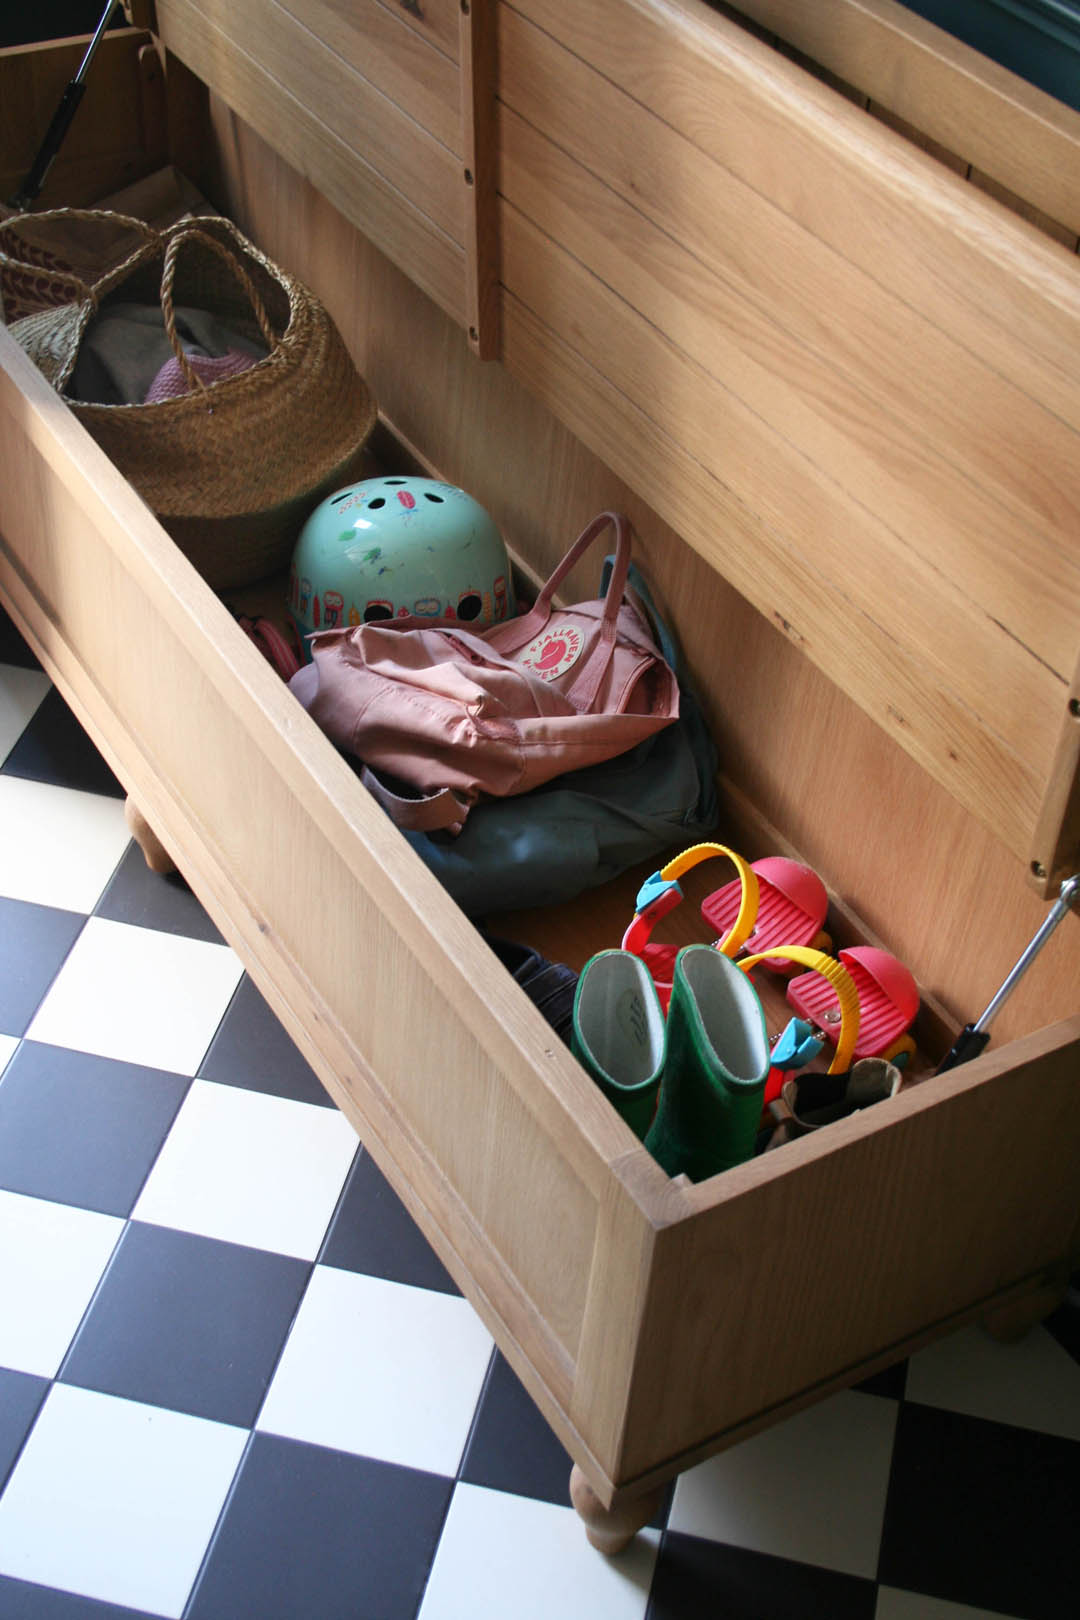
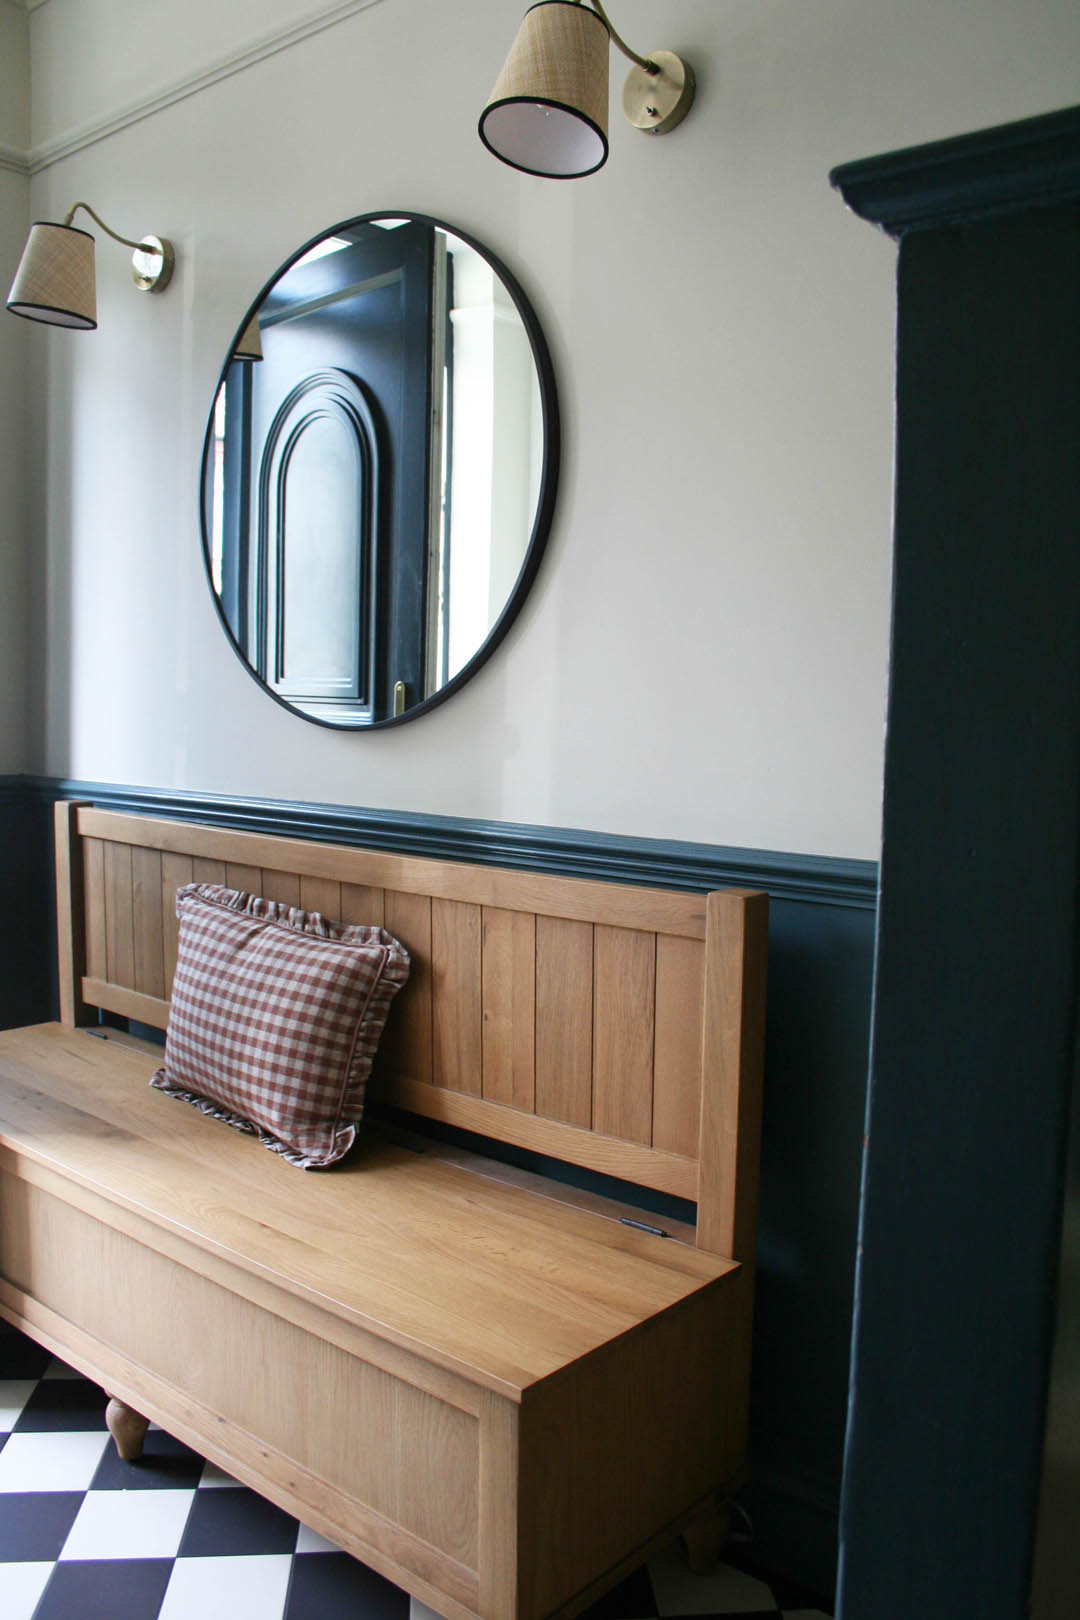
The next big change I wanted to make was to remove the ‘temporary’ console storage table I bought secondhand three years ago for £15. It always looked so untidy as the storage was open and we always ended up going into the sitting room to change our shoes as there was no where to sit. Therefore, I was very sure that I wanted a storage seat and I did have a good look at antique options, specifically Hungarian settles, but generally they are either too big or too small for our space. They also have very high arms, which can make a space feel more cramped, and often the storage seat isn’t fully acessible. I did find one but the seller let me down so I was thrilled to come across this Elkstone Oak Monks Bench from The Cotswold Company* (PR product). Not only is it the perfect length but it has no arms, which makes it feel far less imposing and we can perch on the end if necessary. Also, the entire seat lifts up so there is SO MUCH storage as well as a soft closing function. We can now store woollens, bike helmets, excess shoes, shopping totes and all those other bits and bobs that are unsightly but need a home in a hallway. We are going to try and find some dividers to make the storage more organised. We can just tuck every day shoes under the bottom of the bench too as it stands on legs. It’s completely ideal.
The Cotswold Company have a huge amount of hallway furniture and accessories and I have to say it was up there with one of the best furniture orders/deliveries I have experienced. Not only was the bench ‘in stock’ so no huge lead times but it arrived about two days after the order was placed and the delivery company was brilliant; great communication, changed the allocated day for me with no issues and they were super careful when they made the actual delivery. The packaging was great and there wasn’t a single quality issue, which if you order furniture regularly you’ll know is extremely rare. Anyhoo, having a seat in the hallway makes everyday life much easier and we’ve found when guests come they are much more likely to leave coats and bags on there rather than bringing them into the sitting room, which is something that drives me a bit mad (just me?!).
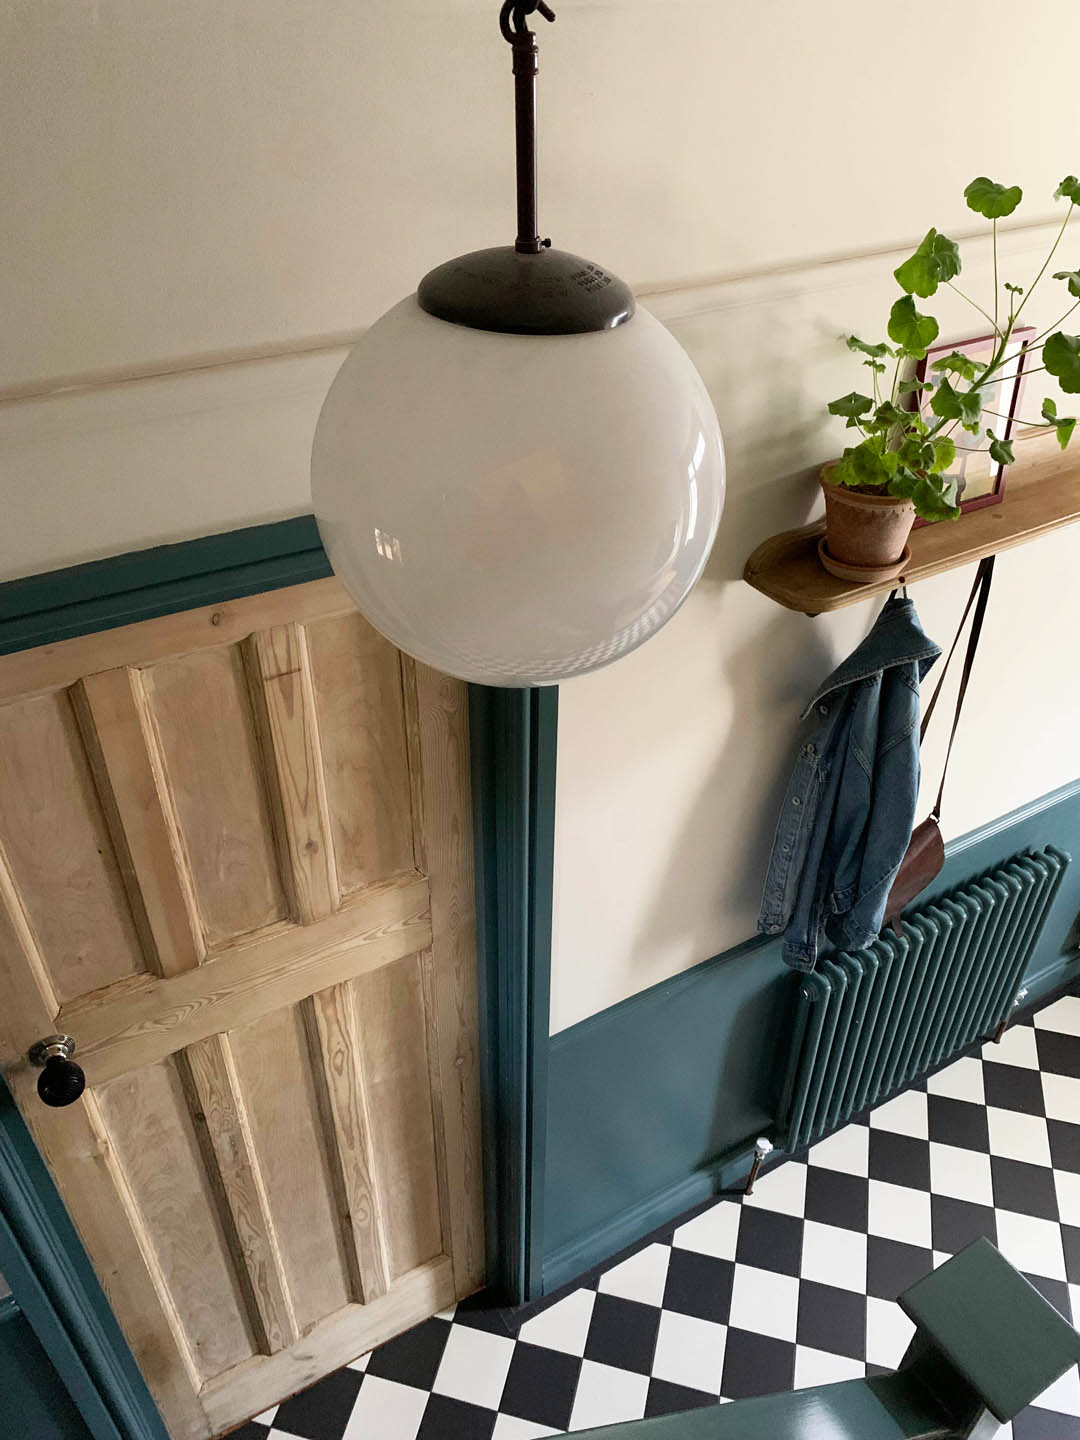
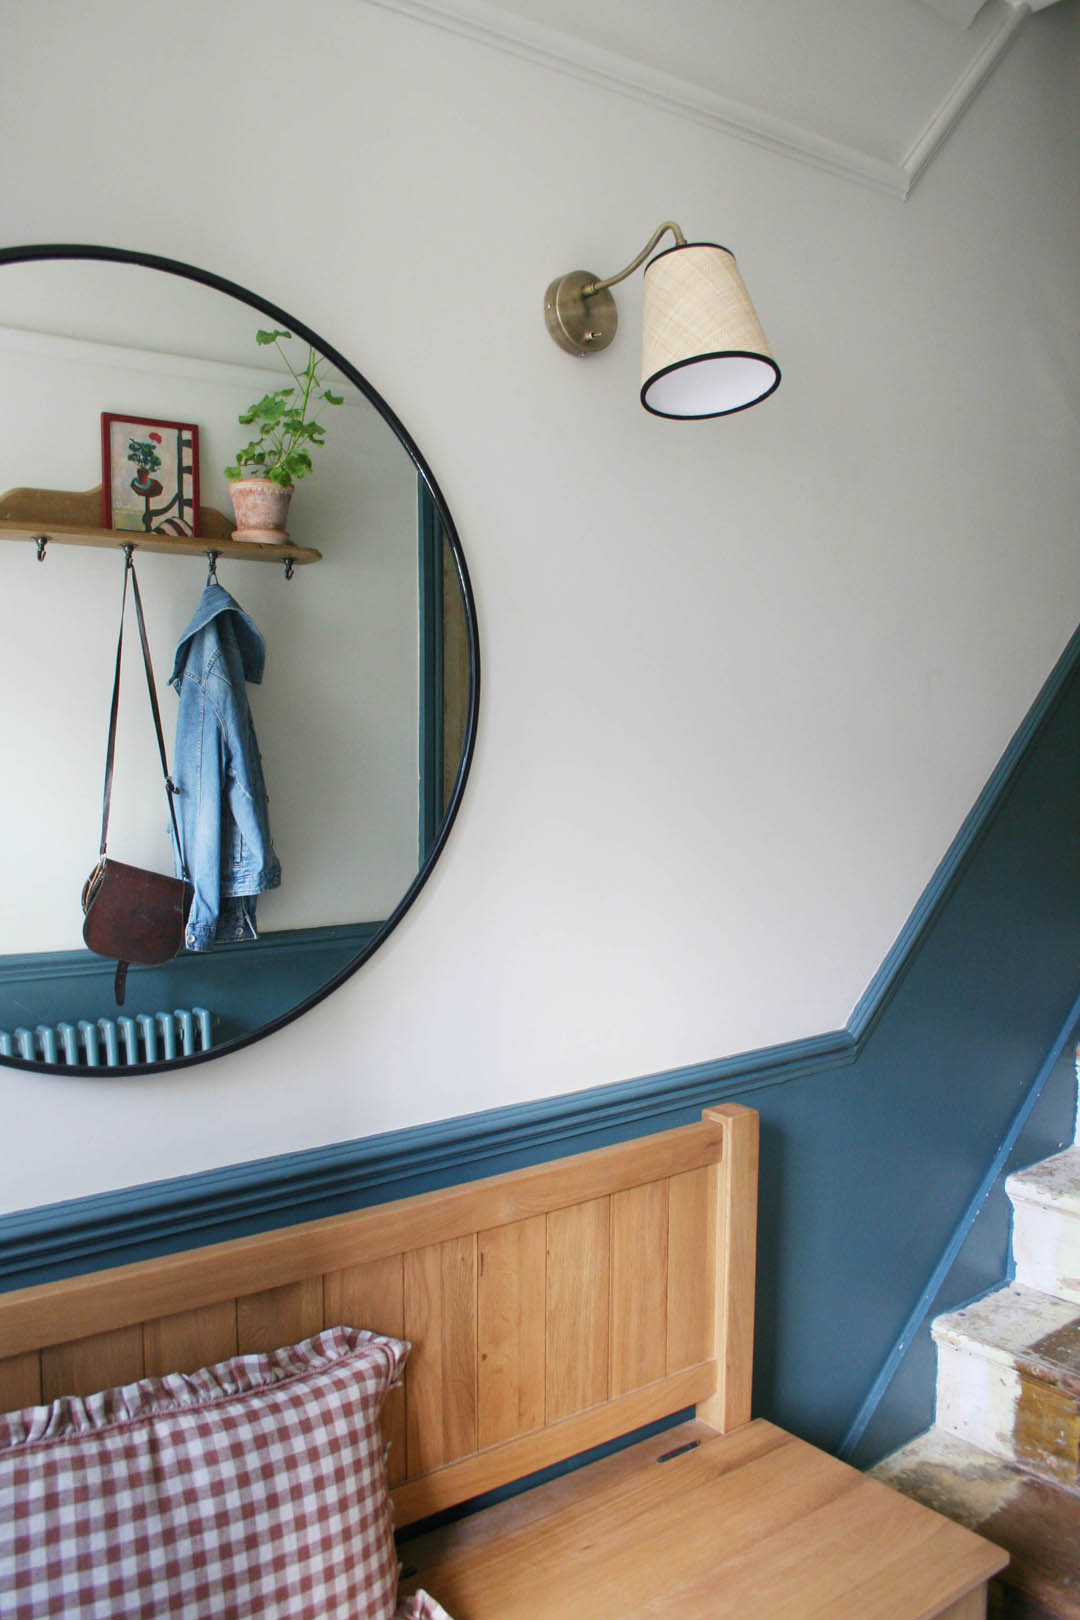
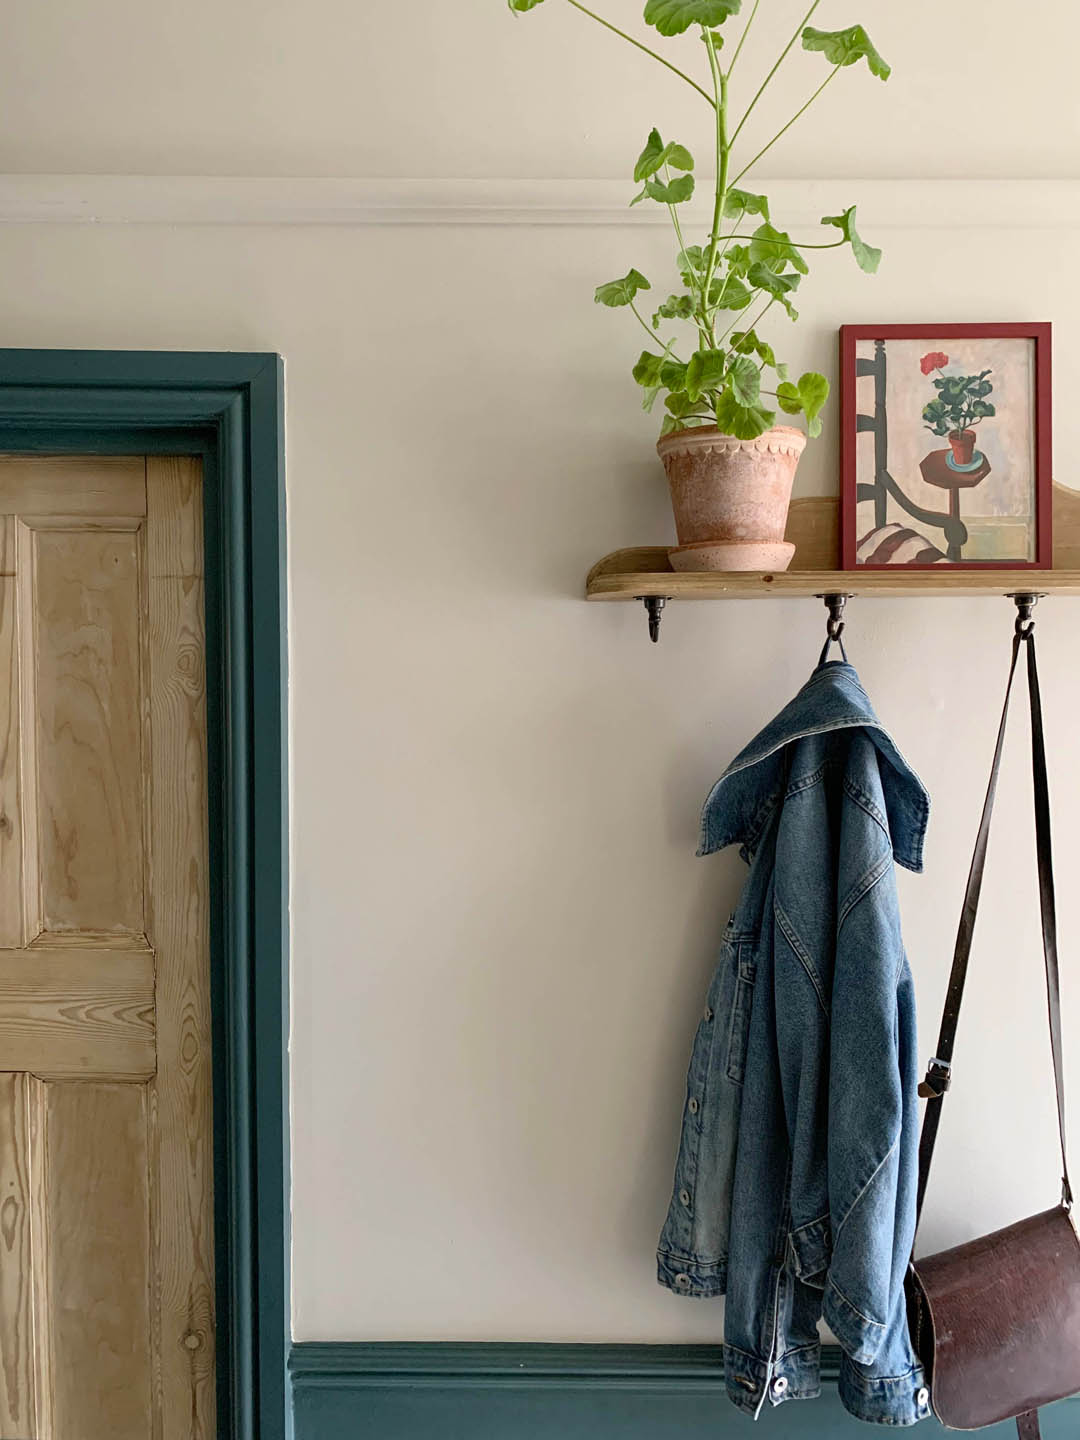
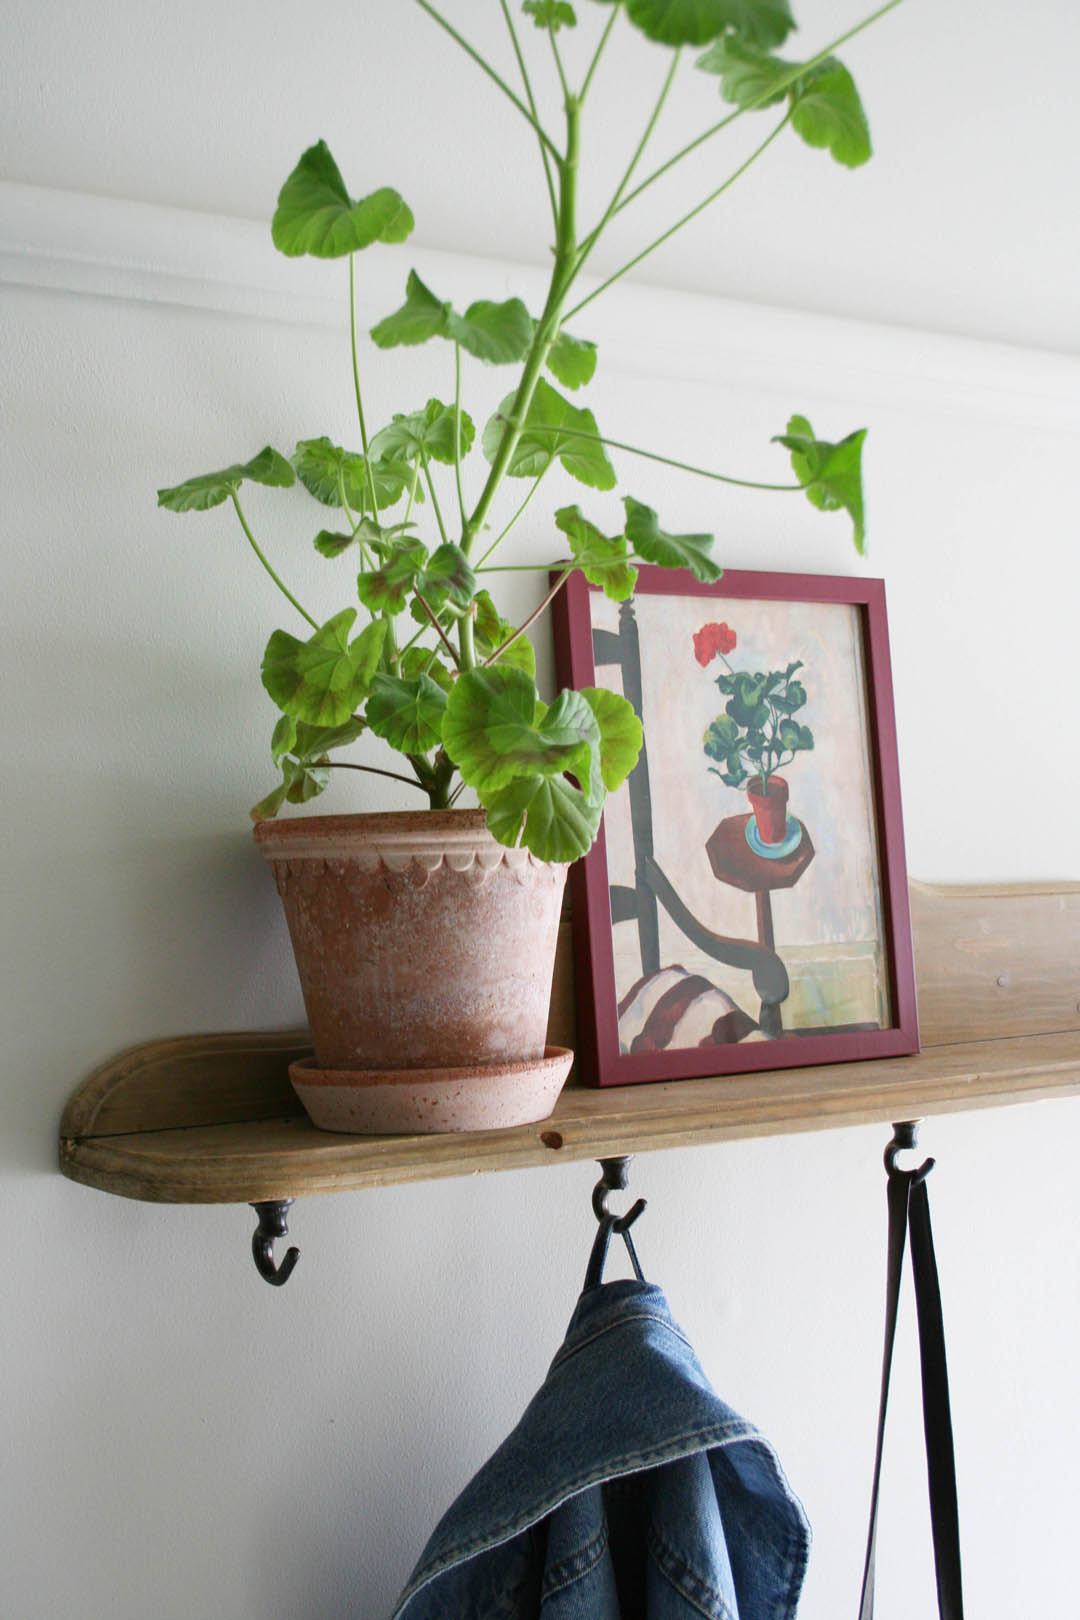
The other storage we added was a little street find shelf that we had mounted as a shelf below a mirror but I realised that if we turned it upside down we could add some hooks and use it as a peg rail and the shelf above is very handy for glasses etc.
Wall colour
The woodwork has stayed exactly the same and was painted Inchyra Blue three years ago. I still really love it. However, one big budget saver we made was agreeing to have all walls in the house painted brilliant white. I knew I would change them slowly as we got to know the house and I’ve actually really enjoyed the process of taking my time. I painted the walls myself before the tiles were laid and chose Shaded White to complement the Inchyra Blue (both Farrow & Ball)and bare wood of the doors. It brings so much more warmth to the space. I haven’t painted the ceiling yet (the brilliant white really sticks out like a sore thumb to me) but maybe after Christmas! I decided to paint up to the cornice as that makes the ceiling feel higher and as it’s not a nice cornice it doesn’t emphasise it more than needs be.
Lighting
A huge priority for me was to improve the lighting in the hallway during this process. I’ve been desperate for wall lights to add some really warm light so I asked the builder to add a plug socket behind the bench which cost £100. I didn’t want to pay more to have the lights chased in and a socket gives flexibility if we ever shift things around or want a floor lamp, for example. I found relatively inexpensive wall lights on sale although I share the link with the warning that they come with plastic cabling (that I’ve removed in order to change it), bright white lampshades and euro plug adapters (so I will have to add UK plugs when I re-wire them). However, even with new lampshades, new cable and plugs they have still worked out about half the price of what I would have paid for an equivalent wall light. I bought new lampshades from the very talented Munro & Kerr that work so well in combination with the tiles and colours as well as adding some lovely texture and I ordered some linen coloured fabric cable that was delivered today so I will add that to the lights later. I am thrilled with the warm cosy light – thrilled!
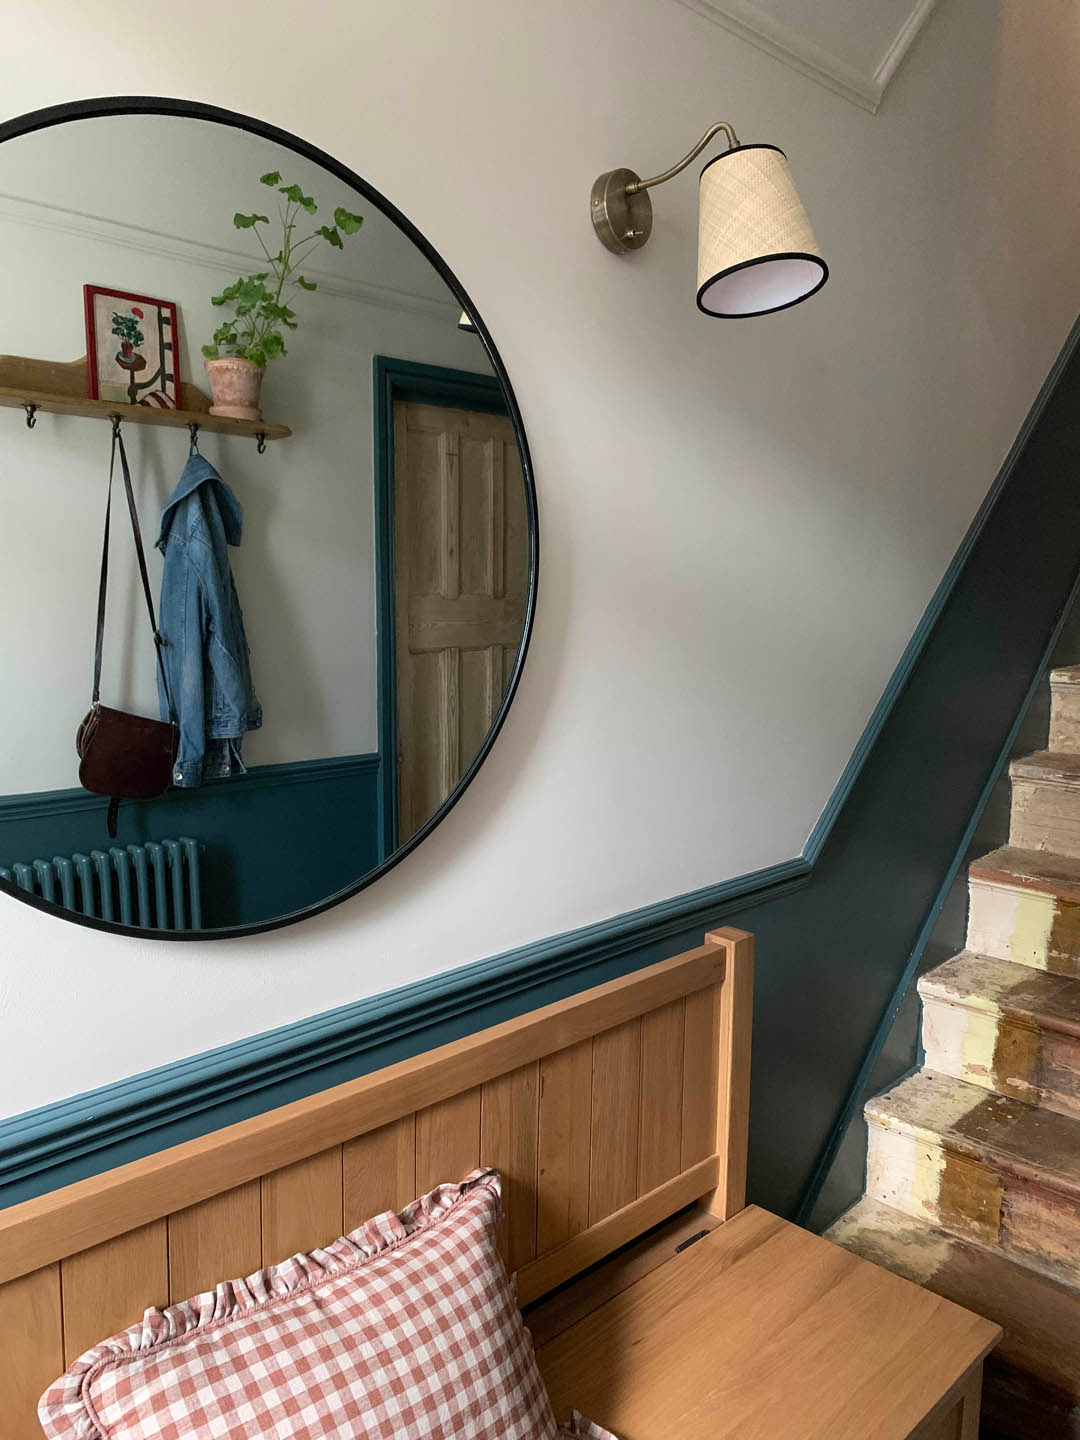
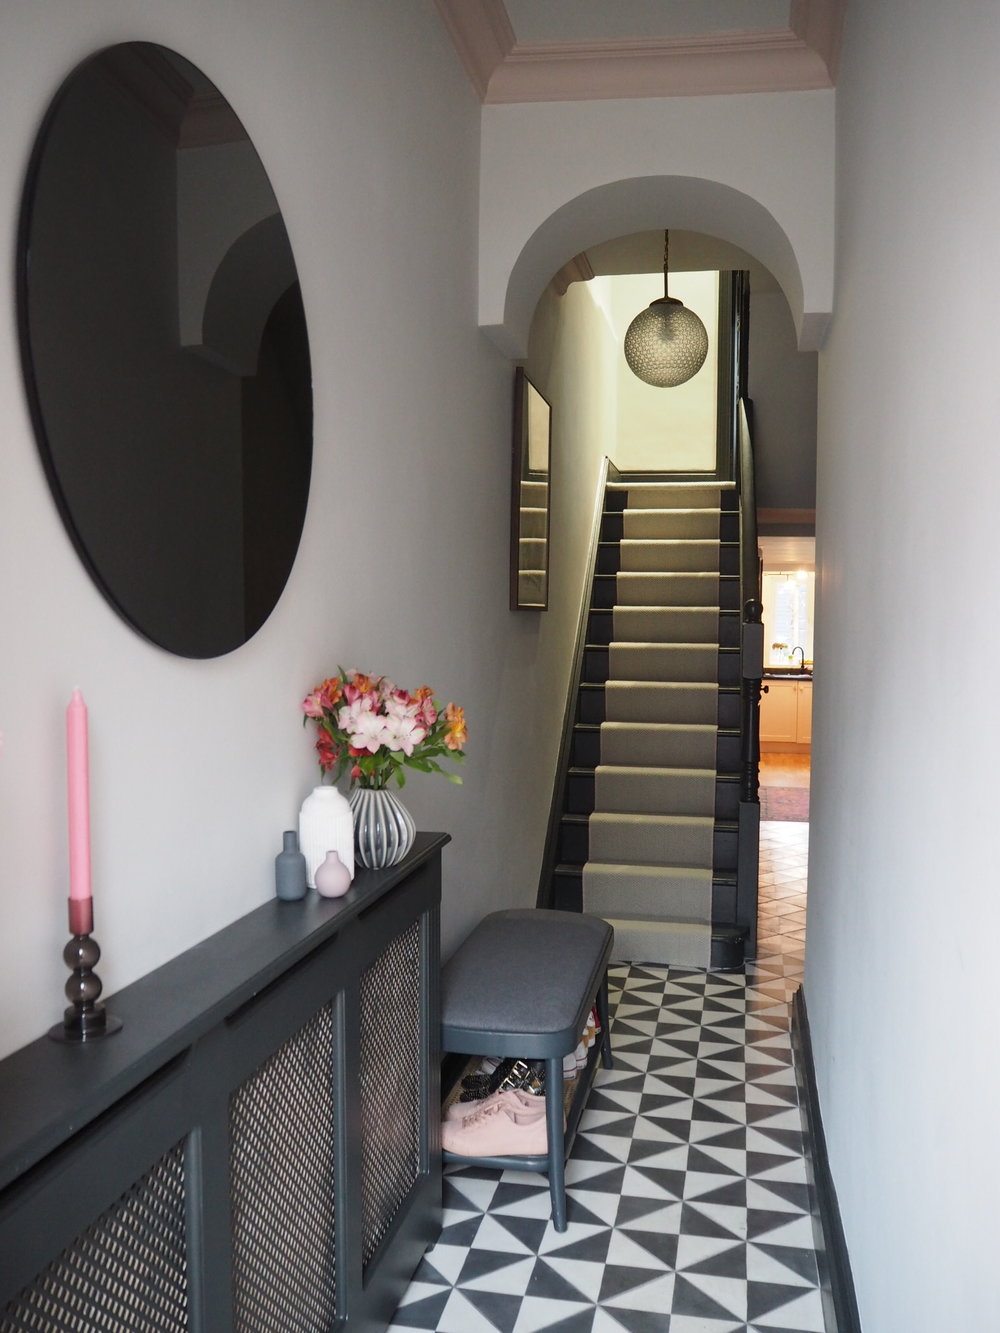
The huge 80cm round mirror above the bench is perfect and bounces much needed light around. A plant up on the shelf makes more difference than you could ever imagine and I would really like to find a lovely piece of art to go where the portrait currently is next to the front door but all in good time.
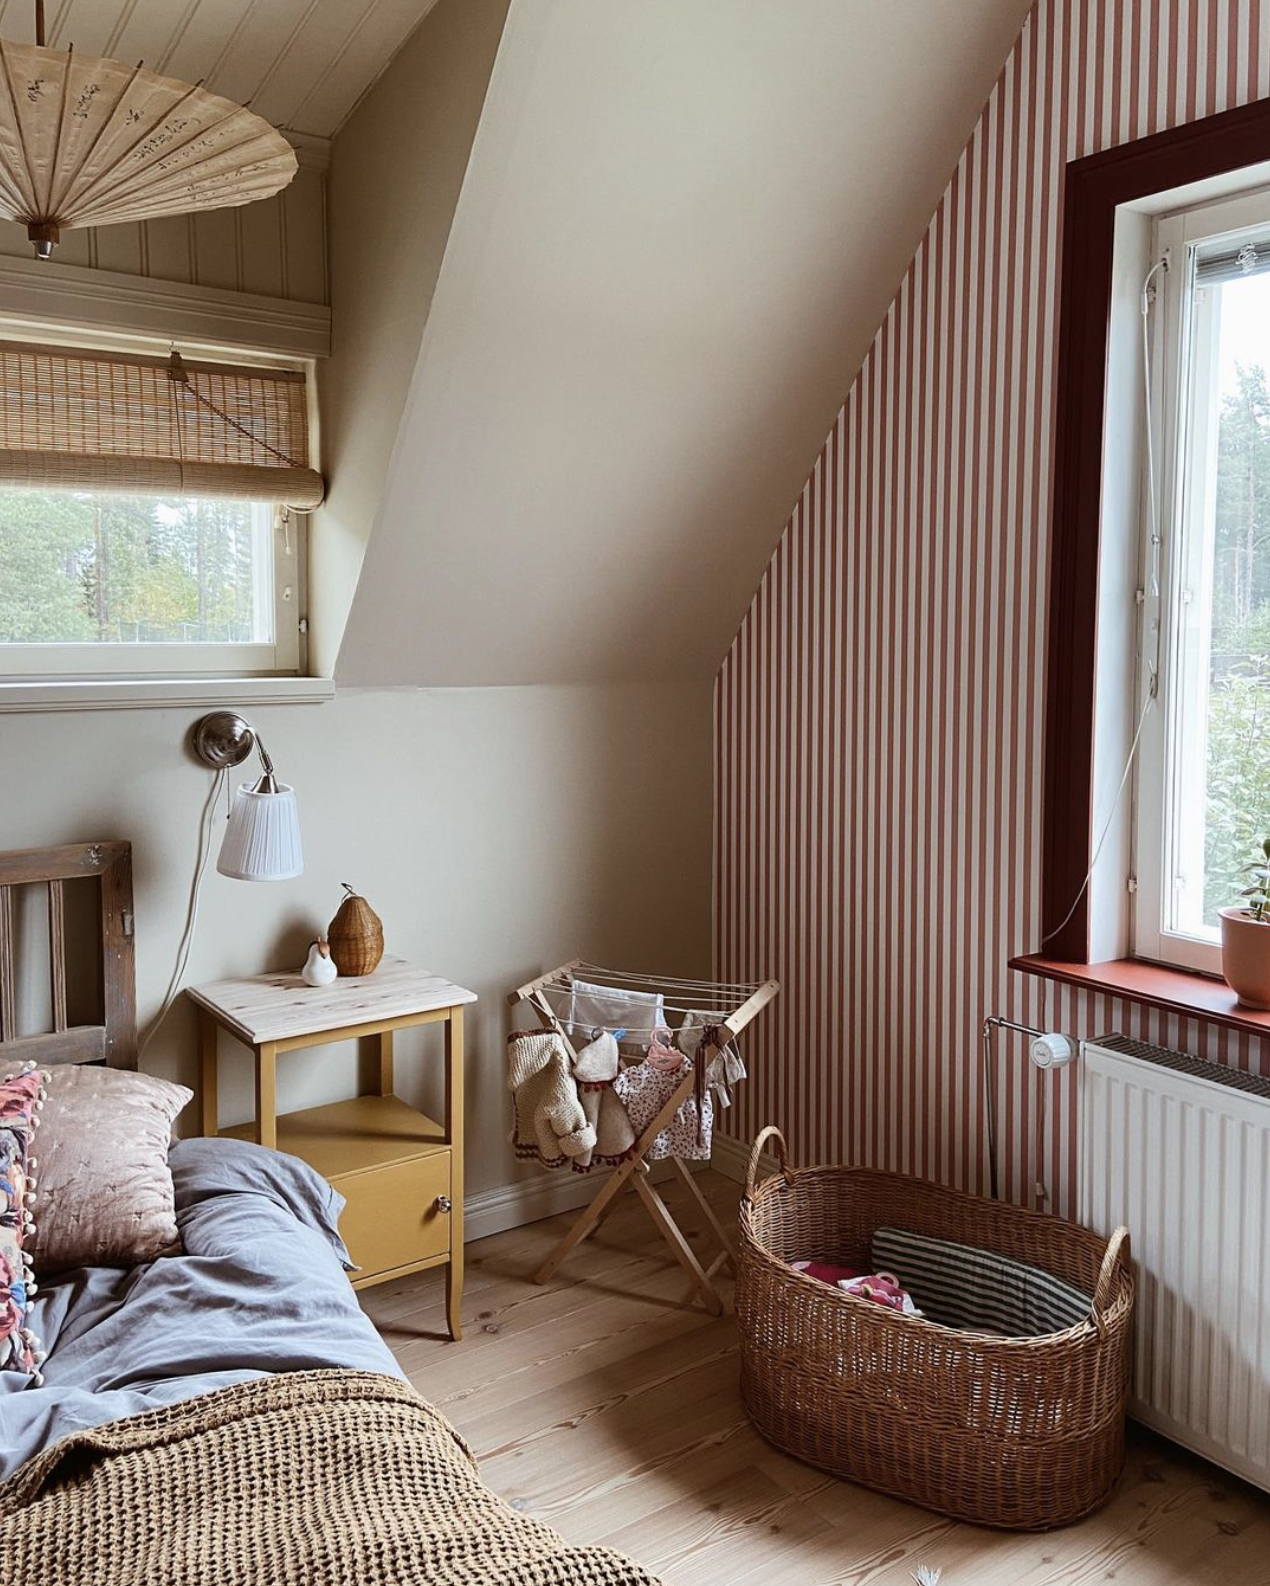
You may have noticed that the stairs are still in their raw state but we don’t quite have the strength to deal with those and I know I want to install Unnatural Flooring manmade sisal when we can afford it so there’s not much motivation to go to all the effort to paint them. We shall see. The front door is still very much on the list of something to change but in the mean time I plan to re-paint it a lighter colour as it feels very dark with the new tiles.
But other than that it really does feel like a finished space now, which is amazing after three years of it feeling like the remnants of the renovation building site. If you have any specific questions about the tiles or anything else do let me know and I hope you like the changes!
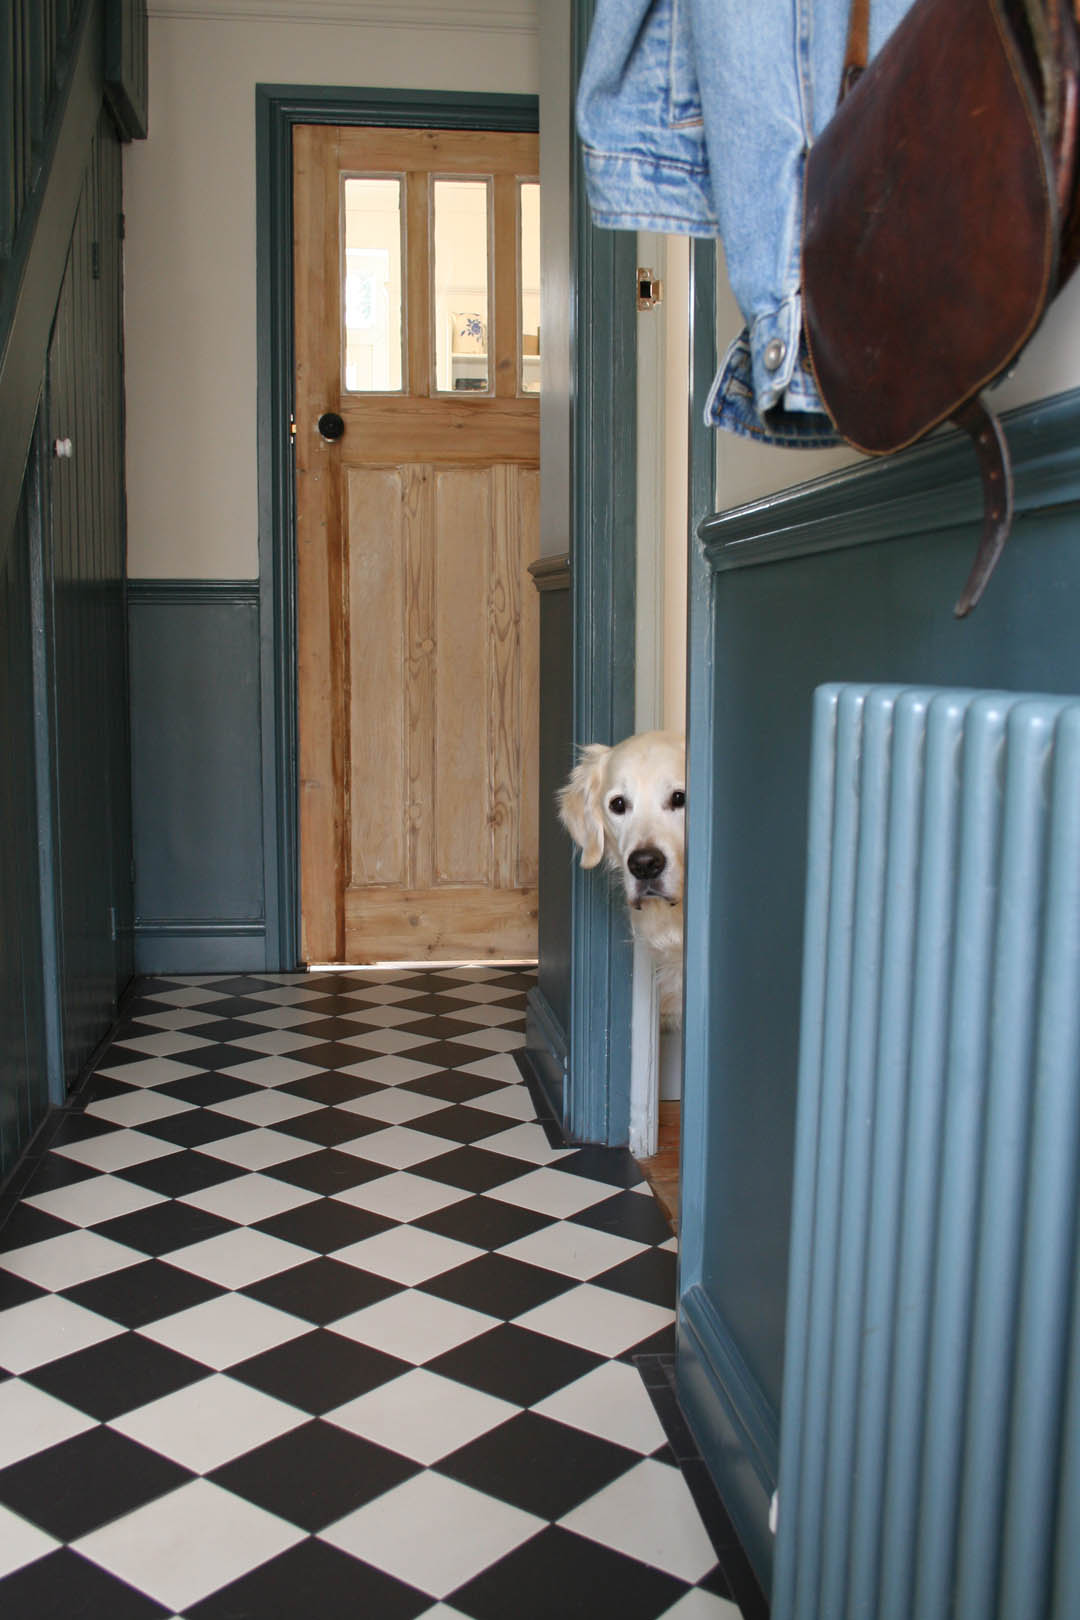
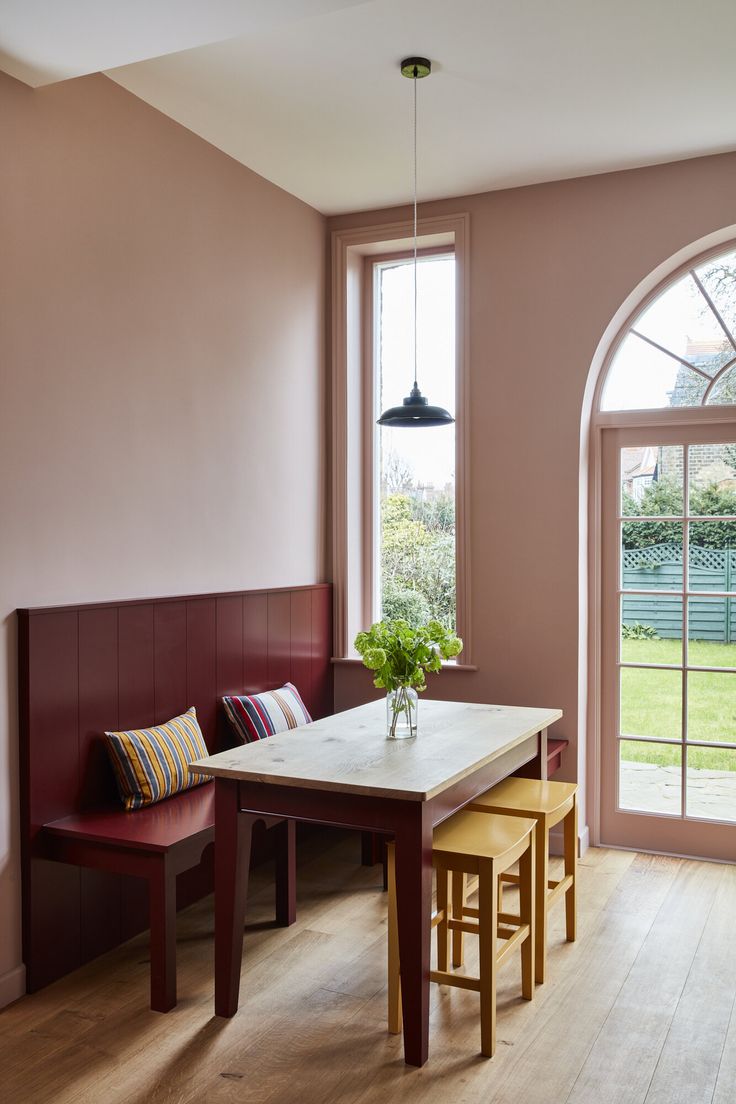
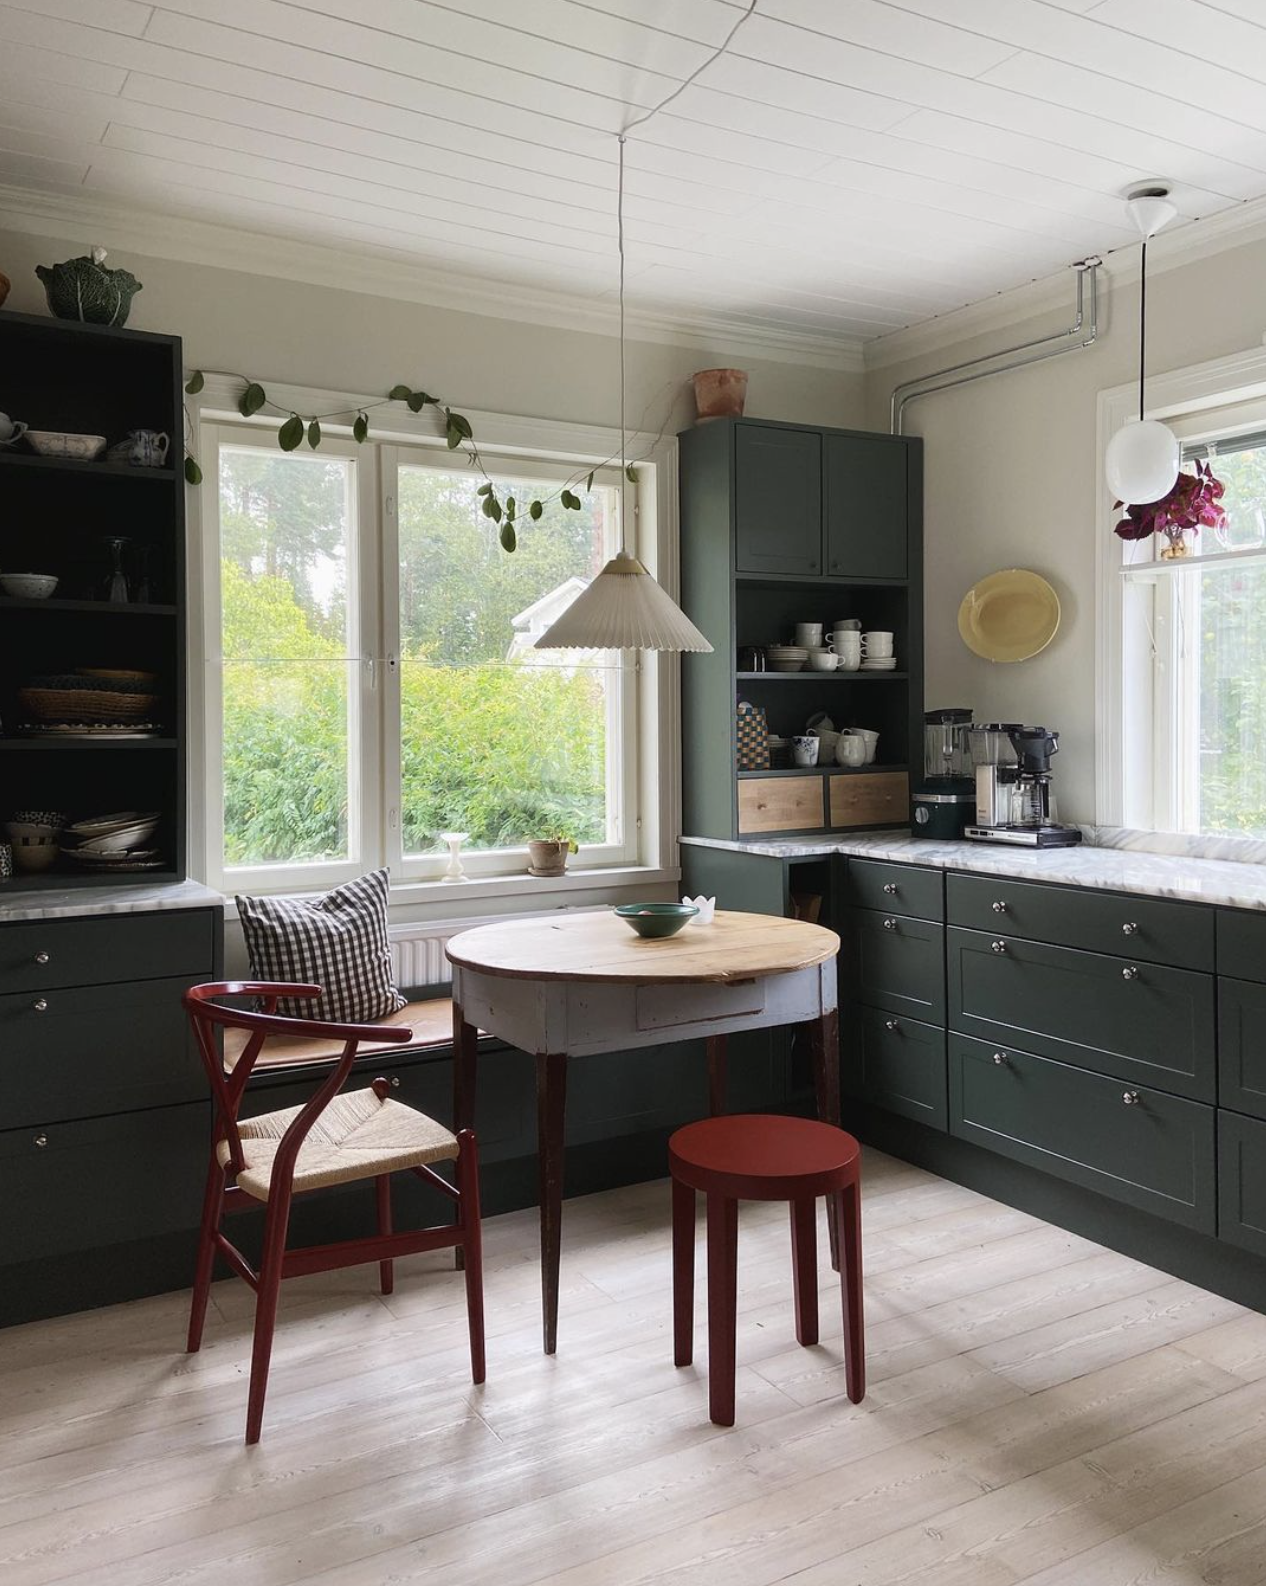
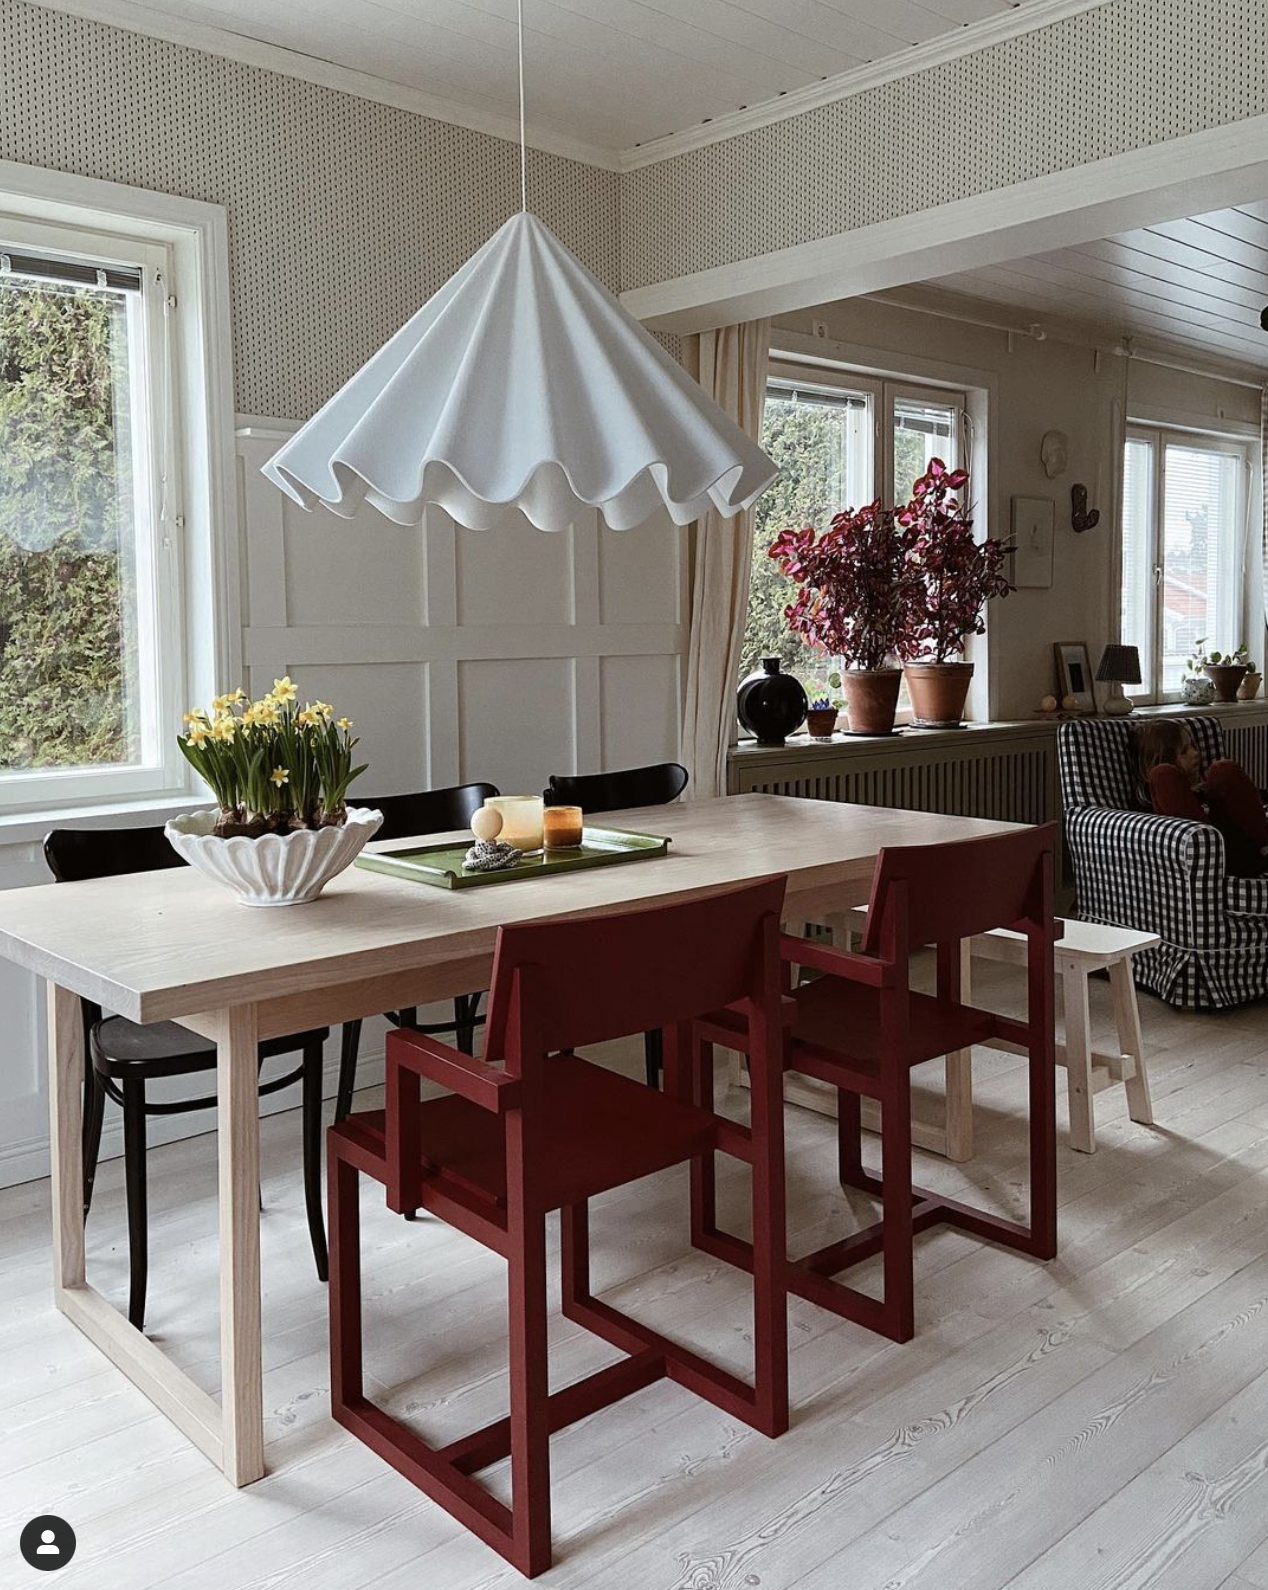
The work on the hallway floor is well underway and the underfloor heating and tiling should be done by the beginning of next week. If you follow me on Instagram you will have seen that I painted the walls Shaded White before the work began and that has made the space feel so much warmer to balance the cooler Incyhra Blue below the dado rail. The walls were previously a budget-saving Brilliant White, which I always knew I would change down the line once I got a good feeling for the space and had saved up again after the initial renovation budget was blown. I really disliked the Brilliant White after a while as it is so cool and actually makes a space that lacks natural lighting quite dingy; it is definitely not a good choice if you want to brighten or warm up a room. So, the combination of Inchyra Blue and Shaded White is a great one and extremely practical as the blue hides all sorts of scuffs and dirt at dog and child level. However, I want to add another colour to the hallway to make it more welcoming and cosy but one that will work well with the rest of the house and all of the greens and blues. Therefore, I want to add some deep reds here and there. The inspiration came from this DIY lamp that I spray painted a while ago and I just love the way that colour sits with the blues and greens downstairs and it really adds a touch of warmth and rich colour. I also have reds and rust colours in the rug in our home office and it adds so much to that space and even glimpses of it from the landing seems to wrap the whole first floor up in a lovely warm glow.
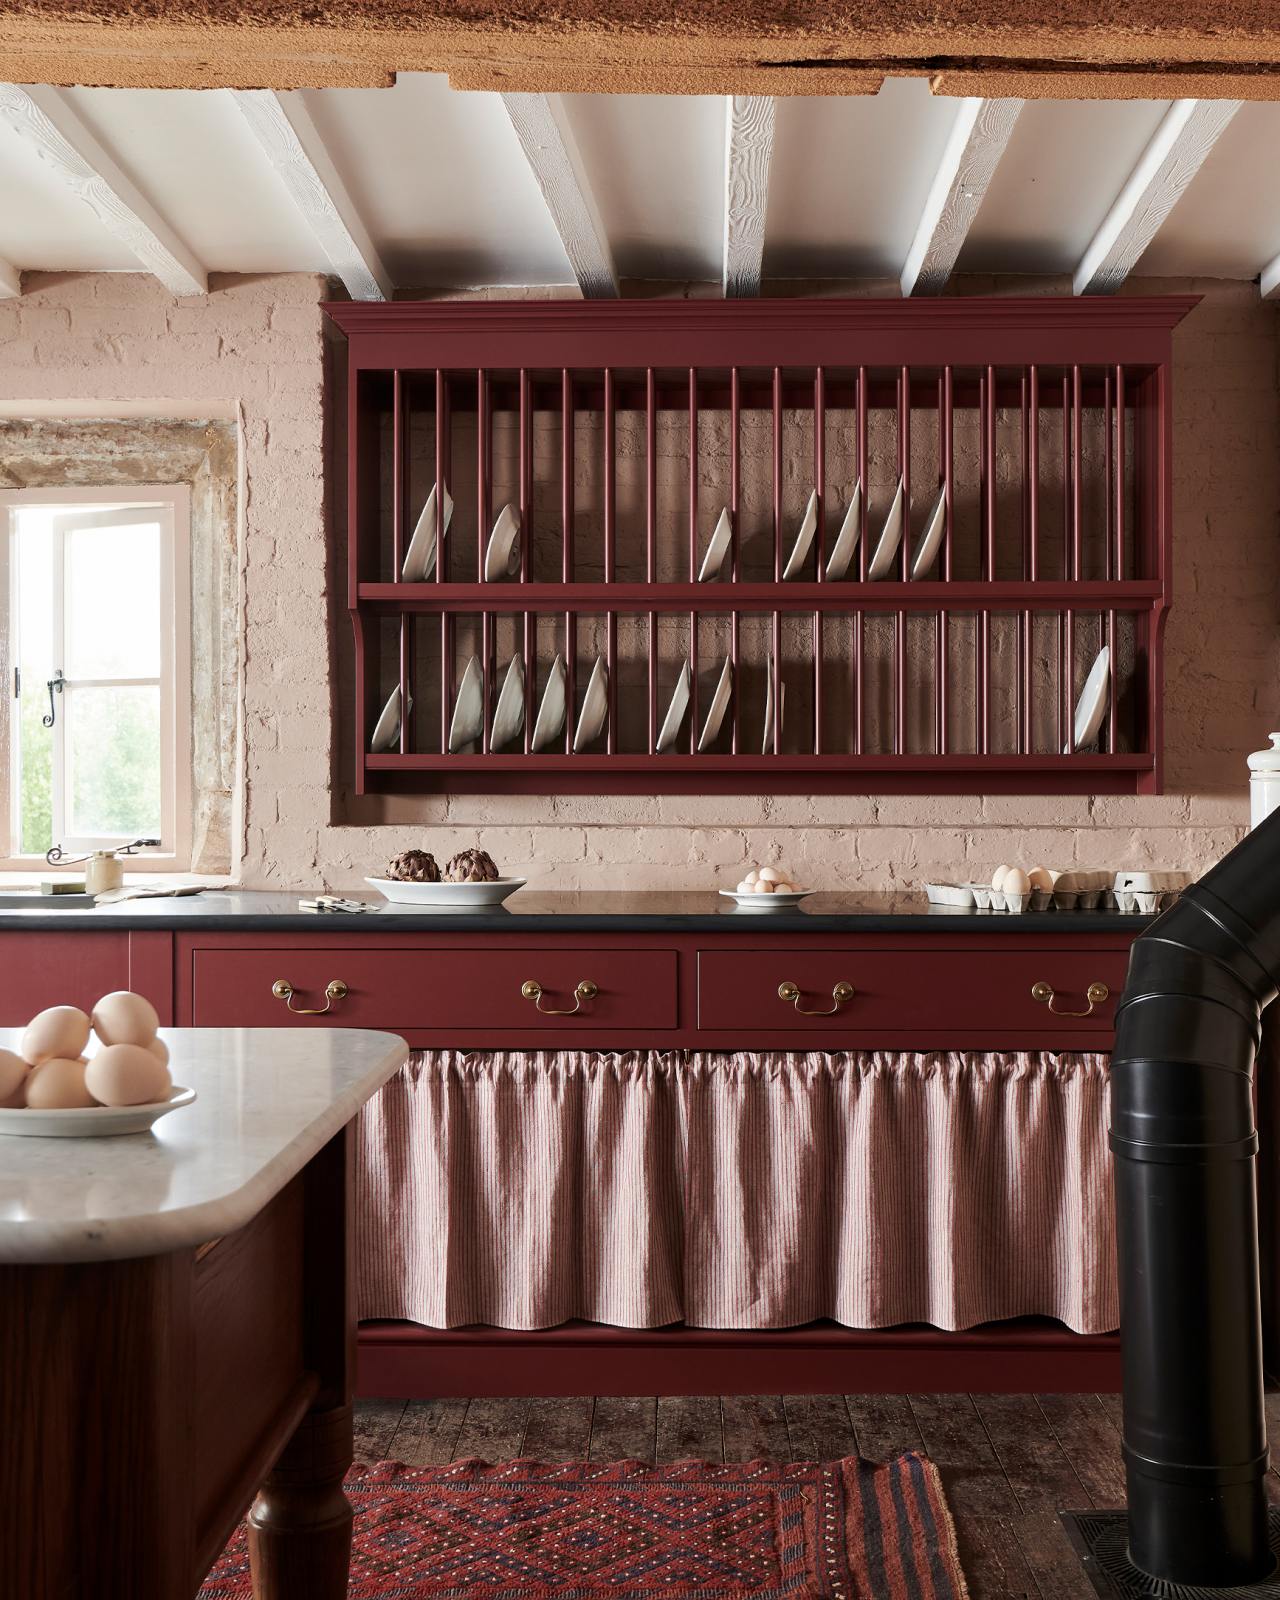
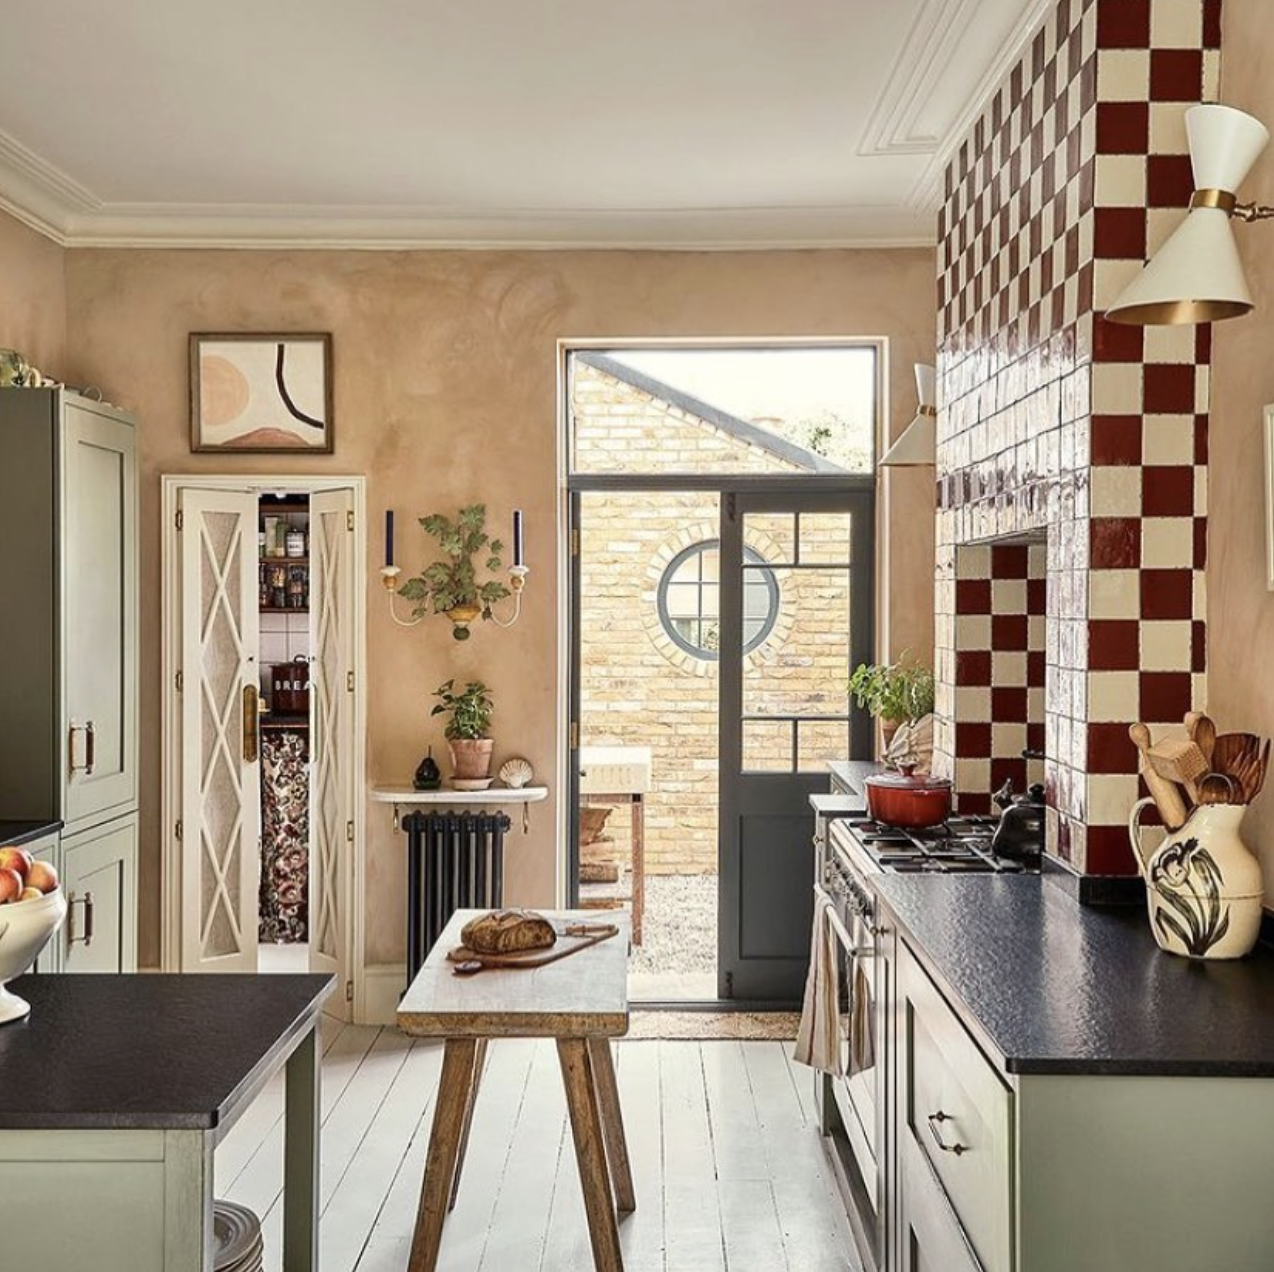
I’ve been noticing a lot of gorgeous red, rust and wine-coloured homewares and paint colours and I’ve decided to paint the inside of the front door Refectory Red, which is a deVOL furniture and joinery paint (hoping it works on our uPVC door as it’s been primed and painted with eggshell previously so it can be treated like interior wood now…famous last words) as well as adding a couple of other red touches with accessories. Obviously I wish it were a beautiful original 30s front door that I will be painting but it really doesn’t look plastic anymore and I hope the Refectory Red will add a big dose of cosiness to the space whilst still being dark enough not to highlight the ugly the ugly mouldings on the door.
A beautiful deep red used at both ends of Matilda Goad‘s kitchen.
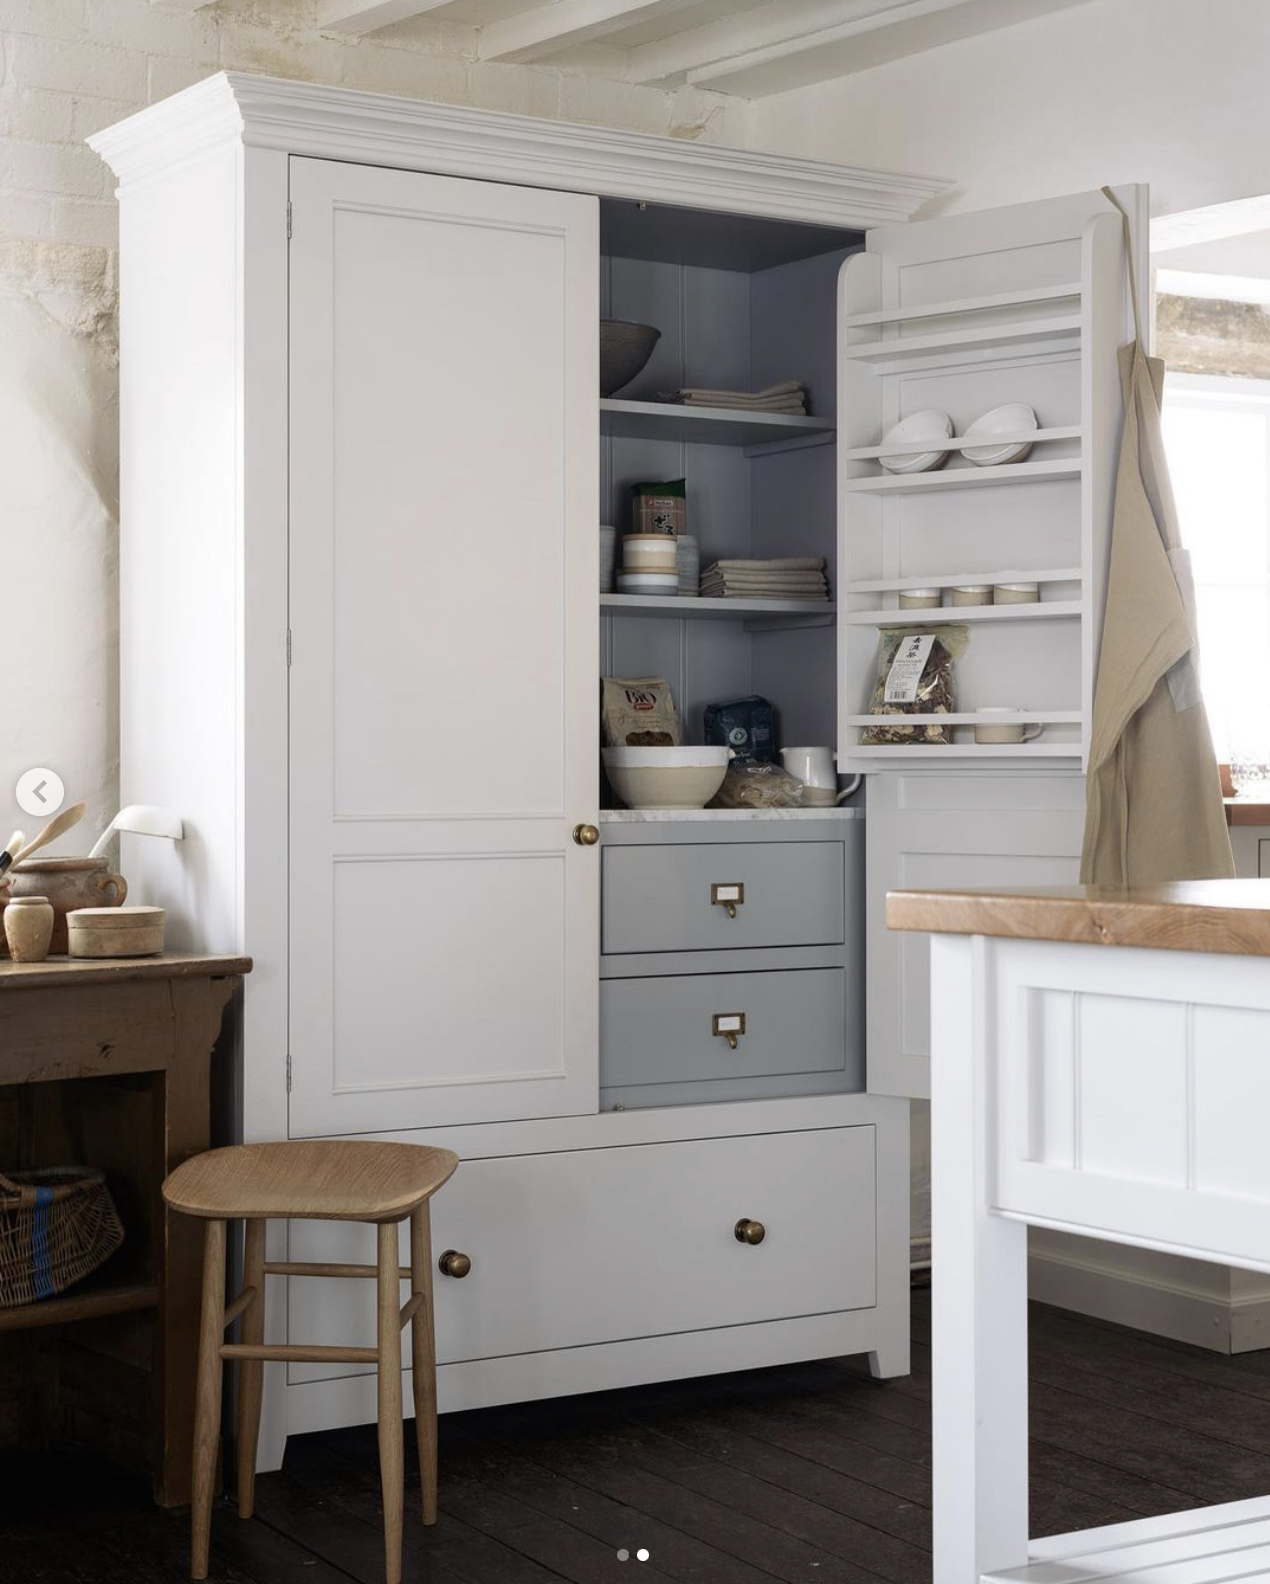
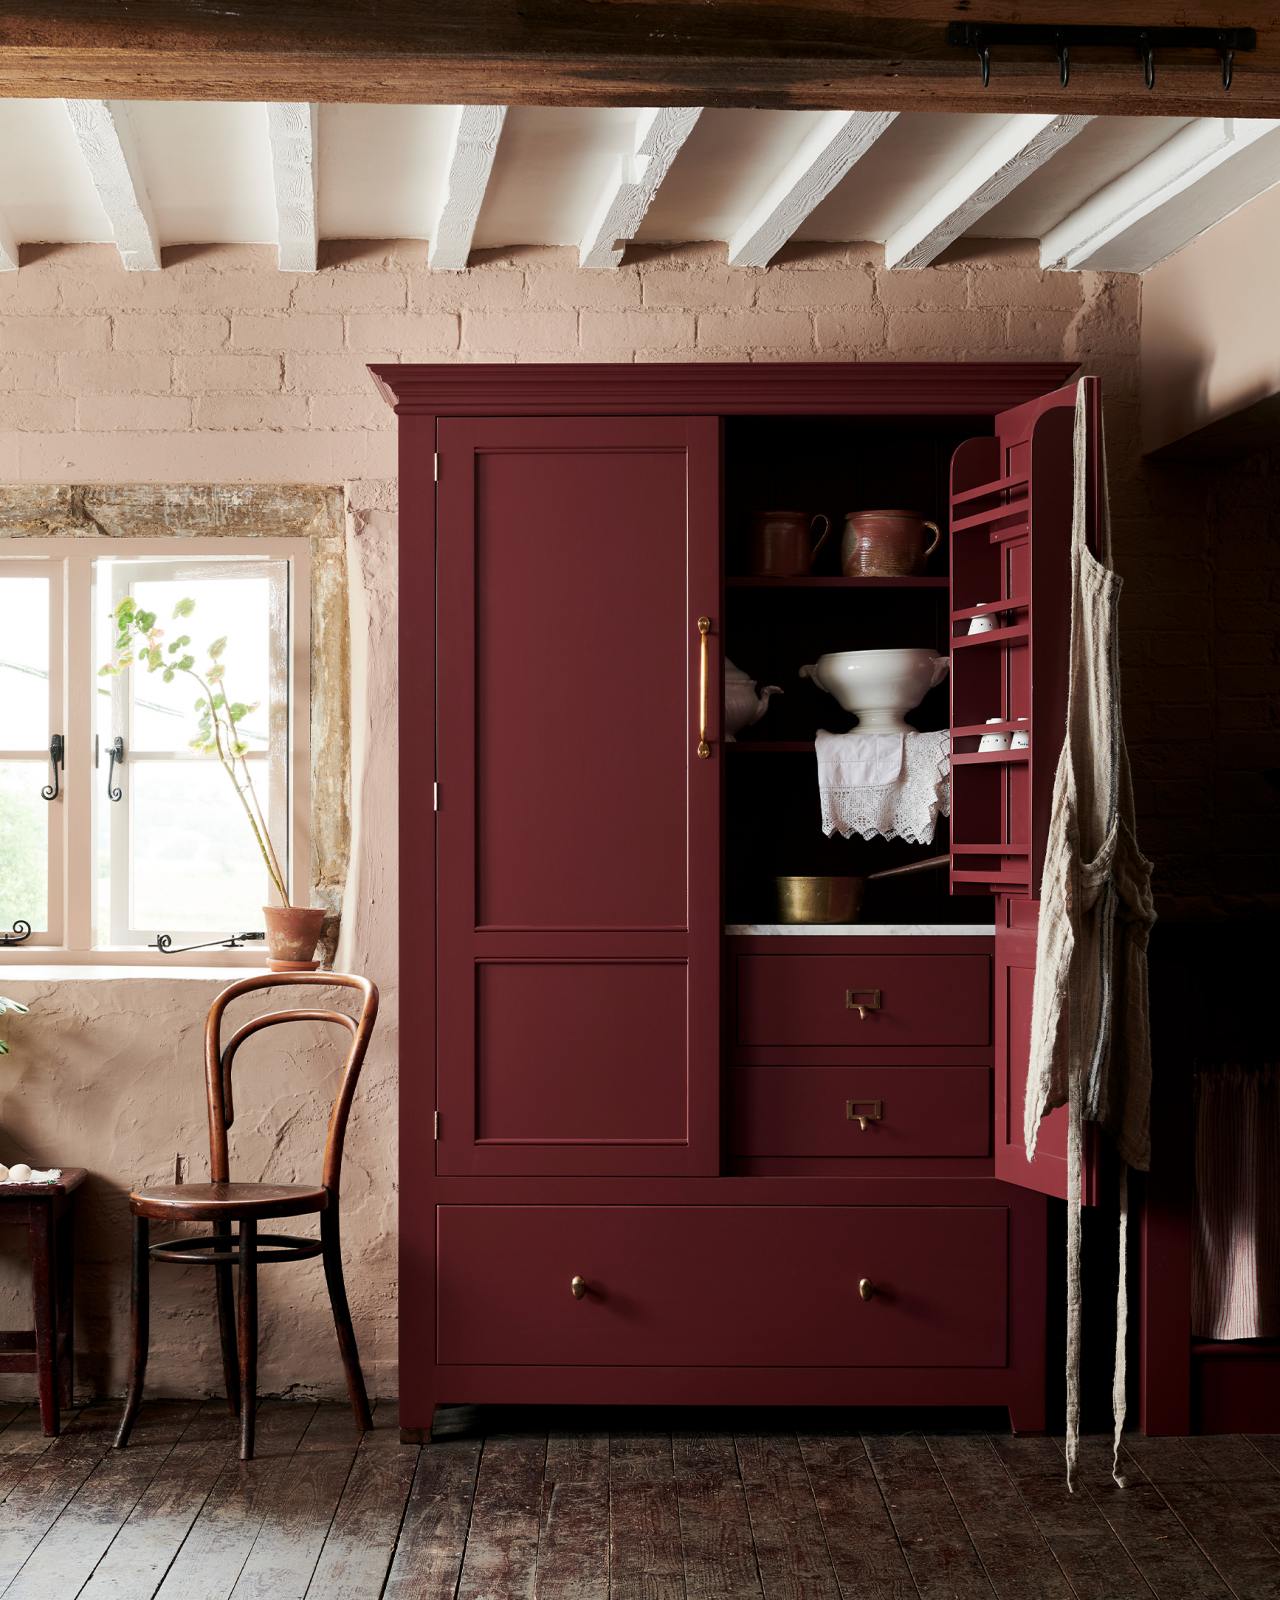
Before I go I just wanted to come back to deVOL’s Refectory Red that I have chosen for the inside of the front door and show you the difference it makes to this white pantry cupboard…
What do you think of these colours – can you be convinced? I’ll keep you up to date on how I get on with the front door!
I asked whether this would be a useful post over on Instagram and the answer was a resounding yes. It seems to be a very common issue, no matter the type of flat or house. I count myself extremely lucky having a wider than average hallway and I can honestly say it is a complete game changer compared to homes I have lived in before this one. I recently did an interiors consultation for a family who live in a five bedroom house but their hallway is the width of the front door and it was driving them all mad so we really focused on how to solve the storage issues that come from having an extremely narrow hallway.
Obviously the decor of a hallway has a huge bearing on how it looks and feels but I won’t be focusing on that here other than to say that the lighting is absolutely key to how well a hallway works. If it is badly lit and gloomy it makes functioning in the space so much more difficult i.e. not being able to find shoes, keys, tie laces, see into bags etc. I would say that the first thing to do is really assess your lighting and whilst you don’t want it to be harsh and too bright as that feels unwelcoming, you do need to have a well balanced, even lighting from different sources – a pendant or two combined with wall lights is ideal (make sure they are on different circuits so you don’t have to have them all on at the same time as sometimes in the evening, for example, it’s nice to have lower lighting for just passing through the hallway) or a table lamp if you have space for a table and don’t have wiring for wall lights. A dimmer switch for hallway lights is also a good idea to help change the mood of the lighting.
So, moving onto the storage issues…
Coats and bags
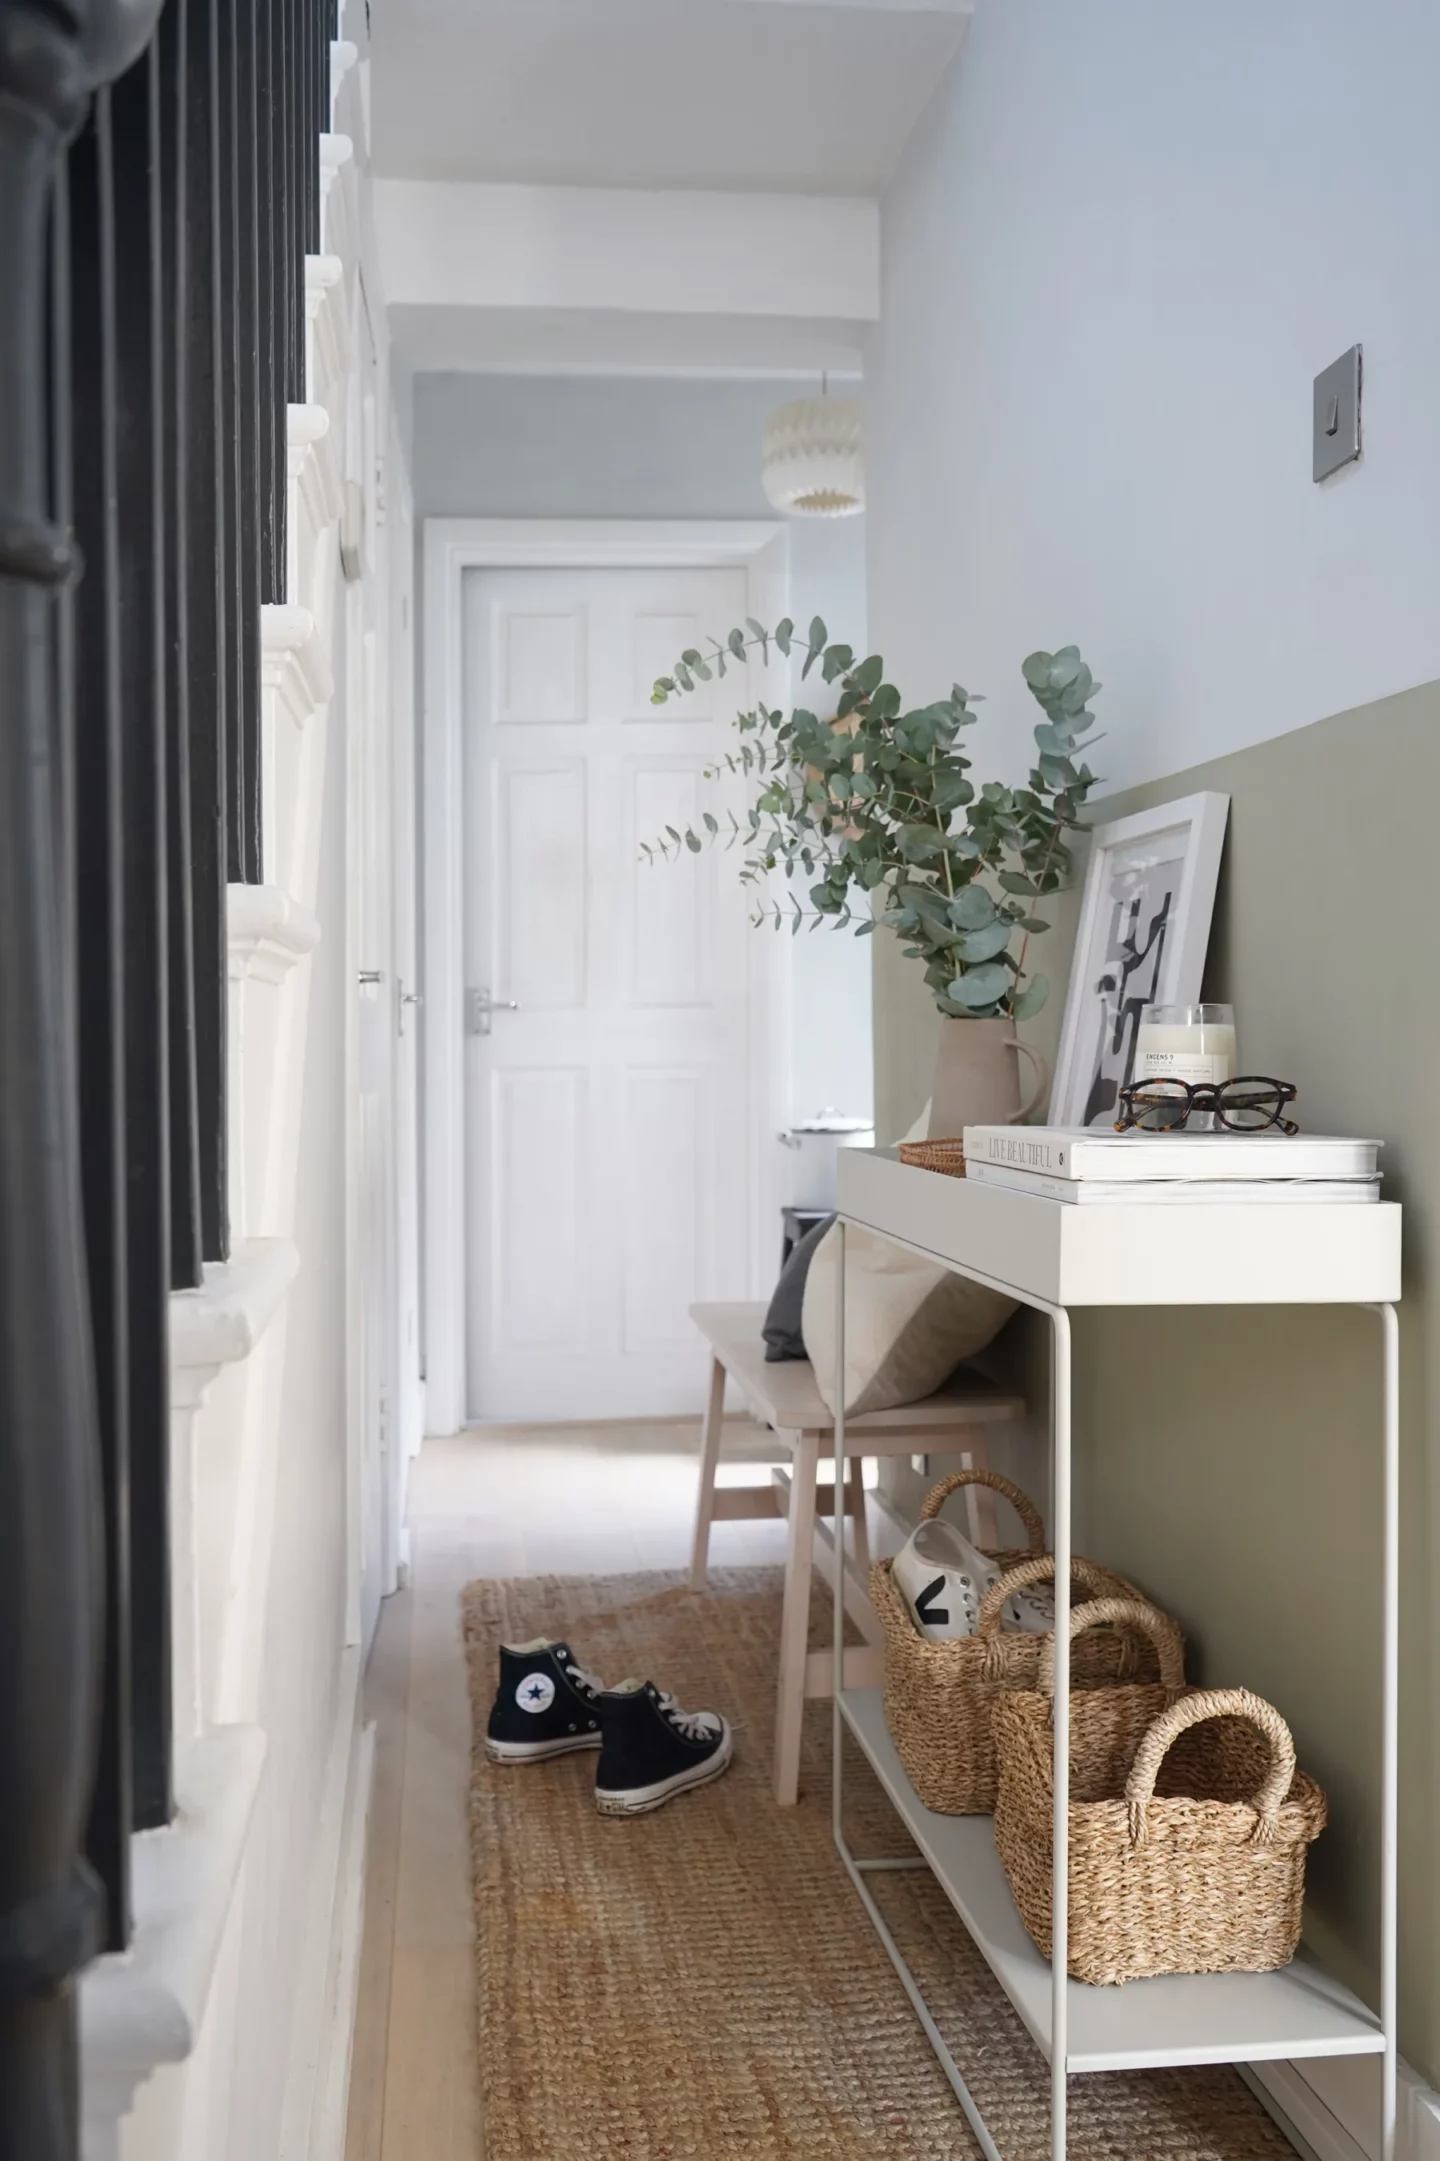
Do try to remove as many coats and bags from the hallway as possible – whether that be storing winter coats in wardrobes (vacuum packing is good for big bulky coats) during the summer and vice versa or if you live in a house what about using landing space at the top of the first flight of stairs? If you have to hang coats and bags in your hallway then a high peg rail is what you need. Try to make it as long as possible to space the coats out so they don’t become a massive bunch of coats that will cause an obstacle and get dragged off the pegs as you pass. Also ensure the pegs themselves really do hold the coats to make it easier to hang them and less likely that they will slip off. I love the bespoke rail that Hannah from The Otto House had in one of her previous homes that you can see below. The length of it means coats don’t get bunched up and the shelf above can be used either to store bits and bobs or to display things to make the hallway look and feel more welcoming. Don’t be afraid to hang coats over a radiator as this can actually be quite practical especially in the winter when coats are wet and soggy. Try Etsy for similar peg rails shelves. You can go for a bigger shelf if it is high as this won’t encroach on the space but can be a very handy place to store things that aren’t used everyday.
I have found that children’s coats are much better hung up at their level so that they can be in control of them and because they are generally a lot less bulky they don’t get in the way ion really tight hallways or knocked off their pegs even though they are at hip level.
We hang Mimi’s coats below the dado rail right next to the front door on a cheap wooden peg rail that I painted the same colour as the wall.
Shoes
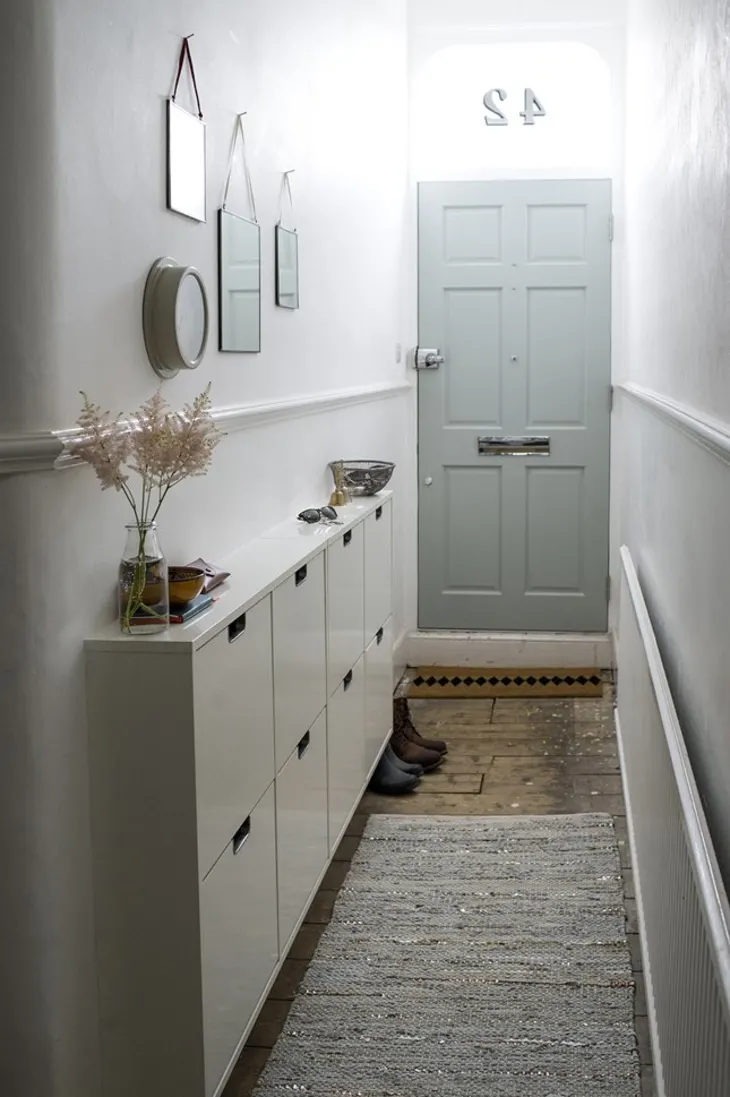
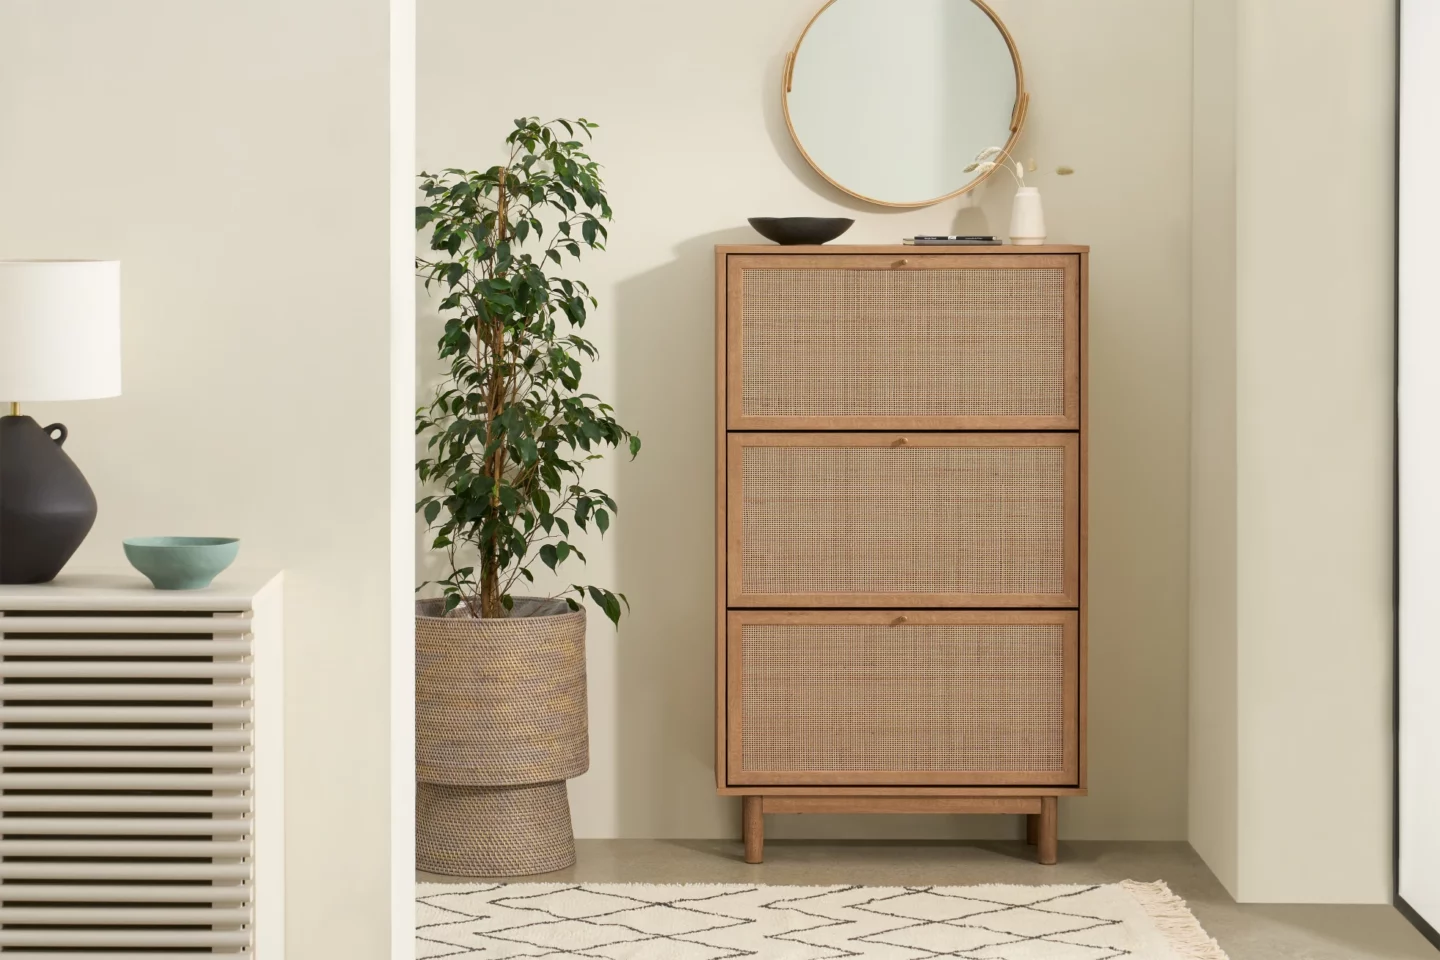
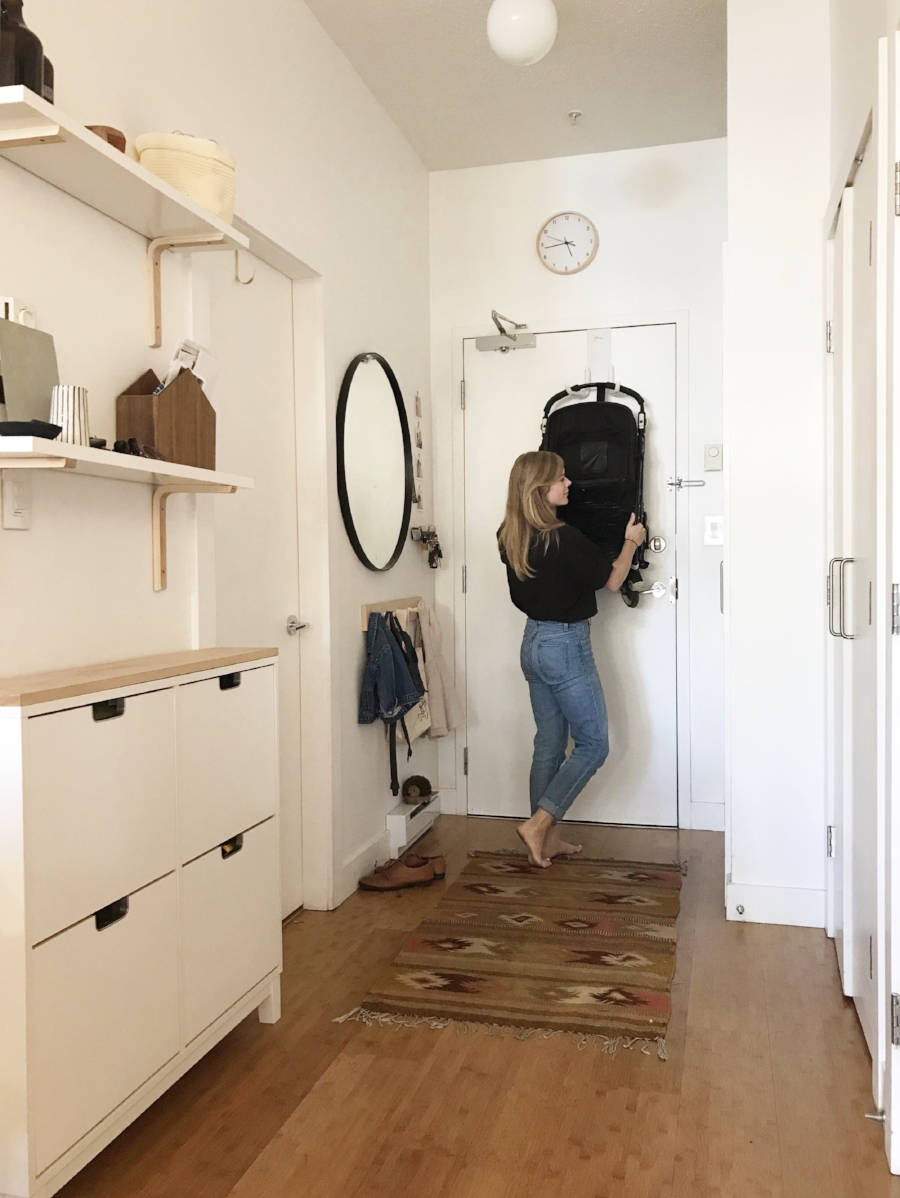
Come to our house on any day of the week and the hallway is strewn with shoes. It is beyond annoying. Even a neat row of shoes against the wall is annoying, if you ask me. Shoe storage cabinets are really great for narrow hallways for every day shoes and slippers and they also provide a handy ledge for keys, glasses, face masks and all the other bits and pieces that build up in this space. We also make a big effort to keep shoes that aren’t worn often in wardrobes and we often keep walking boots and wellies in the car.
The white shoe storage cabinets above are from IKEA (they do a couple of different models) and MADE make a blue shoe cabinet, which is nice. The image below shows another lovely version that is much more of a feature by MADE.
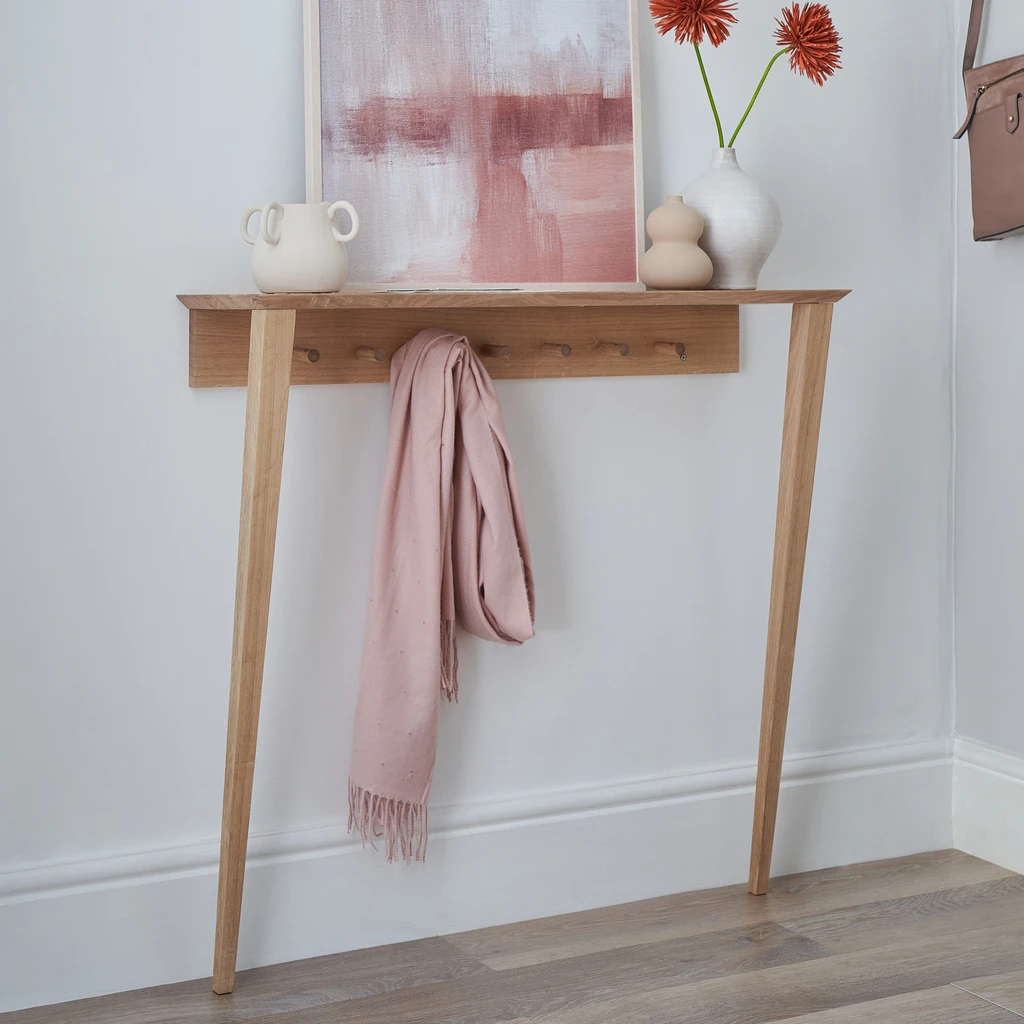
If you really need a hallway table or console there are some great options for very narrow spaces. You want the table to work as hard as possible so it needs to have storage as well as a surface so go for something with a drawer or a shelf below. This is a great example from Cate St Hill’s lovely blog…
Not only is this Ferm Living console table very slim and easily pass-able but it offers a decent amount of storage on the top and bottom, especially with the tray style surface so things won’t be knocked or dragged off as you pass by.
Another option that takes up the smallest space possible and can be used over a radiator, if needs be, is this Urban Size console table with a peg rail below.
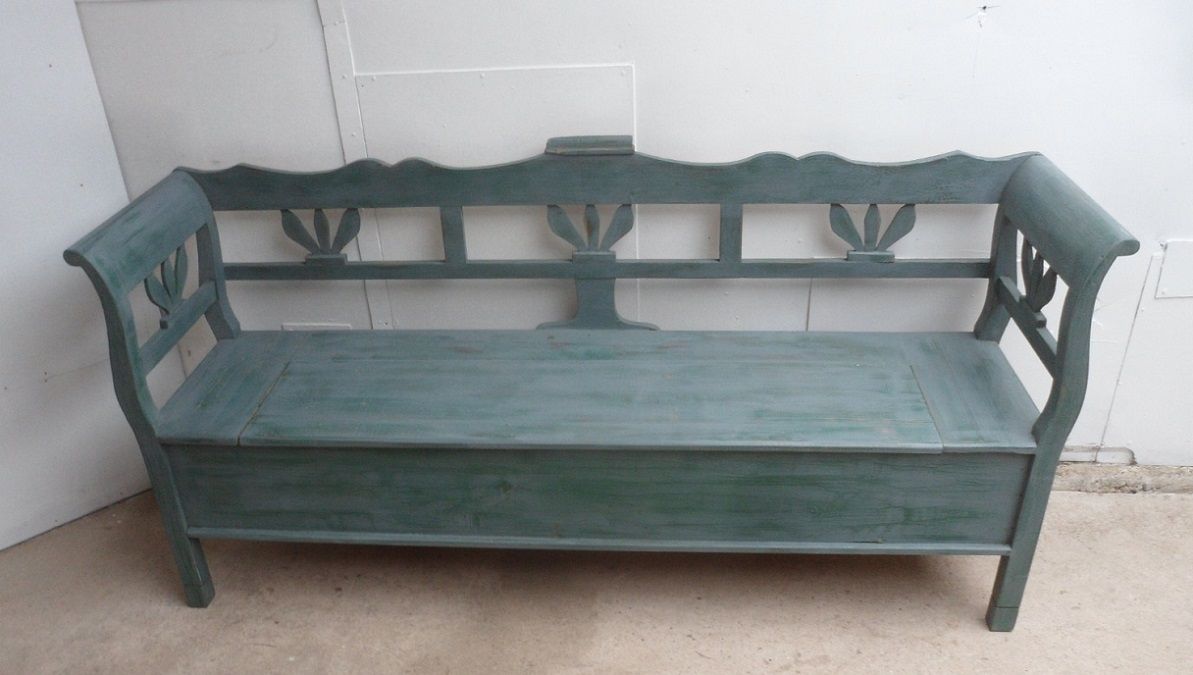
It’s impossible to add seating into some hallway spaces due to radiator or door placement but it can be done even in the narrowest of spaces. It seems like the ultimate luxury to me to be able to have a seat in the hallway and I have decided that it is a real priority in our hallway to make the most of a wider than average space. We have had a make-do IKEA console that I got for free second-hand and painted for the last three years until we had the budget to finish the space and so now it is time to choose a seat to replace the console. My family is very kindly gifting me part of a settle bench for my birthday, which has just been. Much like hallway tables I think hallway seats or benches have to work as hard as possible and provide storage. My bench hasn’t arrived yet so I can’t recommend it but there are a lot of options for second hand settle benches if you are interested in one. The one I am getting is £375, so not cheap, but it is a very flexible piece of furniture that can be moved around a house and I’m pretty sure we will have it for years and years to come. I’m hoping we can store some shoes, woollens, bike helmet and picnic blankets in the seat. If you do a quick google and search for ‘settle bench’ you will see the various second-hand and new options.
I am getting a settle bench similar to this but in bare pine.
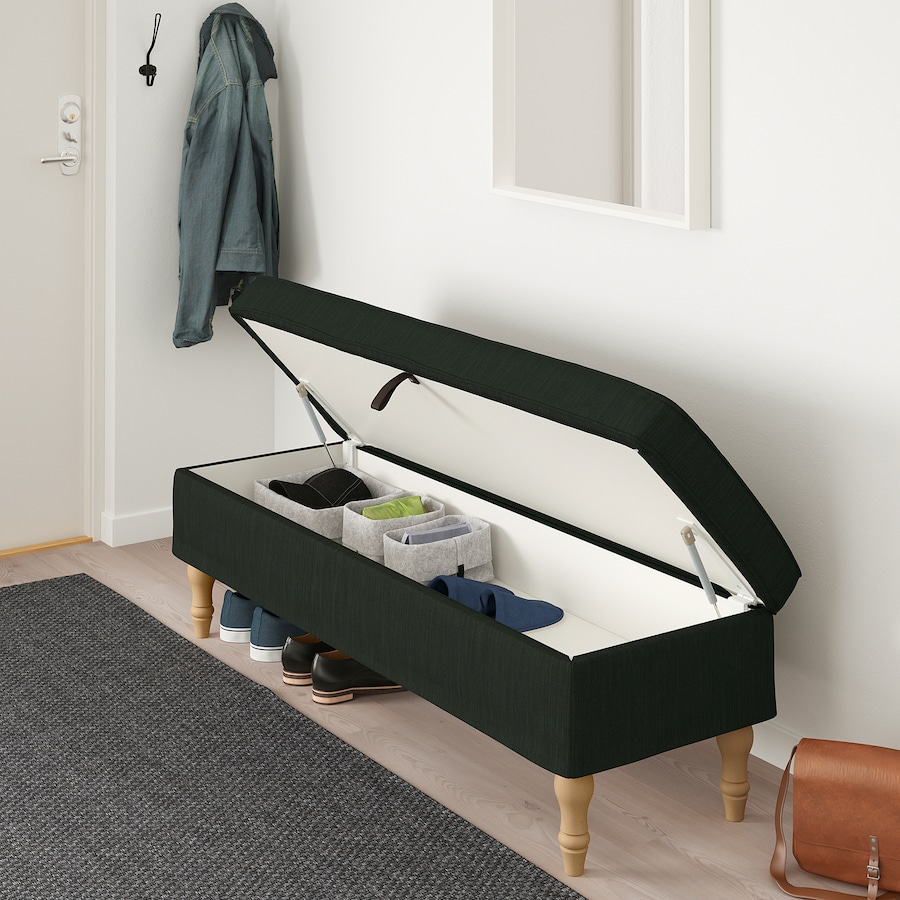
Another good option for a storage bench is the IKEA Stocksund model as you can see below. A lovely soft seat in the hallway with decent storage. Just bear in mind that textiles in the hallway are prone to getting pretty grubby but saying that Bemz design bespoke washable covers for IKEA furniture that are worth investigating.
If you are tighter on space than the options above allow try a slimmer bench but still with potential shoe storage as can be seen in Jess’s beautiful hallway below. This is a storage bench from MADE and fits in very neatly to a narrow Victorian hallway.
If you need something with even less depth and have more of an industrial style try a shoe bench like this vintage 60’s one from Vinterior or a new version from John Lewis.
Ultimately, if there is any way of building a bespoke seat storage bench then that is the ideal option as seen below.
If you are struggling for space and have a buggy to deal with every day there are a couple of options. I came across this buggy hook called a Strollaway, which would be ideal on an unglazed door. You would have to be organised about not storing loads of stuff under the buggy but worth it, I’d say.
Alternatively, and something I discussed with a client in a two bed garden flat with two children, is the option of wheeling the buggy through the flat and storing it outside in a dedicated shelter.
I hope some of those ideas help if you are stuck with how or where to store things in your hallway. I can’t wait to show you my new bench when it arrives next month some time.