Hallway makeover

As I said a couple of weeks ago, it’s time for us to make some changes to our flat because I have such itchy feet. I desperately want to move to the period home of my dreams but, alas, London house prices have gone through the roof!

I posted last week about choosing a new floor for our sitting room, kitchen and hallway. Today, I want to chat through my plans to makeover our hallway – which I hate! It has got to be the most boring, dull, generic hallway I have ever seen and it makes me cry inside.

This is what the hallway looks like now…

Hallway makeover

Even Otto looks sad about it.

All of the rooms in the flat come off this hallway and there are three cupboards so, in total, there are SEVEN – yes seven – of these monstrous wooden doors. There are no windows, so no natural light and the same horrible, beige carpet that I want to get rid of from the sitting room runs through the hallway. I love the vintage poster that is hung on the wall, but it was only ever put up as a temporary gap-filler – it doesn’t fit there at all.

These are my plans to make this small space more of a design statement, rather than an unpleasant passage to the other rooms.

1) Replace carpet with wooden floor.

2) Try and find a beautiful runner (I have been looking for the last three years!)

3) Paint the walls in one of  Little Greene’s French Greys – not sure which shade yet.

4) Add Jane Cumberbatch’s ‘Toast’ striped border halfway up the wall all the way round the hallway.

5) Paint all of the doors white and change the handles. This is going to be an arduous job but I hope it will be well worth it.

6) Add some interesting art work – I love Double Merrick’s new Swimmer print.

7) Buy a vintage hallway table and mirror.

8) Add an interesting wall light as we only have spot lights, which can feel very overbearing at times..

Jane Cumberbatch striped borders

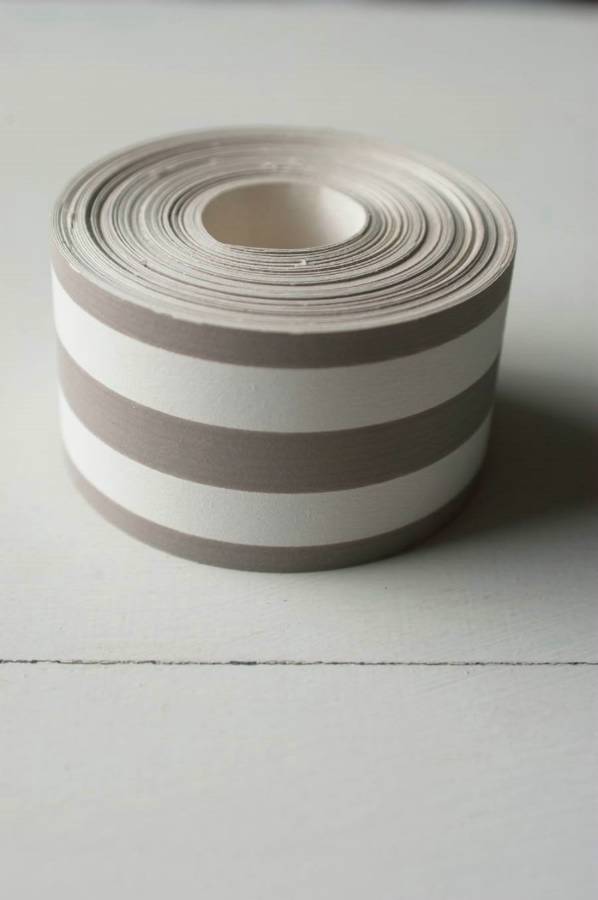
Toast wallpaper border to go half way up the walls.

Double Merrick swimmer print

I’m really enjoying Double Merrick’s new print.

Now I just need to find a weekend to make it happen!

Katy x


DIY vintage placemats

I’ve got a goal in mind: make everybody handmade Christmas presents this year (sorry, I did it, I mentioned Christmas but with such a goal I need to start now). More of my goal to come, a whole post in fact, but for now I want to show you one present I’ve already made that I’m really rather pleased with – and might have to keep for myself. Ha!

So far with the vintage wallpaper that I bought from Sarah Moore Vintage I have been able to do a vintage makeover on my bathroom cabinet and line a chest of drawers. I have just enough left to make a set of six placemats. I’ve seen lots of people covering placemats with photographs of their children and such so I thought I’d experiment with the wallpaper.

I’m really pleased with the outcome…

You will need:

Wallpaper  that I bought from Sarah Moore Vintage or you could try pretty wrapping paper (just use less PVA and more varnish).

Cork placemats that I bought from Amazon but if you have an old set of mats at home you can re-purpose those.

PVA glue and a brush.

Clear acrylic varnish and a brush.

Pencil and scissors.

Tutorial:

DIY vintage wallpaper covered placemats by www.apartmentapothecary.com

1. Draw round your mats onto the wallpaper and cut out. Cut ever so slightly within your line so that the paper is an exact fit and does not hang over the edge of the cork mat at all.

DIY vintage wallpaper covered placemats by www.apartmentapothecary.com

2. Pour a lot of PVA glue onto the wallpaper and spread out using a brush (use far less if you’re using wrapping paper as it will wrinkle badly). Make sure every single bit of the paper is covered right up to the edges. However, don’t get any PVA on the right side of the wallpaper.

DIY vintage wallpaper covered placemats by www.apartmentapothecary.com

3. Stick the paper onto the mat and smooth out any air bubbles. Make sure you line the paper up with the board as accurately as possible. If any glue squeezes out run your finger round the edge of the board and smear it over the cork board – try not to let it go onto the paper.

DIY vintage wallpaper covered placemats by www.apartmentapothecary.com

4. Leave to dry for at least four hours and weigh it down with a big heavy book, otherwise the mats can curl up at the edges slightly (which I found out when I tried the first one).

DIY vintage wallpaper covered placemats by www.apartmentapothecary.com

5. When the mat is completely dry start applying lots of thin layers of the varnish, leaving about an hour between each coat. I did about five coats (you may need more if you’ve used thin wrapping paper). Make sure you paint the varnish round the sides of the mats too (I put mine on top of food tins to let the sides dry).

DIY vintage wall paper covered placemats by www.apartmentapothecary.com

Finished! This project is quite time consuming but it’s very, very easy to get a really good finish if you’re patient.

DIY Vintage wall paper covered placemats by www.apartmentapothecary.com

Ready for a little vintage tea.

Now I have to decide who to give them to…

Katy x


Christmas Liberty guest post

Before you say it I know it’s only November BUT if you want to make this adorable Christmas advent calendar bunting you need to get started now.

I was sent a collection of beautiful Liberty prints to make a Christmas project for the Liberty Craft Blog and the next edition of Sew Liberty. Sadly, the whole craft blog has since been removed from the Liberty website so find the full tutorial here.

How to make Liberty print advent bunting | DIY advent calendar | Liberty print sewing project | Apartment Apothecary

Happy sewing!

Katy x


100 DIY home projects

I am very excited to announce my first contribution to a magazine! I was asked by Anna, the new Editor of Homemade With Love magazine, to contribute my cotton reel holder tutorial and I have spent all of October as the ‘Guest Pinner’ for the magazine. For those of you who aren’t ‘pinners’ this means I have been finding images and tutorials of exciting handmade, craft and DIY home projects for the magazine’s Pinterest account. For those of you who are familiar with Pinterest, you will know this was just an excuse for me to spend more time pinning!

Now the month is over, I wanted to share some of the 100 home projects I have discovered in the process. The only problem is, I can’t decide which project to do first…

Mason jar lights by in.gredients

Mason jar lights by in.gredients.

Spray painted gold mugs by Garland of Grace

Spray painted gold mugs by Garland of Grace.

Crocheted hangers by Dottie Angel

Crocheted hangers by Dottie Angel.

Liberty print blankets

Liberty print blankets on Purl Bee.

Handmade clay pots by Claire of Fellow Fellow for Say Yes to Hoboken blog

Handmade clay pots by Claire of Fellow Fellow for Say Yes to Hoboken blog.

Hand printing on fabric by Karen Barbe.

Hand printing on fabric by Karen Barbe.

Decoupage bowl on the Liberty Craft blog

Decoupage bowl on the Liberty Craft blog.

Vintage yardstick hooks by Better Homes and Gardens

Vintage yardstick hooks by Better Homes and Gardens.

Copper foiled mirror by Byf Ryd

Copper foiled mirror by Byf Ryd.

Toy boxes with castors by This Little Street

Toy boxes with castors by This Little Street.

Get crafting people! Homemade all the way.

Katy x

P.S Here’s a sneak peek of my article…

Homemade With Love craft tutorial by www.apartmentapothecary.com

Paper lanterns

It’s that time of year when we all have to wrap up warm and brave the cold to watch pretty fireworks and drink lots of hot cider and eat sticky toffee apples.  To help give your garden some extra illumination try making these super simple paper lanterns…

You will need:

White paper bags – you can buy them here from Not On The High Street.

Hole-punch

Battery powered tea lights – you can buy them here.

How to make a paper lantern www.apartmentapothecary.com

All you need to do is use a hole-punch to create a design that’s very effective when illuminated. You can be much more ambitious and use a craft knife to create all sorts of designs.

How to make a paper lantern www.apartmentapothecary.com

Then place about four battery powered tea lights in each bag and you’re done (I told you it was as simple as can be). If it’s a windy night pop a few stones in the bag too to weigh them down even more.

How to make paper lanterns www.apartmentapothecary.com

I love the warm glow of these lanterns and they emit a lot of light too.

I hope you all have a lovely evening and happy birthday to my beauteous sister Juliette!

Katy x