Stained glass class

It was my birthday recently and my boyfriend has got into a habit of buying me an ‘experience’ rather than ‘stuff’. This year, he arranged for me to go on a stained glass class, which I was very excited about because I LOVE stained glass, especially 1920’s-1940’s door and window panels (like the 1920’s one above that I bought for £18 in Southwold at a cute little antiques shop). My mum’s best friend, Jo, makes stained glass and I remember as a child seeing her creating and thinking it was all quite magical.

I went along to the class at Crafts Bee, which is a relatively new venture run by Karen. They teach lots of different crafts from stained glass to sewing and are based in South East London and Kent. I did the copper foil stained glass class, which is suitable for beginners and there were six of us in the class, so we got lots of individual attention.

I have never done any stained glass and I assumed that there would be no way of creating anything special by the end of the class, but I was wrong. In the six hours that I was there I was able to quickly learn the cutting glass technique, cut glass to complete a design and then learned how to copper foil and solder the design. By the end of the class I had made a beautiful panel that is now proudly hanging on my sitting room window.

This is how it happened…

Stained glass class www.apartmentapothecary.com

Deciding the colours for the design.

Stained glass class www.apartmentapothecary.com

Cutting the glass to fit the design.

Stained glass class www.apartmentapothecary.com

Copper foiling each piece of glass.

Stained glass class www.apartmentapothecary.com

Soldering the glass together – I was rubbish at this bit!

Stained glass class www.apartmentapothecary.com

The finished piece. I love it.

I’m now thinking about buying some equipment so I can do it at home. I would really, really love to develop this craft and one day create a beautiful art deco style window panel.

Katy x


Choosing a new floor

Exciting news everyone – we are definitely going to rip up our carpet and get a new floor (ok, maybe this is just really exciting for me).

Anyhoo, as promised, I am going to guide you through my decision making process (remember, I’m making changes to five parts of my home – see previous post). In doing so, I hope this may help some of you who may be struggling to make your own interior decoration decisions. Here goes…

Phase one: Inspiration

The very first thing I am going to do to help me choose a new floor is find inspiration.  This is where I find mine:

– Magazines

– Blogs

– Pinterest

– I go and knock on two of  my neighbours’ doors who have got new wood floors

– I visit my friends’ houses to check out their floors (and reassure them that I don’t just want to be their friend because of their beautiful floor….).

At this point I am thinking of nothing other than: “What do I really like the look of?”. This is definitely the most enjoyable part of the process and these are some of the millions of inspiring floors I have found (for more, see my flooring Pinterest board):

Black and white checkered painted floorboards

I WILL have this floor one day. Black and white chequered floor has always been my favourite (I have it in my bathroom) and it’s even better on floorboards. Photograph from Elle Interior.

How to choose the right floor: Herringbone wooden floor www.apartmentapothecary.com

I WILL also have this floor one day with big, beautiful rugs laid over it! I adore it. Photograph from Convoy Tumblr.

How to choose the right floor: Original wooden floorboards www.apartmentapothecary.com

If I lived in a period home, the simple solution would be to just rip up the carpet and expose the original floorboards. Best option every time – you can’t beat the warmth and character of original boards. Photograph from Design Dautore.

How to choose a new floor: Concrete floor www.apartmentapothecary.com

Polished concrete creates an industrial look that can be a great blank canvas. This floor was laid in a converted barn that I visited and you can see more of it in this post. Add underfloor heating and a concrete floor is nowhere near as cold and sterile as you might think.

How to choose a new floor: Vintage tiled floor www.apartmentapothecary.com

There a million different photographs of beautiful vintage tiled floors that I could add here. Photograph from Espacio Vital.

How to choose the right floor: Red and white vinyl floor www.apartmentapothecary.com

There are so many new vinyl floors on the market now that are both practical (easy to clean, warm underfoot) and stylish. Photograph from Hemnet.

How to choose the right floor: Herringbone tiles www.apartmentapothecary.com

Vintage herringbone tiles – yes please. Photograph from Creating Keepsakes.

How to choose the right floor: Sisal carpet www.apartmentapothecary.com

I’ve always really liked the warm neutrality and texture of sisal carpet. Photograph from i-decoration.

How to choose the right floor: Geometric tiled floor www.apartmentapothecary.com

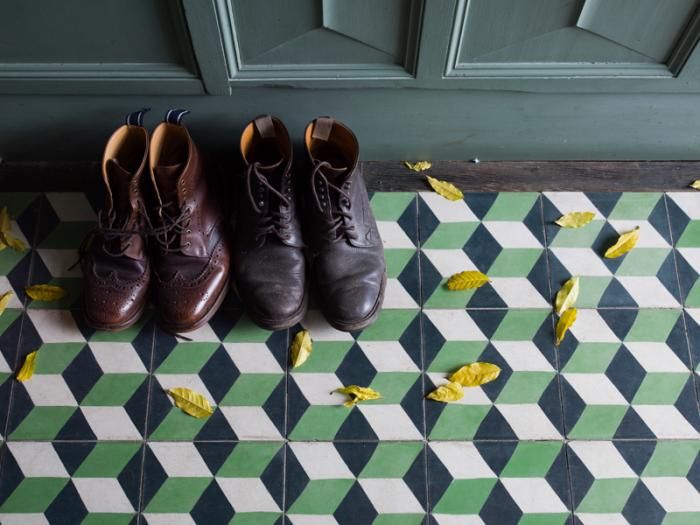
There are so many amazing modern floor tiles available. I like the current trend for geometric patterns, reminiscent of traditional Victorian hallway tiles. Photograph from Emery and Cie.

How to choose the right floor: Painted white floor boards www.apartmentapothecary.com

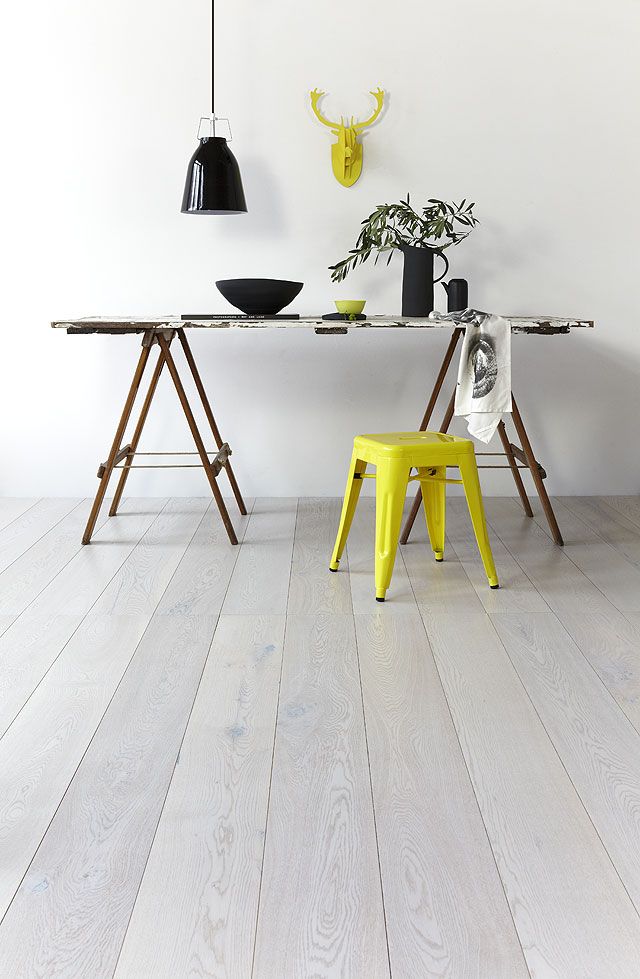
I’ve had this floor in my bedroom before and I love the look. Photograph from The Designer Pad.

Phase two: Practicalities

It’s now about eliminating my inspirational floors based on the practicalities (this is the boring bit). I have to very clear about what those practicalities are and think through what I want from the floor:

– Durable (puppy proof): This eliminates the white floorboards as they will get scuffed and marked to hell and back. It also eliminates vinyl as this gets damaged easily too.

– Easy to clean (puppy poo proof): This eliminates the sisal.

– Not too ‘different’ as we will be selling the flat sooner rather than later so don’t want to alienate potential buyers: This eliminates any gorgeous designs like the beautiful vintage tiles or geometric tiles.

– Light and bright so as not to make the flat feel small: This eliminates the black and white painted floorboards (sob).

– Suitable for the sitting room, kitchen and hallway: This eliminates having a tiled floor as this is not suitable for a sitting room area.

So, I am left with the original pine floorboards, the herringbone floor and polished concrete as potential options.

Phase three: Ask your friends and family

This phase is invaluable. Try and find out first hand whether what you want will work for you. At this point, I asked friends about their herringbone floor and they said it was a nightmare! They said it was soft, no one could wear heels on it, the gaps between the blocks snagged things. They also said unless it is weathered and has had years worth of varnish applied to it it is not very durable. No herringbone floor for me then (sob, again). Don’t be tempted to go against people’s advice just because you love the floor – it won’t be worth it in the end.

Phase four: Does it match the interior?

It’s at this point that I begin to think about the rest of the interior and whether the potential options will work with the rest of the flat. If you find it difficult to visualise this phase, which I know a lot of people do, order some samples! This is the best way to get a sense of what the floor will look like. I have to eliminate the polished concrete option at this point because I don’t think it will work with the furniture I have.

Phase five: Budget

I always leave this till last as I always think there is a way around it. I start to look at prices by doing a quick google. I quickly realise that the option I am left with, which is original floorboards, will be quite expensive. I have to think about whether this is something I really want or could I go with a cheaper alternative that will actually serve me better. If I’m really practical about it, original floorboards, though beautiful, aren’t necessarily the best option in a new build flat; they probably won’t appeal to future buyers as the type of person who generally buys a new flat wants new floors. So, I think about alternatives:

1) Plywood floor

There are sheets of plywood underneath our carpet at present. I saw a house tour in Homes and Antiques magazine of a couple who had painted and varnisehed a plywood floor and I loved the effect. Plus, it is a very cheap option. However, it would take a huge amount of time and effort to get it right.

How to choose a new floor: White plywood flooring by Apartment Apothecary

We could paint the plywood any colour we wanted to. Photograph by 79 Ideas.

How to choose the right floor: Plywood flooring www.apartmentapothecary.com

Or we could varnish it as it is. Photograph from Zyprezz.

2. Engineered floor boards

This is the boring, easy, safe option and when we come to sell, a proper oak floor will be far more advantageous. Plus, it is durable  and easy to clean. However, it is a lot more expensive than a plywood floor.

How to choose the right floor: Engineered wood floor www.apartmentapothecary.com

To make the final decision I have to go and see examples of these floors in real life, so I visit a friend who has an oak engineered floor and a shop that has a plywood floor. I actually like the aesthetic of the plywood floor a lot as it looks quite industrial, yet still warm. It’s also a bit more individual than an oak floor.

So, we’re going to take up a corner of the carpet, do some paint and varnish testing and see whether we can get a good effect. If not, we’ll resort to an oak floor. Watch this space…

Vintage kitchen hooks

Back in Spring (where has the time gone?!) I needed to do a final shot of an apron I had made for this post. My kitchen is relatively dull, as it’s a new-build flat, so it didn’t look particularly aesthetically pleasing when I hung it in there. So, I decided to photograph it on some vintage school hooks that are in our spare room for guests to hang their clothes. I hung some kitchenalia on the hooks too and the end result was rather pleasing:

Liberty print apron

Find out how to make this Liberty print apron here.

I was then lucky enough to go to designer Lisa Levis’s house for a nose around and to interview her for the blog. You can read that interview and see all the beautiful photographs of Lisa’s home here. In Lisa’s kitchen I saw some very similar hooks to my own:

Lisa Levis (nee Stickley) vintage kitchen hooks

Photograph by the beauteous Katharine of Peachey Photography.

I then caught a glimpse of Sarah Moore’s home and there were more very similar vintage hooks in her kitchen:

Sarah Moore Vintage kitchen hooks

All these vintage hooks got me thinking that this could be an easy way of adding character to a kitchen. Plus, hooks are so practical as they take up so little space, yet you can store a lot on them. I had a nose around Pinterest and found another few examples for inspiration:

Vintage kitchen hooks

Image from Blood and Champagne blog.

Vintage kitchen hooks

Image from Melanie Molesworth’s book ‘Junk Style’.

Vintage kitchen hooks

Image from the Tokyo home of Katsuya Kamo on The Selby blog.

All in all, I’m sold on the idea. Vintage hooks for the kitchen is added to my list of projects x

P.S. My little apron was featured in Issue 2 of Sew Liberty this month. Take a look here (p.8).


Mason jar glasses

Happy Halloween everybody! I don’t know about you but some of my fondest childhood memories are of trick or treating with my sisters and kids from our neighbourhood. We’d get all dressed up and paint our faces and traipse round the streets stuffing our faces with as many sweets as is humanly possible.

I recently bought a box of Mason Ball jars (so expect a lot of posts about what you can do with them!) and I decided to try out something I’ve seen on a lot of American blogs. I’ve added a Halloween theme, just in case any of you are having a little party – this will work for both adults and kids alike.

You will need:

Mason Ball jars – I bought mine from an American site and even with the postage it was the cheapest that I could find. Buy Mason Ball Jars here.

1/4″ Grommets – buy grommets here.

Chalk board paint and chalk – buy paint here.

Straws – I bought Halloween themed ones from Pearl and Earl.

Toy spiders – I bought them here.

Drill with a metal drill bit

Pliers

 Tutorial:

Mason Ball jar glass tutorial by www.apartmentapothecary.com

1. Use the drill, with a metal drill bit, to make a hole through the centre of the lid.

Mason Ball jar glass tutorial by www.apartmentapothecary.com

2. Increase the size of the hole to 1/4″ by using a set of pliers to gently ease through the hole, making it bigger. The lid is very thin metal so this is very easy .

Mason Ball jar glass tutorial by www.apartmentapothecary.com

3. Spray the lids with the chalkboard paint and leave to dry for a couple of hours.

Mason Ball jar glass tutorial by www.apartmentapothecary.com

5. Use the pliers to help you ease the grommet around the hole in the lid. The sharp edges on the back of the lid will be covered by the grommet.

Mason Ball jar glass tutorial by www.apartmentapothecary.com

6. Write the names of your party-goers in chalk.

Mason Ball jar glass tutorial by www.apartmentapothecary.com

7. Pop a couple of the toy spiders in each cube of an ice tray and pour water over to create scary ice cubes!

Mason Ball jar glass tutorial by www.apartmentapothecary.com

8. Add your drink and then you can secure the lid with the outer ring (you can spray paint these too if you want to).

Mason Ball jar glass tutorial by www.apartmentapothecary.com

9. Pop your Halloween themed straws into each glass.

Mason Ball jar glass tutorial by www.apartmentapothecary.com

10. And you’re ready for your party – shame only my boyfriend and puppy are coming to mine 🙁

Mason Ball jar glass tutorial by www.apartmentapothecary.com

I can’t wait to make more of these for a summer garden party (oh for the return of those long summer days!). They’d be perfect for cocktails or pimms. Instead of spraying chalkboard paint, you could cover the lids in pretty paper or fabric.

Hope you have a good one (and more people come to your party than they did mine!) x


How to plan changes in your home

Since I left home I have never lived anywhere for more than three years. We have now been in our current flat for just over the three year mark and I’m getting very itchy feet. This isn’t because of the flat itself or the location – both are great. It’s because I get bored of being surrounded by the same decor and furniture – everyday I am tortured by images on blogs and Pinterest of AMAZING interiors that I want to recreate. Whenever I have moved in the past I have used it as an opportunity to redecorate and buy new furniture; I try to make myself a little piece of that AMAZINGNESS that I hanker after.

I have a very sensible boyfriend who, when I tell him we need to move, tells me that we can’t move just because I’m bored with our dull, new build kitchen and our beige carpet. I can’t think of a better reason, myself, but then I look at house prices and my bank account and realise the two don’t quite match up.

So, the upshot is, I need to do some decorating or make some changes to the flat otherwise I will go crazy. Weirdly, it’s sometimes enough just to make plans, without even doing the decorating, to stop me getting bored. Maybe there’s something wrong with me! Anyhoo, I thought it may be a good idea to document my planning (even if the decorating doesn’t happen) as this could help those who find it difficult to know where to start. The choices are literally endless so I want to try to help pin down how to begin. I’m going to tackle each area in my home that I want to change and how I go about planning those changes so this may require a few posts.

These are the areas I will be tackling (subject to change as my mind can go off in all sorts of directions when I get going!):

Part 1: Flooring

We need to replace the carpet in our sitting room, kitchen and hallway to a hard floor to cope with a mucky pup and because I HATE the carpet – it’s SO boring (Part one is now published!).

Part 2: Sitting room furniture

I want a new sofa and armchair that are more appropriate to the space in our sitting room. I bought our current sofa and armchair for a different flat and they are both too big for our current living space.

Part 3: Tiling in kitchen

The developers of our flat did not do any tiling in our kitchen and I think this would be a great way to add a bit of character to the space.

Part 4: A hallway makeover (see it here!)

I HATE our hallway. It’s lined with big, modern, laminate wood doors and boring beige carpet. It’s dull as dish water and makes me sad so it needs to change.

Part 5: Choosing rugs (see it here!)

If we have a hard wood floor we are going to need some beautiful rugs (I love a good rug).

I propose to take you through my planning process for each of these areas over the next few weeks, which I hope will help some of you who may be trying to figure out how to go about making your own changes. Whether any of my planning becomes reality is another story – I wish money grew on trees!

Katy x

P.S. I must remember to always tell myself that I am very, very lucky to live in such a nice flat and that I have got so much more than so many other people. Note to self – I must not think like a spoilt brat!

P.P.S. The photo above is of my dining area taken by the wonderful Katharine of Peachey Photography.

P.P.P.S If you want to see more Peachey Photography photographs of my flat you can here.