Our new house – the estate agent pics

Oh hello blog, my old friend. And hello, lovely readers! I am so sorry for being absent for so long – the last three months, since I blogged last, have flown by in a haze of running around after a very adventurous toddler and spending every nap time desperately trying to push the purchase of our new house through dealing with surveyors, solicitors, agents, builders and mortgage advisors. It was definitely not a straightforward purchase and after buying my previous two flats, which were both new builds and therefore pretty easy in terms of the conveyancing, it came as quite a shock to the system just how much time, energy and headspace this purchase would take. I immediately knew when I saw the house that it would be perfect for us and I was so invested from the first moment so when it looked like the purchase might fall through on a couple of occasions I felt sick to my stomach. This was the only house we could afford in Ladywell, which is the area we wanted to be in (as it is a probate property that needs renovation and therefore that bit cheaper than equivalent houses), so that really added to the stress levels. Also, my levels of productivity throughout the process fell to an all time low because I felt so stuck in the limbo of having no idea whether or not we would be moving on and whether we needed to pack up and I lost all pleasure in being in the flat because I wanted to be elsewhere. I have discovered that living in a half packed home is not good for my mental well being.

Anyhoo, the good news is that we finally completed the purchase last week and the sale of our flat went through really smoothly so it’s all done! We can’t actually move in to the new house for a few months as it needs to be completely renovated so we are currently staying with my very kind sister who is willing to put up with us all for the summer. Mimi is completely obsessed with her so she’s very happy about the temporary move although Otto isn’t quite so pleased and it seems like he’s desperate to ‘go home’, which is making me sad. Hopefully he will settle down soon.

I’m hoping to be able to post here more regularly now that I HAVE A WHOLE HOUSE TO DECORATE FROM SCRATCH!!!!! It’s actually too exciting for words. I will have my mum and sister on hand for a bit of help with Mimi so fingers crossed I will have more time to dedicate to the blog as up until now I have only had enough time for interior decoration projects with clients.

So, do you want to see this old run down house of ours that we have bought?! It’s definitely not a looker from the street, that’s for sure…

All images from estate agent Acorn, Catford (who I would highly recommend if you are buying/selling in the area).

The house was built in 1929 and needs quite a bit of work to make it look nicer from the outside. It’s never going to be a handsome house but that was a compromise I was willing to make as I think that everything else about the house will work for us. We don’t have the budget to contract out any of the work to the outside of the house so anything we do will be DIY. I’ll do a more detailed post about it but in brief we plan to paint the outside of the house white, build a new brick wall, tile the path leading up to the door, replace the side access gate, create a porch and use an original 1920s/30’s front door and do some lovely planting to add a bit of green and colour.

The house has been rented out for years and years so it’s in a pretty poor state. The plasterwork throughout is shot, the flooring is horrible cheap laminate sheets, the bathroom is in a horrid state and most importantly it is begging for walls to be knocked down to open out the small rooms. I love the proportions of 1930’s houses as they are so square and the layout really works but this house is very small so we decided as soon as we saw it that it needed to be open plan downstairs. Here is the current floor plan:

I love the way the whole width of the back of the house opens out onto the garden and we plan to make the most of that in the future by building a glass extension but for the time being we will knock down the wall between the two reception rooms and the wall between the back reception and the kitchen.

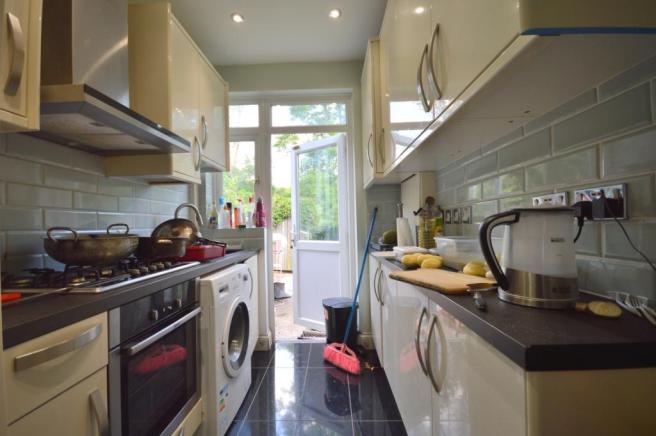
This is what the front reception and kitchen currently look like:

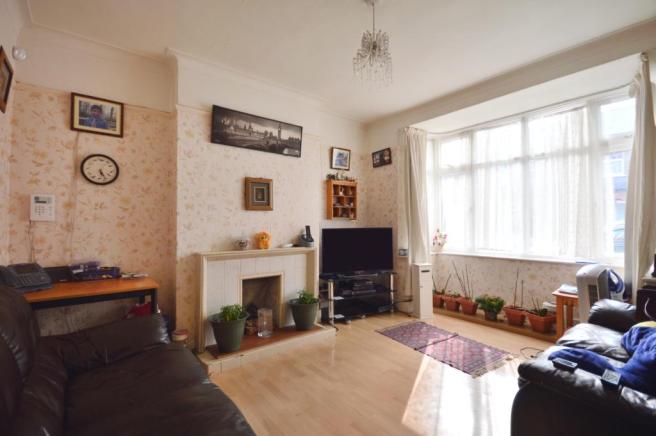
The reception rooms have their original doors, coving and picture rails and lovely big windows so the house is wonderfully light and by knocking all the rooms downstairs together we hope to make it even lighter. I’ll tell you more about our extension and kitchen plans another time as they won’t be part of the first round of works.

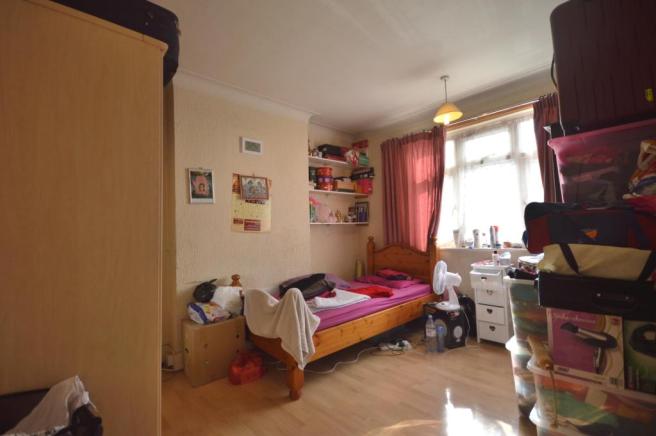
In the future we will also do a loft conversion to make a really good sized master bedroom but for the time being we’re more than happy with the bedrooms as they are. Having a third bedroom, albeit a very small one, will make a massive difference to us as it will give us the extra storage and a guest bed that we didn’t have in the flat.

Upstairs there’s also a bathroom with separate toilet and we plan to knock them together and completely re-do the room, which I’m very excited about as I have never planned a bathroom from scratch.

So, there you have it…a quick tour of our new house as it looked before we bought it. I plan to do some decorating and furnishing inspiration posts as well as detailed posts about some of the DIY jobs we will do that I hope will be helpful on a practical level. Let me know if there is anything particular you would like to know about that I can potentially cover during the renovation project. Our contractor doesn’t start until the end of May but fingers crossed we will be able to move in by the end of summer. I’m so pleased to be back on the blog and look out for lots of new posts soon!

Katy x

Holiday House

As you may have seen on my Instagram we are moving house! I started to play the Rightmove game last Friday night, got the flat on the market by Monday and it was under offer within a day – boom! We had a mortgage agreed on Tuesday, saw a house that we like on Thursday and I’ve got a feeling that this could be the one. It’s a cute 1930’s three bedroom house in south east London that backs onto lots of green space (ideal for Otto) and has a lovely garden (perfect for Mimi). It needs lots of cosmetic work and walls need to be knocked down so it wouldn’t be the way we wanted it for quite some time but I’ve always wanted to do a house up from scratch so I’m very excited about it. We will see…

Anyhoo, that accounts for why I have not published this post sooner but it feels like the perfect time for me as all I can think about right now is inspiration for doing up a WHOLE HOUSE and there is nowhere better for design inspiration than the Holiday House. A couple of weeks ago I was lucky enough to be invited to a beautiful dinner with the team at Farrow & Ball at the houses (there are actually two of them worth a cool £22m) as they are one of the sponsors and you can spot lots of their colours and wallpapers in the rooms. The houses are an interior design showhouse, where top interior designers showcase their talent to raise funds for The Breast Cancer Research Foundation – each room is designed by someone different so it is filled to the brim with beautiful designs, furniture, styling and the best bit is that everything is for sale, with proceeds also going to the foundation. Also hosting the dinner and the tour of the houses was Rachel Laxer who is the co-chair and creative director of the Holiday House in London. It was so wonderful to get her insight on the project and to hear the inspiration behind the cause that it supports.

You have this weekend left to visit the house as it closes on Sunday 10th December evening and it would make a lovely day out. You can book tickets here.

Here are a few snippets to give you an idea of what the houses look like…

The Holiday House interior design showhouse designed by renowned interior designers.

I love the simplicity of this design and the exquisite rug pulls the whole scheme together – CW Design.

The Holiday House interior design showhouse designed by renowned interior designers.

The vintage chairs in this room are the stars of the show – Beth Clancy at Rachel Laxer Interiors.

The Holiday House interior design showhouse designed by renowned interior designers.

The lovely Laura Hammett, who is a friend of mine, designed this stunning bedroom and I really appreciated the attention to detail of every aspect of the room.

The Holiday House interior design showhouse designed by renowned interior designers.

The ceramic wall sculpture in Laura’s design was stunning.

The Holiday House interior design showhouse designed by renowned interior designers.

Wallpaper heaven – Amelia Carter Interiors.

The Holiday House interior design showhouse designed by renowned interior designers.

I love the combination Farrow & Ball’s Hague Blue and Calamine stripes in this striking bedroom – Roselind Wilson Design.

The Holiday House interior design showhouse designed by renowned interior designers.

Farrow & Ball’s Peignoir used in the hallway. If you’ve seen my living room you will know that that is one of my favourite F&B colours – Hazel Collins Design.

The Holiday House interior design showhouse designed by renowned interior designers.

This is Rachel Laxer’s design and is dedicated to her mother, Barbara Stern – a strong breast cancer survivor.

I think we spent about an hour with Rachel touring the houses but we could have spent three hours there with no problem at all; there are so many rooms to see and the details in each room need to be soaked up. Buy tickets here to visit this weekend – your last chance!

Katy x

Adding a few decorative touches back to my flat with Fox and Ivy

I can not quite believe that Mimi is now nine months old – nine months in, nine months out. In some ways it feels like she has been with us forever but in other ways it feels like yesterday that I was waiting for her to arrive. A lot has changed in the last nine months and it has been a bit like learning a whole new way to live; new routines, new priorities, new levels of tiredness! One of the things that I lost control over whilst Mimi was a newborn was keeping the flat looking nice. Dreaded piles of ‘stuff’ started to build up and there was never enough time or inclination to sort them out. Now that she is toddling around and claiming a bit of independence I suddenly have more time and a bit more head space to get things looking good again. Therefore, the other day I simply went around the flat with a big shopping bag and threw every pile of stuff I came across into it to be sorted out in one go (or not!) – it felt so good.

With lots of clear space free of piles and baby stuff I am collaborating with Tesco to add a few new bits to the flat to make the space feel a bit more ‘me’ again. I have chosen a few pieces from their new Fox & Ivy homewares collection (click through and check out the prices, people!) that may surprise you as they are beautifully designed and work really well with the vintage pieces in my home. It can be frustrating to see so many gorgeous homewares in magazines or on Pinterest and know that either they are completely unaffordable or you have no way of finding out where to buy them from or both these problems! Therefore, I hope you find these pieces and ideas the opposite of that…

The first surface I cleared was my bedside table as it had become a complete dumping ground. It feels so good to have got rid of all that rubbish. And do you know what? I went and bought myself some flowers to celebrate reclaiming this space as my own. The ceramic vase is part of the Fox & Ivy collection and the delicate lace cut out design is so pretty and adds a touch of femininity to my bed side. I always tend to add a small vase or bottle of flowers on my bedside table but actually using such a big vase makes a real statement to the point where you don’t really need much else. It would also work really well on a hallway table or in an unused fireplace.

Minimal white bedroom with accents of dusky pink and vintage bedside table with an autumnal bouquet of flowers

One of the pieces I love most from the collection is this vintage inspired mirror. Adding new to old (the bedside table is an antique one that I got very cheaply on eBay – I always get questions about it so just search ‘antique Victorian wash stand’ if you are interested in one similar) works so well and I don’t think you’d ever tell that this mirror isn’t vintage. Isn’t it a pretty shape? I love the cottage-like feel of the combination of the mirror and flowers.

Minimal white bedroom with accents of dusky pink and vintage bedside table

You know when it’s a whole tea pot kind of morning?!

The other thing I have finally had time to do is to print out some baby photos. This has been on my to do list for nine months! I find the faff of printing photographs is not so much the printing process but more sorting out what to do with the photos themselves – finding frames and then hanging them. This is why I adore these glass hanging frames (great price too!). You can easily slip the photos in and out as you please (or add dried flowers, mementoes etc) and then hang them on a hook or a cupboard door handle, wherever you fancy really. Also, I removed the chain from mine to add some natural twine to personalise it but you could also use ribbon or a special piece of fabric.

Hanging photo frame in Scandi inspired nursery with vintage shelves | Tesco Fox and Ivy collection

I printed out this pic of Mimi and Otto that just melts my heart and hung it on the vintage shelves in Mimi’s room.

Gold edge hanging frame from the Fox & Ivy collection.

I used to have a plant and a vase of flowers on my coffee table but the moment Mimi started pulling herself up there a couple of months ago it all had to go. However, I noticed this little vase of faux peonies and hydrangeas in the collection and thought that perhaps it could withstand cheeky little baby hands and swishing dog tails for that matter.

I always like a few faux plants and flowers – so much cheaper and less hassle than buying and looking after all fresh.

I have another little project to do to help us adjust our space to having a baby; we basically need an office space so all these nasty piles stop accruing here, there and everywhere. I will keep you updated on that one. For now I am happy to have added a few new bits to the flat to make it feel a bit more loved. A thank you to Tesco for collaborating with me on this post and do make sure to check out the full Fox & Ivy collection.

Katy x

*This post was written in collaboration with Tesco.

How to refresh your wardrobe

Sorting out my wardrobe has been on my to do list for as long as I can remember. I did a major clear out of clothes last year using the Konmari method and I have been meaning to organise the space for ages without the masses of unworn clothes kicking about. One of the main tips of the Konmari method is to store as many of your clothes as possible in drawers so my wardrobe should be lovely and clear but I just didn’t get round to finishing the job off. Whilst at Homesense the other day I spotted some great clothes hangers, a basket and a full length mirror that I knew would be perfect to spur me on to get the wardrobe done.  So, what does one do on a beautiful sunny bank holiday morning at the crack of dawn? A wardrobe makeover, of course!

I have never bought a brand new wardrobe and when I moved into this flat over seven years ago I had no budget left for one. Instead I bought two old cupboards for about £40 from eBay, changed the knobs and painted the exterior and they look fine. However, not being purpose built wardrobes and pretty old the interior leaves a bit to be desired as you can see…

wardrobe makeover refresh for the autumn

So, here are my top tips for re-organising and refreshing an old wardrobe…

1. Paint the interior

My wardrobes are heavy wood, which makes the inside very dark. This makes seeing my clothes extra difficult and the overall effect is that of a big black hole. Therefore, the first thing I did was to paint the interior a light colour so everything becomes that bit more visible.

2. New hangers

You may think that beautiful luxe padded or wooden hangers are the ideal option but actually the slimmer your hangers are the better in order to create as much space as possible. However, no one wants horrible wire hangers, even though they are most space efficient, as they get so tangled and misshapen. I found these brilliant hangers at Homesense – I love the storage department there – that are both slim, sturdy and fabric covered so they glide along the rail with no scraping. Perfect.

Flex covered hangers from Homesense.

3. Sort hangers by colour according to type of clothing

The Konmari method advises to hang different types of clothes together i.e. all dresses together etc. Buy different coloured hangers and hang all dresses on one colour hanger, all tops on another and so on. This helps to keep your clothes organised and super easy to find.

3. Sorting hangers by colour makes it even easier to find items of clothing.

4. Hang mirror on back of wardrobe door

I don’t have space in my bedroom to hang a full length mirror so the back of the wardrobe door is the perfect place for it.

5. Clear bottom of wardrobe

A good rule to stick by is not to have anything in your wardrobe that can’t be worn i.e. my suitcase that I was stashing there had to go! However, it is tempting to dump lots of stuff in the bottom of a wardrobe so a basket seems like a good option as it can be pulled out so you can find what you need – whether it be shoes, scarves, bags – and loads of stuff won’t get lost at the back of the cupboard.

So there you go…brighter, more accessible and better organised.

Knowing the inside of a cupboard is organised brings such a sense of calm to a room, don’t you think? Or is that just me?!

What does the inside of your wardrobe look like? Is it all serene from the outside and chaotic inside? Give some of my tips a go and let me know if they make a difference.

Katy x

*This post was written in collaboration with Homesense.

A few new additions to my living room

As I told you last week I’m working with Homesense this month so I went along to the new store in Greenwich to choose a few things to show you. I went with a shopping list in mind but almost as soon as I got there I was stopped in my tracks by a beautiful chair, that I had no idea that I needed. I fell in love on the spot so I spent my own money buying the chair and the rest of the budget given to me by Homesense on a collection of other great homewares for my living room and more for a wardrobe makeover that I will show you next week.

So, here is my new chair that I pounced on as soon as I saw it (knowing that it was a one off find as Homesense stock varies from day to day and store to store)…

My living room has been taken over by baby toys of late and the worst offender was the bright tacky plastic of the jumperoo. Happily, I gave that away not long ago as Mimi is having none of it now she crawls, climbs and cruises. So, I was left with a gaping jumperoo-sized hole (have you seen those things – they are flipping HUGE!), which was the perfect spot for the new chair. We have a foam play mat that surrounds the chair normally (when I’m not taking photos 😉 ) and Mimi loves the fact that I sit in the chair and she can play close by and occasionally use the chair as a new climbing frame.

Chair from Homesense £149.99.

I love the mid century vibe of this chair and the colour of the wood is perfect for this room. It also feels really solid and well made. I chose a beautiful wool blanket from Homesense to add a bit of softness and colour to the chair and to help tie in with the colour scheme of this room. Also, as usual, I am getting excited about my favourite season drawing in and you can never have enough blankets once the days get colder.

Basket from Homesense £12.99.

I also bought a new toy basket that is the perfect shape for Mimi to reach into and the best way to keep toys from being strewn everywhere. There was only one of these baskets in store so I was very pleased to get my hands on it.

As I mentioned in my last post I was overly excited to find this crocheted bunny toy for Mimi whilst I was at Homesense for only £4.99 compared to the RRP of £29 – I’ve got to grab aesthetically pleasing toys that Mimi will actually like when I see them. There is far too much brightly coloured plastic in my house these days.  She really does love the bunny as it rolls around and she chases after it (as does Otto!). Look at those chubby little hands!

I love the textured grey fabric of the chair as it complements the mid century style and it is very baby and dog friendly (Otto loves nothing more than resting a slobbery chin on chairs).

The basket was £12, which I think is a really good price for such a sturdy basket. It’s going to get a lot of use and I really think it will stand up to it.

The chair is so comfortable and it’s the perfect place for me to sit whilst Mimi plays and she can’t get enough of climbing up it!

I’m so pleased I came across the chair and made the decision to buy it there and then. It’s the perfect addition to our living room.

100% wool blanket from Homesense £29.99.

What do you think? Would you expect to find something like this at Homesense? I have to admit that I didn’t but I’m very happy I did. Back next week to show you my wardrobe makeover.

Katy x

*This post was written in collaboration with Homesense.