Re-styling my kitchen

A couple of weeks ago I shared some ‘before’ pictures of my kitchen, which I hate. I like two things about my kitchen – the fact it has a window (a rarity in flats) and its size, which is relatively large for a central London flat. However, the units and worktop are not my thing and we are definitely going to try to replace some of it. In the mean time I set to work re-styling my kitchen as I plonked every piece of kitchenalia I owned in there when we moved in and then desperately tried to ignore it for as long as possible. The result? A very confused mish-mash that might be ok if set against a beautiful, old kitchen but not in a brand new one like mine.

Today, I would like to show you what I have taken away and a few of the things I have added in a desperate bid to bring a bit of cohesion to my kitchen.

Before

A bit of a confused mess that I’ve tried to ignore for a while…

Kitchen re-style | Apartment Apothecary

After

I stripped everything off the walls to make it feel cleaner and fresher and I wanted to remove all of the colour, use a neutral palette, ceramics, glassware, enamelware and add plants to the kitchen. I didn’t actually buy much, it was more a case of removing all of the colourful things, clutter and repurposing other things from around my home (a good bit of ‘home shopping’). I sold all of the Le Creuset I had in the kitchen (not the pans but butter dish, salt pig, sugar bowl etc) as well as the set of blue enamel utensils. This helped to fund a few new bits for this re-style. In total, I bought two chopping boards (£28.50), tea-towel (£15), hand wash (£14), large jug (£18) and the rest of the changes were made by a simple re-jig.

Kitchen re-style | Apartment Apothecary

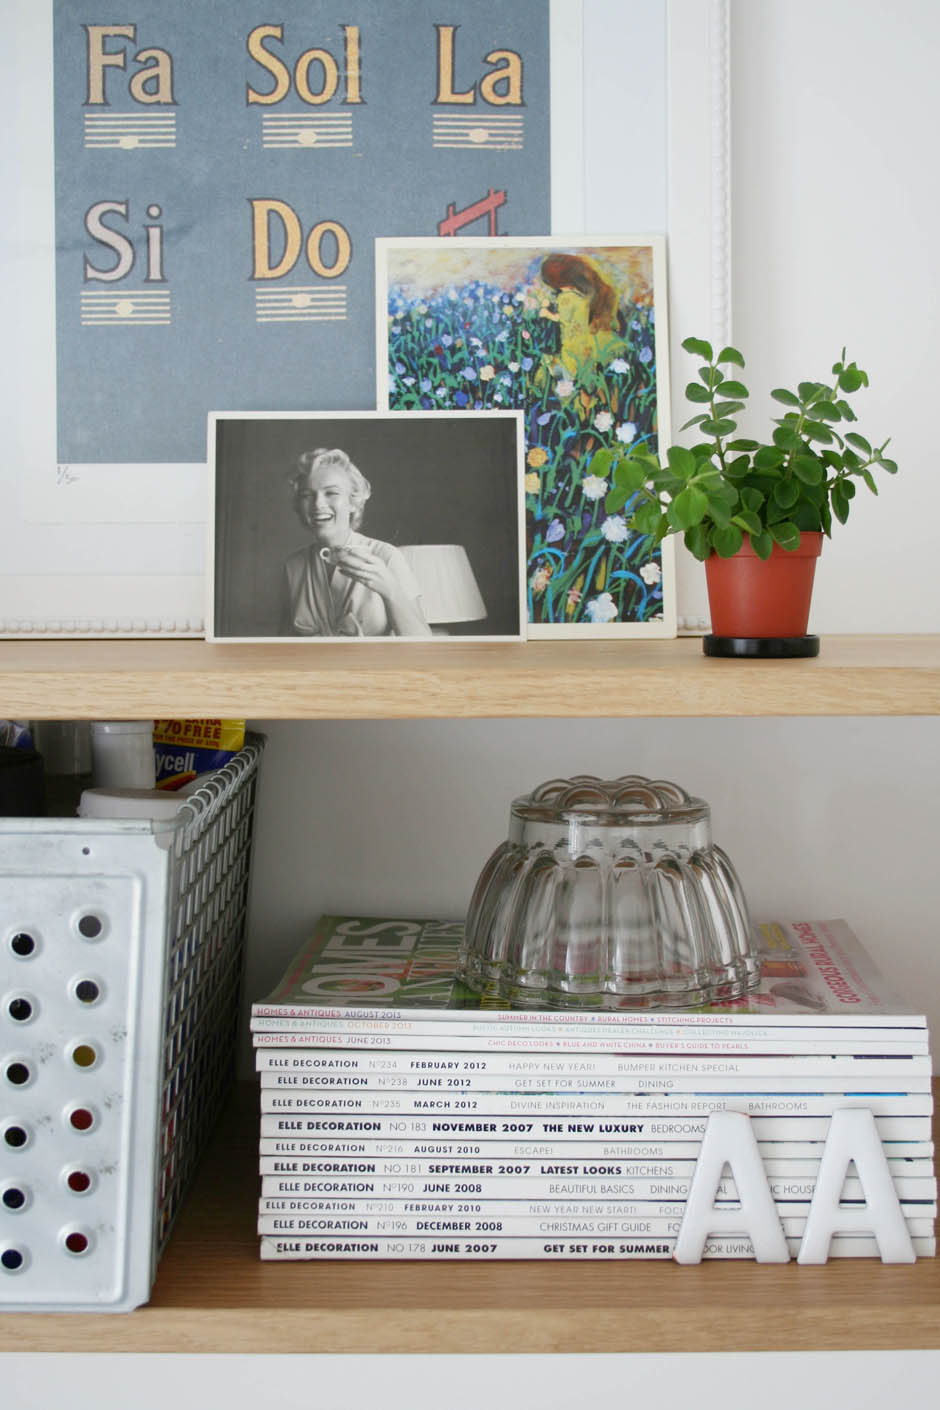
I cleared the window sill and moved the vintage rolling pin, coffee pot and utensil holder (with an added succulent) to here. I also moved the small print tray to the right of the window, which is filled with shells that I collected whilst travelling.

Kitchen re-style | Apartment Apothecary

I removed all of the recipes I had stuck to the cupboard door above and added herbs to the DIY jelly mould planter. Adding green to any room helps to bring it alive.

Kitchen re-style | Apartment Apothecary

I debated with myself whether I should repaint this vintage shelf as it is the only bit of colour left in this room so it stands out a bit too much. However, it kind of feels wrong to paint it as it is genuinely old and I love the colour. Eventually I would like to move this shelf and replace it with open shelving as the blue doesn’t really work in here anymore, unless I choose tiles with blue in them. So instead, I replaced all of the colourful mugs with white ones to try to tone it down slightly.

Kitchen re-style | Apartment Apothecary

Small details like the linen tea towel from Labour and Wait helped to change the feel of the room. I even chose the hand wash from Workshop Living because the packaging blends well with the rest of the kitchen (I have to laugh at myself sometimes!).

I love the contrast of the Tom Dixon marble board (see my review of it here) with the wooden boards. I also added more pots of herbs to add texture and a dash of colour.

Kitchen re-style | Apartment Apothecary

I moved the old science lab stool that I salvaged (from a skip at the school I used to work in) into the kitchen. It’s actually quite handy as I can sit on it and chat to Jules whilst he cooks.

Kitchen re-style | Apartment Apothecary

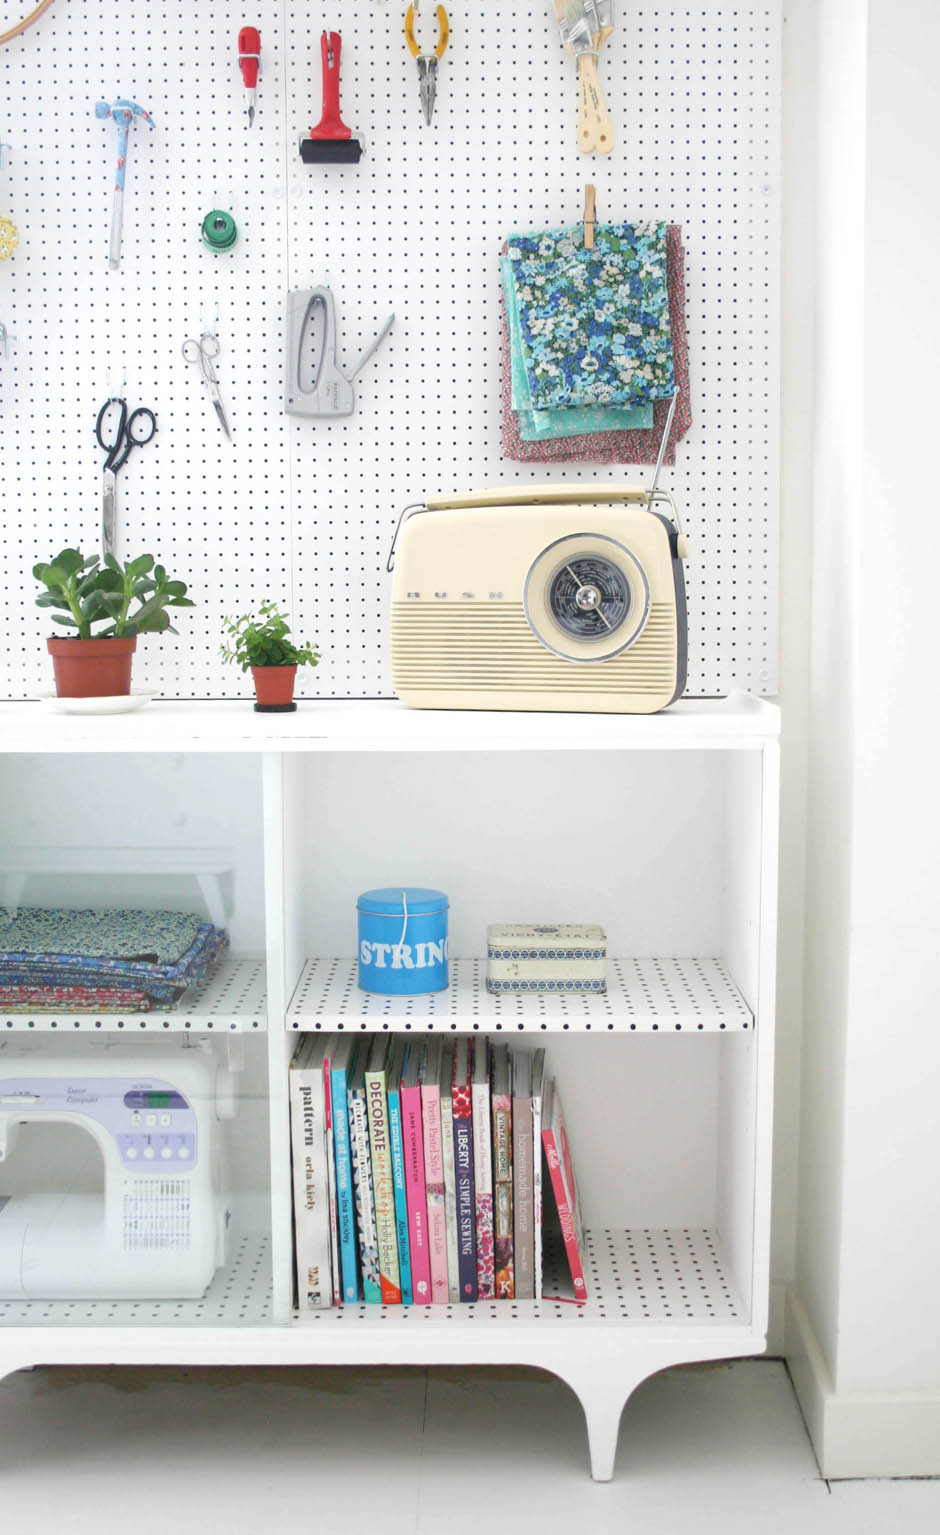
I simply turned the enamel tea and coffee jars round to hide the writing on them so they look less fussy. I repurposed the mustard and marmalade jars, which I had in my craft room for paint brushes, and now use them as utensil holders.

Kitchen re-style | Apartment Apothecary

I put all of the kilner jars I had in my cupboards onto the kitchen surfaces, which is practical as well as adding cohesion. I bought this large stoneware jug from Habitat to act as a utensil holder but since I photographed this post, I found a couple of old earthenware pots in my local antiques market that are perfect and only cost £8 for both.

I have added a couple of really beautiful handmade ceramic bowls that my mother-in-law gave me purely for decorative purposes. I love the character they bring to the kitchen surfaces. I also bought these wooden chopping boards from Workshop Living.

Kitchen re-style | Apartment Apothecary

What do you think? When I feel really dissatisfied with a room, I always try to do my best to solve the problem before spending heaps of money. This re-style has made a massive difference to the feel of this room and I far prefer it to how it was. I’m feeling motivated to make bigger changes now.

Katy x

Hallway makeover

My first DIY reveal of the year – what a great feeling! I love refreshing my home at the beginning of the new year in preparation for the lighter, brighter days. My bedroom is next on the list…

Before

To sum up what the hallway was like before I would say: dark, soulless, beige, depressing, confused, and just soooo many doors! Basically, I live in a new build flat so every single fixture and fitting is functional and lacks character. The doors (there are eight leading off the small hallway – yes, eight) are huge, washable and extremely strong, which is brilliantly practical but they are gruesome to look at and have no mouldings or even nice handles to detract from the fact that they are just massive slabs of wood. The doors, combined with the vile, light absorbing carpet mean that my hallway is just generally depressing and even when I put nice things in it, like the beautiful Victorian washstand and mirror that used to belong to my grandmother, nothing can lift it past the point of being utterly depressing. When I don’t enjoy being in a space, I try to close myself off from it, which means I cut out the light in the flat as I close all of the doors. Another consequence of not enjoying a space is that it quickly becomes a dumping ground – spot the old computer that needs to be disposed of and has sat there for a month!

So, something drastic had to happen, yet I didn’t want to spend more than about £250. Drum roll please…

Hallway makeover 'before' shot| Apartment Apothecary

My hallway BEFORE. The first shot is looking down the hallway from the front door. The second shot is looking up the hallway from my living area. The last shot is of the front door and hallway table. Aren’t ‘before’ shots always so terribly unhappy looking? Even Otto looks sad about the whole thing.

After

These shots were taken by photographer Katharine Peachey during the recent home tour shoot she did for 91 Magazine. Luckily for me, she captured the hallway, which makes it look extra special in contrast to my awful before shots!

So, this is what I did:

1) Pulled up the carpet and painted the MDF boards underneath to match the living area and home office, which creates more continuity and less of the feeling that the hallway is separate box within the flat.

2) Painted all of the internal doors white – what massive change that makes! They are no longer a feature and you barely notice they are there, which makes the hallway feel so much bigger and brighter. We also completely removed the door that leads into the living area, which really helps to create more flow and bring more light into the hallway.

3) Changed the door handles and replaced them with original Bakelite ones that I bought from Lassco, which are a bit more a design statement rather than a purely functional tool.

4) Painted the bathroom door with blackboard paint to create some contrast with all of the white. Plus it’s rather handy for notes as the front door is just to the left of it.

5) Bought a new hallway table from eBay that is a vintage school desk and I now use the Victorian washstand as a bedside table, which suits the style of the bedroom a lot more than the hallway.

6) Added a couple of pieces of art work, including my favourite Double Merrick print.

7) Added our spare Ercol dining chair, with a colourful Orla Kiely cushion, which is practical for putting on shoes but also adds a bit of colour.

8) Bought a jute runner, which is super practical with a dog and it tones in with the table top and chair (I normally have a seagrass basket in the righthand corner too for scarfs and gloves etc). Some of you may remember that I bought a Turkish Kilim runner for the hallway but Otto ran down it with paint all over his feet – cut a long story short, the runner did not survive.

9) Styled up the hallway table to make it more appealing to look at and added a huge vase of flowers, which is always filled with yellow flowers to tie in with the cushion. I bought the vase from Petersham Nurseries Shop.

10) Bought some vintage hooks from eBay to match the black and white colour scheme.

All that is left, is to find the perfect rug/mat to go in front of the front door and some new light fixtures…

Hallway makeover | Apartment Apothecary

A lighter, brighter space. This is looking up the hallway from my living area.

Hallway makeover photographed by katharinepeachey.co.uk | Apartment Apothecary

I added character with a vintage school desk for the hallway table, vintage hooks from eBay and nice bits and bobs on the table.

Hallway makeover photographed by katharinepeachey.co.uk | Apartment Apothecary

I always have yellow flowers on this table, which tie in with the yellow cushion on the chair. The vase is from the Petersham Nursery shop.

Hallway makeover | Apartment Apothecary

All the internal doors are now white, with original Bakelite handles that I bought from Lassco and the bathroom door has been painted with blackboard paint.

Hallway makeover photographed by katharinepeachey.co.uk | Apartment Apothecary

This is looking down the hallway from the front door. The painted floor of the hallway now creates continuity with the living area and home office, which leads off it. We also removed the door at the end of the hallway that leads into the living area so that the hallway is lighter and more integrated into the rest of the flat.

Hallway makeover photographed by katharinepeachey.co.uk | Apartment Apothecary

Styling up the hallway table and adding a mirror breathes life into the space, rather than it being seen as a dumping ground.

Hallway makeover photographed by katharinepeachey.co.uk | Apartment Apothecary

You can just glimpse a small Turkish Kilim mat that I have by the front door, but still searching for something a bit more permanent.

Hallway makeover photographed by katharinepeachey.co.uk | Apartment Apothecary

My favourite Double Merrick print has now been framed and added to the wall between the office door and the hallway cupboard door, which fits a lot better than what was there previously.

Hallway makeover photographed by katharinepeachey.co.uk | Apartment Apothecary

I hung two large honeycomb balls from the ceiling during Christmas and they looked like lovely lampshades. This has inspired me to search out two new pendant lights to replace the spot lights.

What do you think? I know it’s not perfect and it’s certainly not my ‘dream’ hallway, but with what we’ve got and the small amount of money I wanted to spend I’m pretty thrilled with the results. Gone is the dark, beige, light absorbing box and a new, light, bright and breezy passageway has arrived! I just need to find the perfect rug to placed by the front door and new lamp shades to replace the spot lights.

What DIY projects have you got up your sleeves this year?

Thank you to Katharine Peachey for the beautiful photographs.

Katy x

DIY Home office

Yesterday was so much fun, seeing the first of the Styling the Seasons posts and photographs. Thank you so much to everybody who is going to take part (remember, you can share your styled surface on any day during September) and I hope that it has already helped you take a bit more time to reflect on the change of month and how to refresh your home – sometimes a jiggle around is almost as good as redecorating, I find.

That being said, I have done a rather large ‘jiggle around’ of what was our guest room/home office and I would like to share the results of that with you today. The room used to look like this…

Home office makeover 'before' | Apartment Apothecary

I never invested a huge amount in this room, mostly because I had run out of money by the time I had bought furniture for the other rooms in the flat. Therefore, it was always more functional than anything else. However, I always hated the carpet, I can’t bear staring at a wall when I’m working and the bed didn’t get used enough to justify taking up most of the room. So, I have done a DIY makeover with a budget of £300 (excluding the shelves, which Jules bought me as a present):

Budget

Floor paint – Farrow and Ball ‘All White’ £94

MDF desk top – £25 bought from a timber yard and cut to our dimensions

Four desk legs – Ikea £32

Pendant light – The Gifted Few £90

Cabinet makeover – £62 click on this post to see how I changed it: Furniture Makeover Challenge

Pegboard – Amazon £16

TOTAL: £319 (I also sold the bed for £150)

In brief, we sold the bed, ripped up the carpet, painted the MDF floor, removed everything from the left hand wall and cut the existing desk down to 150 x 70cm. We then bought another piece of MDF, exactly the same size, and painted it white to make a double desk. Neither of us wanted to face straight at a wall so I decided to place the desk in the middle of the room, which also means others can sit at it and I can use it as a very easily accessible sewing table and for pattern cutting. It is also good for taking photographs on from every angle. We had two trestle legs on the old desk, which we have kept and we have one each, and then I bought four more legs, which don’t take up the extra space trestle legs do.

My desk chair is from the wonderful Out There Interiors and Jules has had his Herman Miller chair for ages. I slotted the cabinet in next to the window and it has sliding glass doors, which is perfect for the space and it’s where I store all my sewing bits. Find out more about it and the pegboard in my furniture makeover challenge post. The String shelving was a massive indulgence but is such a flexible shelving system that can broken up or added to (I want the cabinets and drawers) and can be moved to other rooms – I hope one day to have a whole wall of it). I have left the wall behind my desk completely blank so that I can take photographs against it and there’s also a set of drawers, that were in the old guest room, next to the door as you enter the room where I can leave on-going craft projects or take photographs.

I hope you like the end result…

Home office makeover | Apartment Apothecary

My home office makeover by Apartment Apothecary

Did you see my first Styling the Seasons post yesterday that focused on my new String shelving?

My home office makeover by Apartment Apothecary

I love this Double Merrick print, which I used as colour inspiration for the room.

My home office makeover by Apartment Apothecary

I have hung three clipboards on the wall for inspiration – pages of magazines, fabric samples, photographs etc.

My home office makeover by Apartment Apothecary

The drawers are stuffed with craft supplies and the top of the drawers is a good place to leave on-going craft projects or to take photographs. During the makeover, I smashed my Original BTC clip-on lampshade – I HATE the feeling of breaking something! I had to buy a very expensive replacement shade 🙁

My home office makeover by Apartment Apothecary

I love these baskets that I bought from Tea and Kate. One is full of fabric and the other with my wrapping paper and wallpaper stash. I still need to find a new home for the phone.

My home office makeover by Apartment Apothecary

I used Mini Moderns Peggy wallpaper to line this cabinet that I bought from eBay. See more on my Furniture Makeover Challenge post.

My home office makeover by Apartment Apothecary

I’ve added my Little Dane lamp from Loaf to this room because the colour works really well with the new pendant light and it’s nice to have a really soft light sometimes rather than task lighting, which the pendant provides.

My home office makeover by Apartment Apothecary

The cup is from Tea and Kate and the jadeite tumbler is from Liberty.

My home office makeover by Apartment Apothecary

Totally in love with Rifle Paper Co notebooks that you can buy from Liberty.

Home office

The vase set is from The Hambledon. I think I am going to buy a big plant in a terracotta pot for the centre of the desk – partly so Jules and I can’t see each other and therefore there is less chance of distraction!

I’m so happy it is finished and the light, bright feel of the room is so motivating. I had better get to work!

Katy x


Painting MDF floor

During the Easter bank holiday, Jules and I committed to staying at home for three days whilst the rest of the family went down to Devon to celebrate (they took Otto, too) so that we could paint our floors. It was a mammoth job that covered our living room, kitchen and hallway that were all previously carpeted (except the kitchen where lino was laid). We had decided to buy a beautiful oak floor but after a £4000 quote we decided against it as we don’t plan on staying in this flat forever and other costs sprung up that took priority. However, it was important we got rid of the carpet, that I have always hated, as I can cope with nice, new, clean carpet but old, dirty, wrecked carpet is too much to bear (Otto is to blame for the wreckage!).

So, I impulsively ripped up the carpet in the hallway, saw that good quality MDF boards lay beneath, did a paint test and it worked! Decision made. Today, I want to share with you how we did it just in case anyone else out there is considering it to save themselves the cost of a new floor.

Sorry about the rubbish photos – when your hands are covered in paint it’s not very easy to take good shots.

Step one: Removing all furniture

This is the old carpet (shamefully dirty where the sofa was!). We had to put every single bit of furniture into the two bedrooms for the three days it took to paint.

Painting an MDF floor www.apartmentapothecary.com

Step two: Remove carpet and underlay

Painting an MDF floor www.apartmentapothecary.com

Step three: Lightly sand and hoover floor thoroughly

Doing a really light sand – we used a hand held orbital sander – helps the primer adhere to the MDF but it’s not entirely necessary.

Painting an MDF floor www.apartmentapothecary.com

Step four: Tape skirting boards and do two coats of MDF sealer/primer

It’s really important to use a sealer on MDF as if it absorbs water it swells. We used Johnstones MDF White Primerwhich acts as a sealer and primer. You have to wait about two hours between each coat as it is a quick drying paint.

Painting an MDF floor www.apartmentapothecary.com

Step five: Three coats of floor paint

Ideally I would have like to have painted the floor white but with a lot of traffic and a very muddy dog we decided it would be far more practical to go for a pale grey as this would disguise some of the dirt. We used International Floor Paint Palest Grey. This is a quick drying gloss paint so we only had to wait six hours between each coat (during which time we had to stay in the bedroom – a lot of box sets were watched!).

Painting an MDF floor www.apartmentapothecary.com

Step six: Wait three to five days to put your furniture back on the floor

We had to live in the bedroom for three more days, which wasn’t that fun, but worth it for the amount of money we saved.

Painting an MDF floor www.apartmentapothecary.com

I had always planned to buy a rug for the living room, which was easier said than done as I found it very difficult to find the perfect rug. However, after HOURS of trawling Etsy I finally found the perfect rug! I searched for ‘vintage Kilim rugs’ and they have an amazing selection.

Painting an MDF floor www.apartmentapothecary.com

And here is the finished floor with the rug…

Painting an MDF floor www.apartmentapothecary.com

Painting an MDF floor www.apartmentapothecary.com

Painting an MDF floor www.apartmentapothecary.com

I will show you the hallway in a separate post as it is STILL not finished as I’m STILL chasing the elusive perfect runner rug! However, for the last couple of months the new floor has been brilliant: hard wearing, easy to clean, water resistant, perfect blank canvas and makes the space feel so much bigger and brighter. Also, painitng it grey rather than white was definitely the right call as it does disguise a lot of the dirt. BOOM!

Katy x


Bedroom re-style

My friend asked me recently if I would help her do a really quick makeover of her bedroom. She’s just moved into an unfurnished shared house and wanted to make her room look ‘grown-up’ but wasn’t sure where or how to spend the money. The constraints were that she needed furniture within two weeks and she wanted it all to be brand new. Huh, I said to myself. Did she know that most furniture shops have leading times of weeks rather than days, I asked. No, apparently not.

So, I got searching, ordering and then helped her put it all together to create a fresh, simple, grown-up bedroom. I bought all the furniture from Loafwho were super helpful and got the bed to us within ten days. I then grabbed a few things from around the house to help style the room.

Before…

I ordered the Loaf Bobbin bed and once it had arrived my friend moved in but she wasn’t sure how to style the room. The problems were:

– Mismatching bed linen

– No lamp

– Blank wall

– Temporary bedside table

– Exposed wires

Bedroom makeover before shot

BEFORE

After…

The changes I made were:

– I bought Loaf’s Campaign bedside table and Little Dane lamp.

– I sorted out her bedlinen so she had a matching set, which instantly lifts any bedroom. A well made bed makes a world of difference.

– I framed a piece of vintage wallpaper to fill the blank wall. Don’t use unframed prints or posters if you want a more sophisticated feel to your room.

– Fresh flowers, which instantly brighten any interior.

– I added some colour with the linen, wallpaper and tea-cup. A colour scheme can tie a room together as long as it’s not a ready-made colour scheme i.e. matching cushions, curtains and duvet cover – yuk!

– I hid the wires by drilling a hole into the side of the wardrobe and fed the lamp wire through it as there is a plug socket in the wardrobe.

Bedroom makeover Loaf furniture

Ta da!

Bedroom makeover  Loaf Campaign bedside table

The Campaign bedside table, whilst being brand new, has character and style. I love the Little Dane lamp and have my own at home. The colour of the lamp base is beautiful.

Bedroom makeover Loaf Bobbin bed

The Bobbin bed is well made, simple and classic. It’s made of wood and painted in matt white paint. The vintage wallpaper I framed is gorgeous and the colour ties in with the linen and the frame goes with the wood of the bedside table.

Bedroom makeover after shot

What do you think? Hopefully you’ll agree this is more sophisticated and stylish than ‘before’.

Now it’s a question of adding some personality and ‘stuff’ to make it more homely – maybe some photos, a rug, shelves, a quilt. But hopefully, this is a good canvas to start with.

It’s my birthday today so I’m off to the Cinnamon Club for a yummy dinner with Jules. I wonder if I’ll get some nice presents (wouldn’t mind some new furniture myself – just sayin’!) x